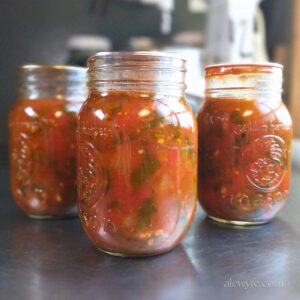
Roasted Tomato Salsa Ranchera
This is a beginner-friendly water bath canning recipe for a taqueria-style roasted salsa ranchera, adapted from a tested Ball canning recipe (with only safe modifications made). If you are canning this recipe, you can increase the amount of lime juice or tomato but do not increase the other ingredients or change ratios (any low-acid ingredients can be reduced or omitted to taste, but not the lime and tomato). If you are freezing the salsa or using it fresh, feel free to modify or adjust any ingredients to taste.
Ingredients
- 6 lbs roma or other paste tomatoes
- 2 medium onions (white, yellow, or red), halved & cut in ½" slices (or one jumbo onion)
- 1 ½ lbs jalapeno or serrano peppers (or equivalent volume of other green peppers... you can reduce but do not increase this amount)
- 8 large garlic cloves
- ⅔ cup lime juice bottled or fresh squeezed
- 4 tsp salt
- 1 tbsp ground cumin
- 2 tsp dried Mexican oregano leaves (substitute regular dried oregano)
- 1 cup cilantro leaves washed, chopped, and gently packed
Instructions
Prep Veggies:
- Preheat the oven to 425 ℉. You can lightly coat your baking sheets with a bit of pan spray or a very thin coating of oil if they are not nonstick, or line them with parchment, for easier cleanup.
- Wash the tomatoes, peppers, and onions. Peel and chop the garlic and set aside.
- Using a small, sharp paring knife or strawberry huller, core the tomatoes, removing just the stem and any hard white or green fibrous bits. Spread the tomatoes out on a half sheet pan or other shallow baking pan.
- Trim the root end and peels from the onions and cut them into long 1/2" thick slices or wedges. Spread them out on another baking sheet.
- Spread out the hot peppers on another baking sheet.
Roast vegetables & prep jars:
- Roast the vegetables in the preheated oven for about 40 minutes.
- Check the pans about halfway through, and then periodically, giving them a shake to loosen the vegetables from the pans or turn them with tongs if they're sticking. You may also want to rotate the pans on your oven racks so that they cook evenly.
- Roast until the veggies are beginning to soften. The tomato peels will begin to split and char, the peppers will be wrinkled and starting to brown, and the onions will soften and become translucent.
- Remove them from the oven and set the pans aside until they are just cool enough to handle. Cover the peppers while they cool with another pan, a bowl, or some foil, so that they will steam as they cool.
- While the veggies are cooling, fill your canner with enough water to cover the tops of the jars by at least one inch, cover the pot, and bring up to a boil. Wash and sanitize your pint or smaller jars, and wash and prepare your lids. Do not boil the lids (unless you are using reusable lids, then follow manufacturer instructions).
Peel, chop, and combine salsa:
- Peel the tomatoes, and using a spatula or knife, roughly chop them. Transfer the chopped tomatoes and their juices to a large, non-reactive pot.
- Remove the stems, seeds, and any loose or charred skins from the hot peppers. You may want to wear latex or nitrile gloves to prevent the hot peppers from burning your hands. Chop the peppers and add them to the salsa pot.
- Rough chop the cooked onion slices into medium sized dice, and add this into the mixture as well.
Simmer and season salsa:
- Add the salt, lime juice, chopped garlic, oregano, and cumin in a large, non-reactive pot and bring the salsa mixture up to a simmer. Stir frequently to prevent scorching.
- Wash and chop the cilantro, and stir this into the salsa. Bring back up to a boil before jarring your salsa. Taste and adjust seasoning if necessary with more salt, lime juice, or dried spices.
Jar the salsa:
- Using a canning funnel (if possible) fill the jars with the hot salsa mixture, leaving ½" headspace. Work quickly and keep mixture hot while filling jars.
- Using a thin non-metallic spatula, thin wooden spoon, or jar tool, remove air bubbles from the jars and adjust headspace as needed.
- Wipe jar rims. I use a paper towel or clean lint-free towel dipped in hot water, followed with a clean towel dampened with distilled vinegar. Clean jar rims make good seals!
- Place your prepared lids on the jars and secure with rings (check rings for dents and discard any damaged rings).
Canning your salsa ranchera:
- Using jar tongs or a canning jar rack, transfer the hot jars into the boiling water canner and make sure there is at least an inch of water over the jars with room to boil. Top up from a hot kettle of water if needed.
- Process in your boiling water bath for 20 minutes (increase as needed for elevations above 1000 ft- consult a standard canning chart if required). Make sure the water is boiling hard the whole time. Do not start the processing timer until the pot is boiling vigorously.
- When the time is up, turn off the burner under the pot, wait 5 minutes, and then carefully remove the jars with jar tongs (or remove the jar rack, if you used one). Place them on a towel-covered or wooden surface and leave undisturbed until completely cool (if it's cold or drafty, you may want to cover the jars with a towel so they cool evenly). Do not tighten the bands (unless you are using reusable lids- follow manufacturer instructions if so).
- After jars have cooled completely (12-24 hours) remove the bands and check for seals.
- Refrigerate any jars that did not seal and use promptly, or reheat and reprocess with new lids within 24 hours.
- Gently wash jars or wipe with a damp cloth, label, and store in a cool, dark pantry. For best quality, enjoy home-canned goods within 12-18 months.
Notes
Nutritional information listed is for a full pint jar, and is only an estimate. Divide by number of servings to get closer to the actual nutritional values.
Nutrition
Calories: 114kcalCarbohydrates: 25gProtein: 5gFat: 1gSaturated Fat: 0.2gPolyunsaturated Fat: 1gMonounsaturated Fat: 0.2gSodium: 1193mgPotassium: 1172mgFiber: 8gSugar: 14gVitamin A: 3795IUVitamin C: 94mgCalcium: 75mgIron: 3mg
Tried this recipe?Let us know how it was!
