BAKE: How to Make Old-Fashioned Pinwheel Cookies
- What is an Icebox Cookie?
- Pinwheel Cookie Ingredients
- Kitchen Equipment Needed
- How to Make Pinwheel Cookies
- Refrigerator Cookie Recipe Variations
- Storage & Make-Ahead Tips
- Old-Fashioned Pinwheel Icebox Cookies
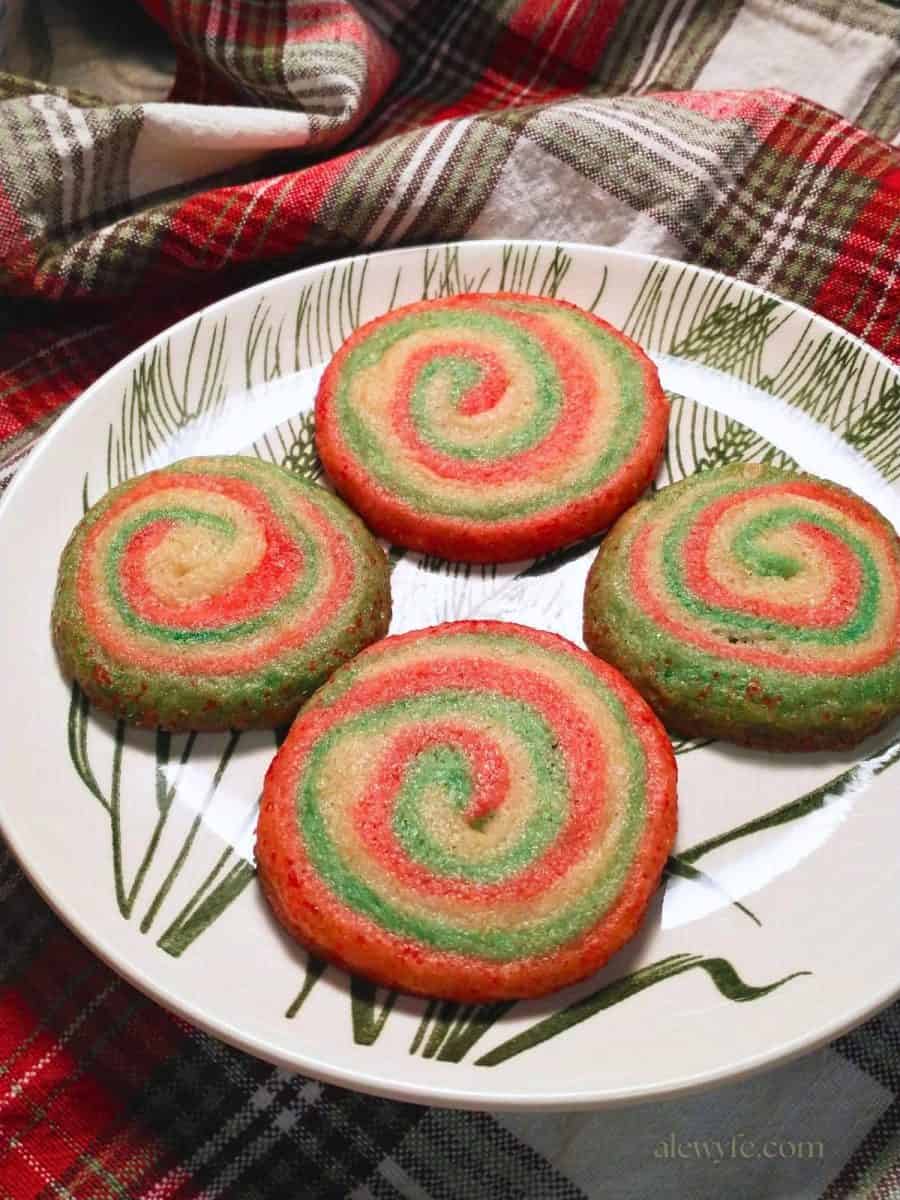
These vintage pinwheel icebox cookies are a charming addition to your holiday cookie plates. The dough is versatile, and can be flavored as you like, and tinted whimsically to match the season, your mood, or party theme.
I like to make red, green, and ivory swirls for the Yuletide season to add color to my holiday cookie plates. But don’t limit yourself to Christmas colors! You can make these vintage pinwheel cookies any time of year.
Try orange and black or green and purple for spooky Halloween cookies, green and cream or orange for St. Patrick’s day, soft pastel swirls for Easter, or red, white, and blue pinwheel cookies for the Fourth of July!
What is an Icebox Cookie?
These chilled slice and bake cookies are a modern invention, but became hugely popular in the mid-century when refrigerators began to replace iceboxes in many American kitchens. They take advantage of this new convenience, and are the inspiration for today’s store-bought pre-made cookie dough… but these are much tastier!
This particular icebox cookie recipe is adapted from one in a vintage edition of the Joy of Cooking from the late 1960’s. It’s a versatile recipe, that can be a simple plain slice and bake cookie, or a fancy rolled spiral version like these.
I won’t lie, this particular version with the multi-colored spiral pattern is a bit fussy to make, and you’ll definitely want to use parchment paper or silicone baking sheets to roll out the layers. You can always skip the spiral and just make plain log-shaped cookies with this to chill, slice, and decorate with sprinkles and colored sugars, or ice the cooled sugar cookies.
You can also make marbled cookies by shaping long 1″ diameter logs of each color, then twisting or pressing them together. Twist the dough spirals together to mix the colors.
Either way, the icebox cookie dough is made in advance, chilled, and can be sliced and baked as needed to serve fresh, hot cookies to your guests. You can freeze the dough or the baked cookies to get a jump on your holiday preparations and take some of the stress out of the busy season!
Pinwheel Cookie Ingredients
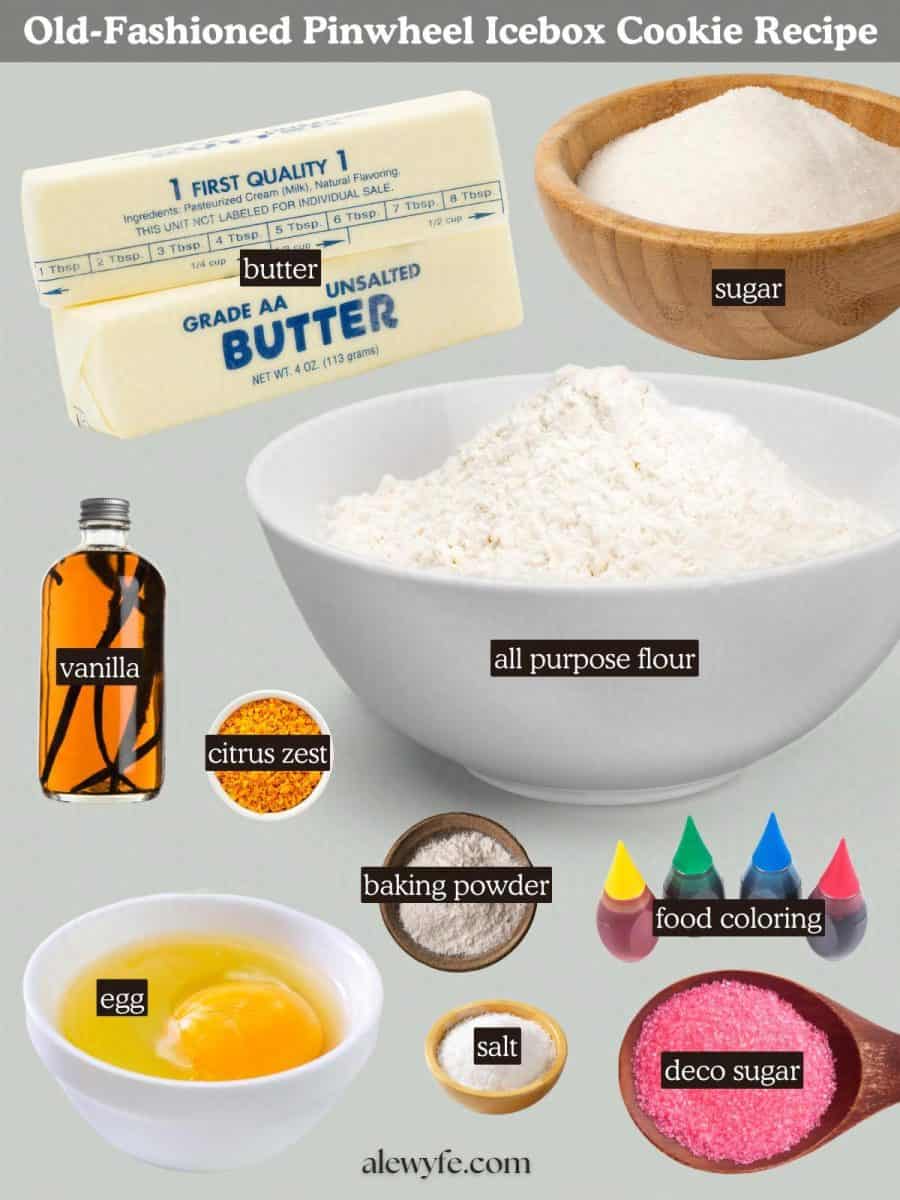
Flour:
You’ll want to use all purpose flour for these cookies. This flour has enough protein (gluten) to make a dough that will hold the patterns without being tough, as long as you don’t overwork the dough. You can vary the amount of flour. Use the amount listed for a sturdy dough that is easier to handle for making the spiral patterns. For a more tender but difficult to handle dough, you can reduce the flour to 1 2/3rds of a cup.
Sugar:
Use plain granulated white sugar for these cookies to make the patterns and colors stand out. You can also make a butterscotch slice & bake cookie with this recipe by swapping in brown sugar, though the darker dough won’t take to coloring as well.
Butter:
I use salted butter for these, as we like our sweets somewhat salty, but you can also use unsalted butter if you prefer or need to avoid excess sodium.
Eggs:
Use whole large eggs. Crack your egg into a small bowl before adding it into the creamed butter and sugar mixture, so you can pick out any bits of shell, and make sure that the egg is fresh.
Other Ingredients:
Vanilla extract, lemon or orange zest or extract, a pinch of salt, just enough baking powder to make the cookies lighter while keeping their shape.
Color: Use food coloring (natural or conventional) to tint the dough so make the pinwheels or other patterns in the dough. You can divide the dough after mixing it, but if you overmix your cookies, they can be tough.
I prefer making two to three batches of dough, and tint each before adding the flour and other dry ingredients. By adding the dye to the butter, sugar, and egg mixture, you can fully incorporate the coloring and get the proper tint without overworking the dough.
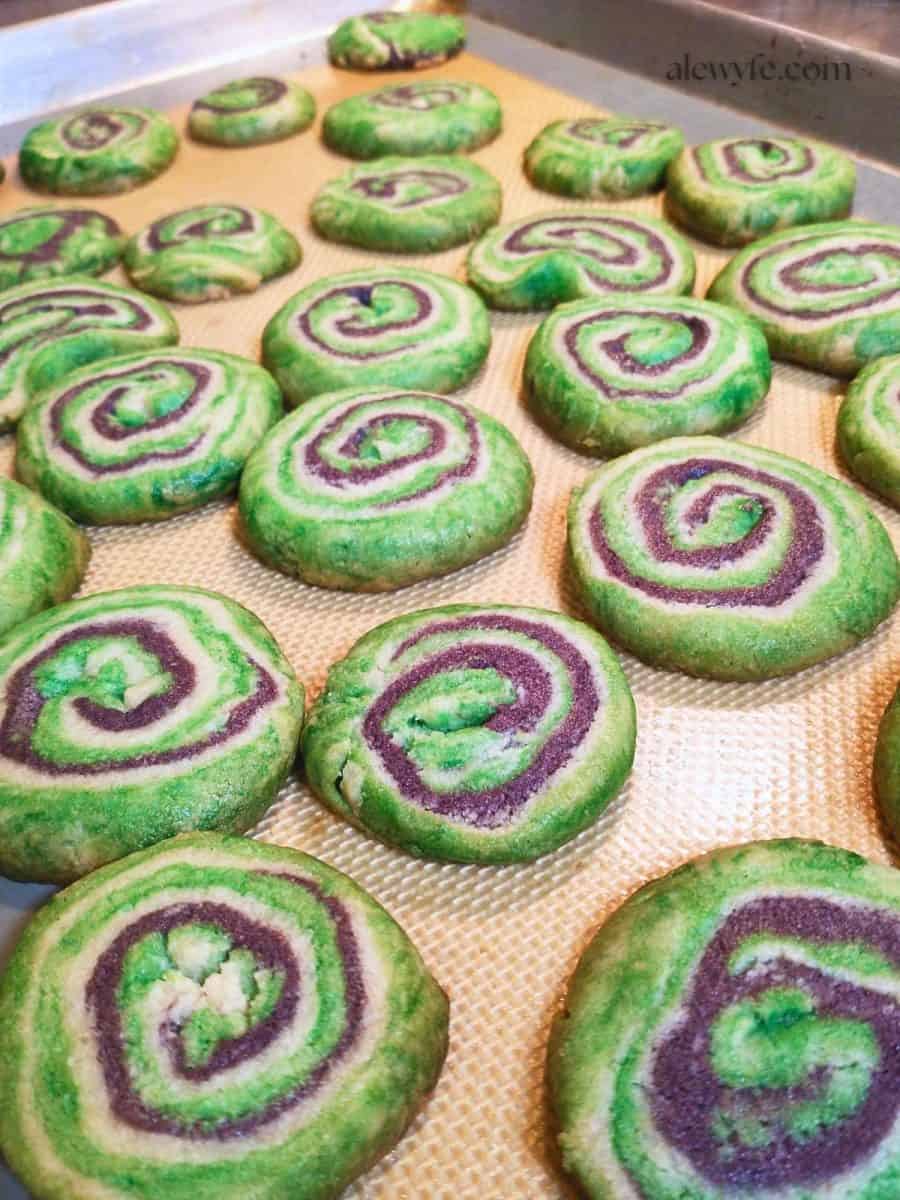
The red, white, and green Christmas cookies were made with a triple batch of this recipe, tinting each a different color or leaving them plain. The color is even throughout the cookies. The other batch pictured, with the green, purple, and white swirls, is a single batch, divided and tinted after mixing the dough. The color is more variegated, with darker and lighter tints in each color. Both effects are interesting!
Kitchen Equipment Needed
Stand or hand mixer:
You can mix the dough for the pinwheel cookies by hand, but a stand or a hand mixer makes creaming the butter and sugar and making the dough a snap. Use ’em if you’ve got ’em, or make sure your butter is softened before starting your dough.
Rolling pin:
You can use this dough to bake simple cookies without rolling them out, but to make the pinwheel pattern, you’ll need to roll the dough thin. Then, you stack the layers and roll them into a tight cylinder, chill, and slice it to reveal the pattern.
Silicone baking liner or parchment:
Using a silicone baking sheet liner or parchment is a game-changer for rolling out cookies, and for these with their multiple layers, it’s almost essential. You can also pop the whole sheet in and out of the fridge or freezer to chill if the dough starts to get warm and difficult to handle.
Baking sheet:
I use uncoated half-sheet sized baking sheets for most of my baking. You can also use your favorite cookie sheets.
How to Make Pinwheel Cookies
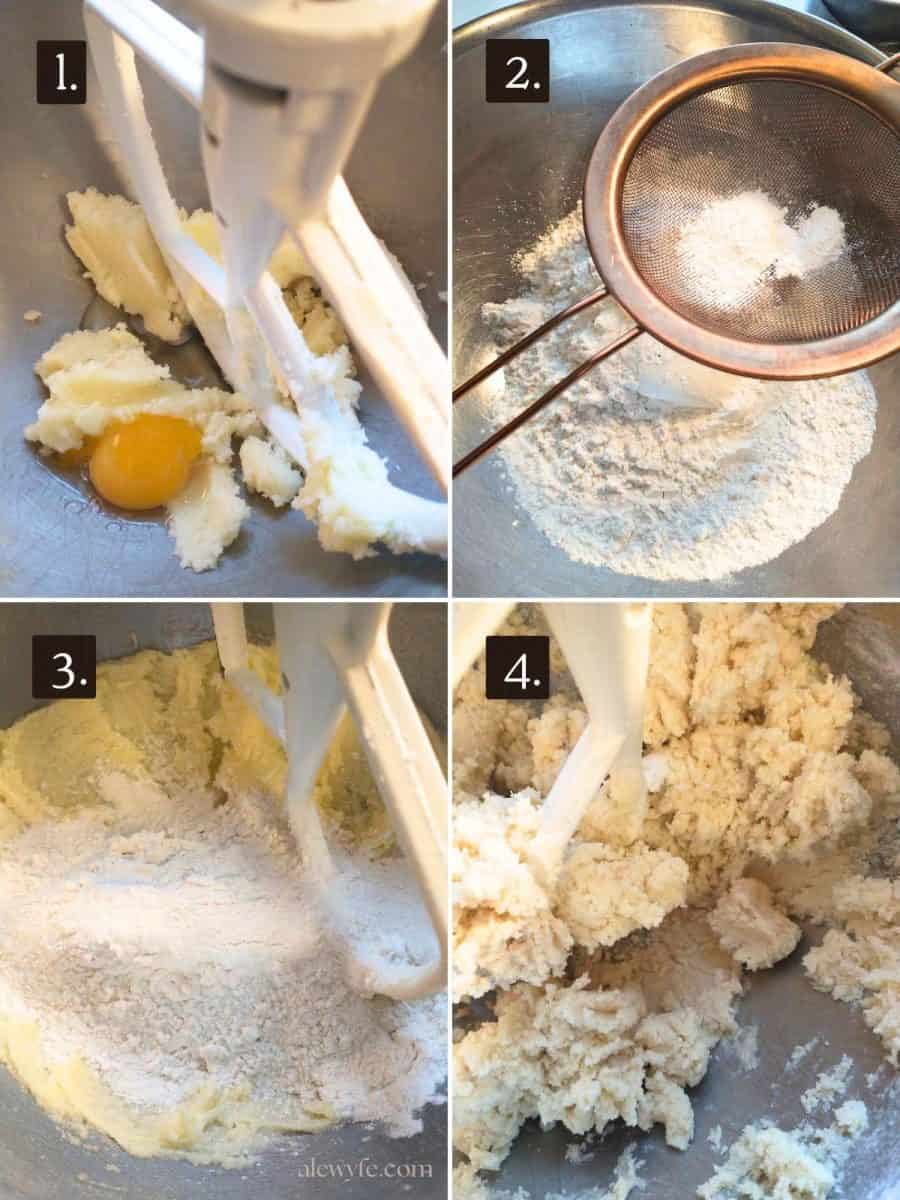
cream butter & sugar:
- Whip the softened butter together with the sugar, either with the paddle attachment on your mixer or a sturdy spoon and bowl.
- Scrape down the horn of the bowl of the mixer periodically and mix until light and fluffy.
add egg & flavorings:
- Crack the egg into a small bowl, and then add to the creamed butter and sugar mixture.
- Mix well until fully incorporated and fluffy.
- Add the vanilla, and either the citrus zest, or any other extracts, spices, or flavorings.
- For best results, tint the dough mixture now if you are making pinwheel cookies (this will require making a separate batch of dough for each color).
sift & mix dry ingredients:
- Measure the flour into a medium mixing bowl.
- Sift the baking powder and salt into the flour, and whisk or sift the dry ingredients until they are well combined.
mix final dough:
- Add the dry ingredients to the butter & sugar mixture.
- Either stir and fold to mix, or pulse on low speed in your stand mixer until the mixture forms a stiff dough. Mix just until there are no pockets of dry ingredients. Don’t overmix the dough.
divide, tint, & chill dough:
- If you are just making a small batch of cookies, divide and tint the dough after mixing, though you will get better results by making one batch of dough for each color as recommended above.
- Wrap the dough tightly with plastic wrap, or place in airtight storage containers.
- Chill the dough for 8-24 hours before rolling and shaping.
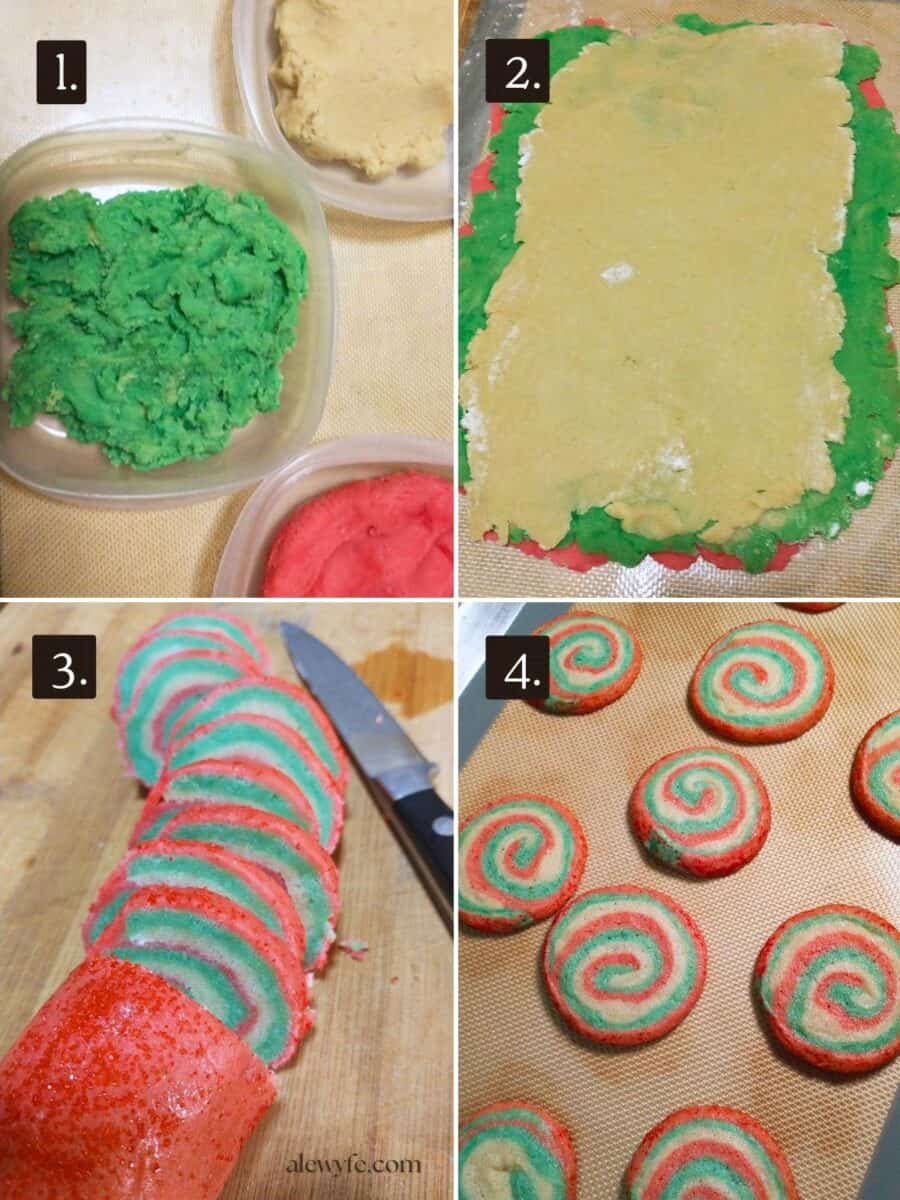
roll out & shape logs:
- Line a clean work surface with a non-stick silicone baking mat or parchment paper. Dust this very lightly with flour if the dough is sticky at all.
- Choose a color for the outside of the cookie log, and flatten it on the mat.
- Cover with a second baking mat or sheet of parchment or plastic wrap.
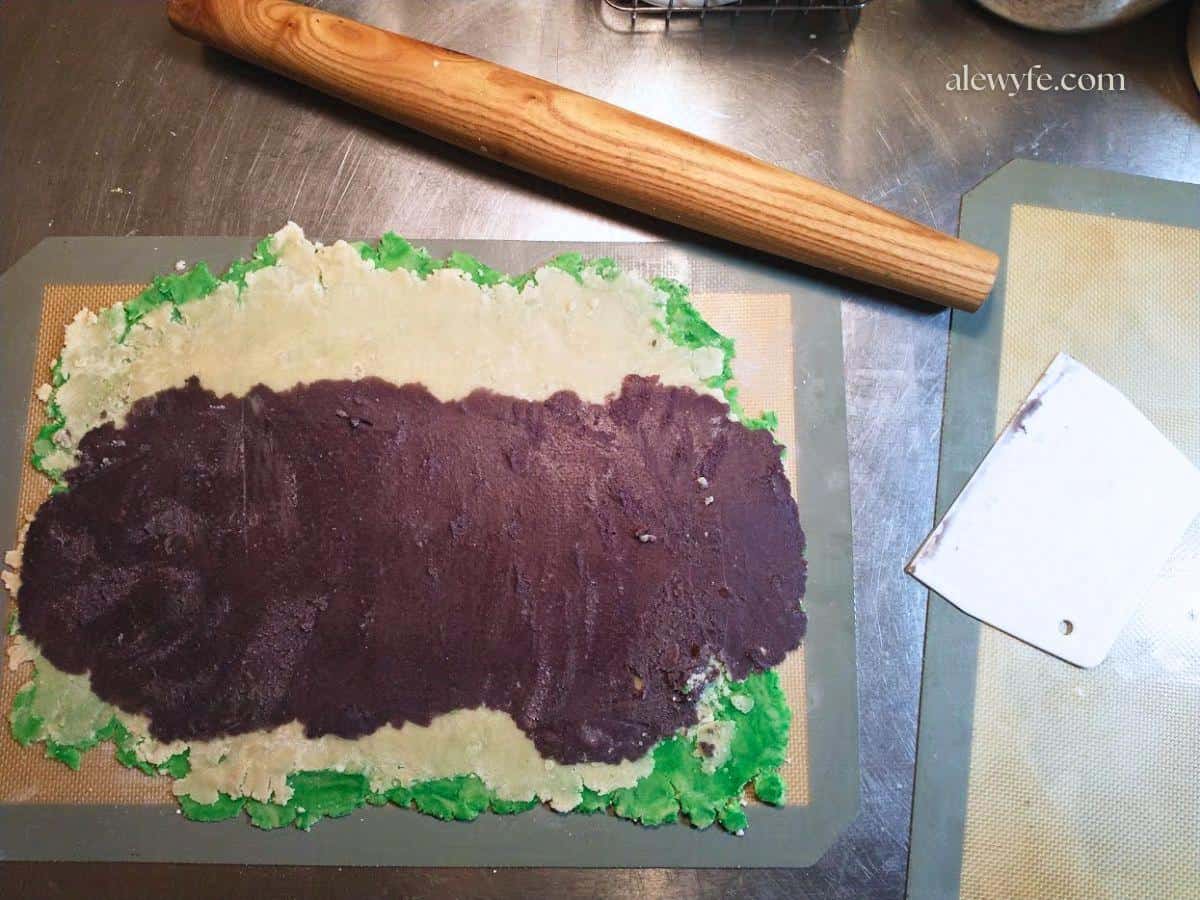
- Roll out into a roughly 10″x14″ rectangle. Carefully peel off the top layer of baking mat or wrap (chill briefly if the dough has softened to make it easier to work with). A bench scraper is helpful here! Set the rolled layer aside.
- Repeat this process with the second layer. It’s ok if these are a little messy looking (see photo). Just try to get thin, even layers that are roughly the same size.
- Lay the two dough-sides together and gently roll over the top to press them together. If the dough is too soft or sticky to work, chill the layers briefly.
- If you are doing a tri-color spiral cookie, repeat this process a third time.
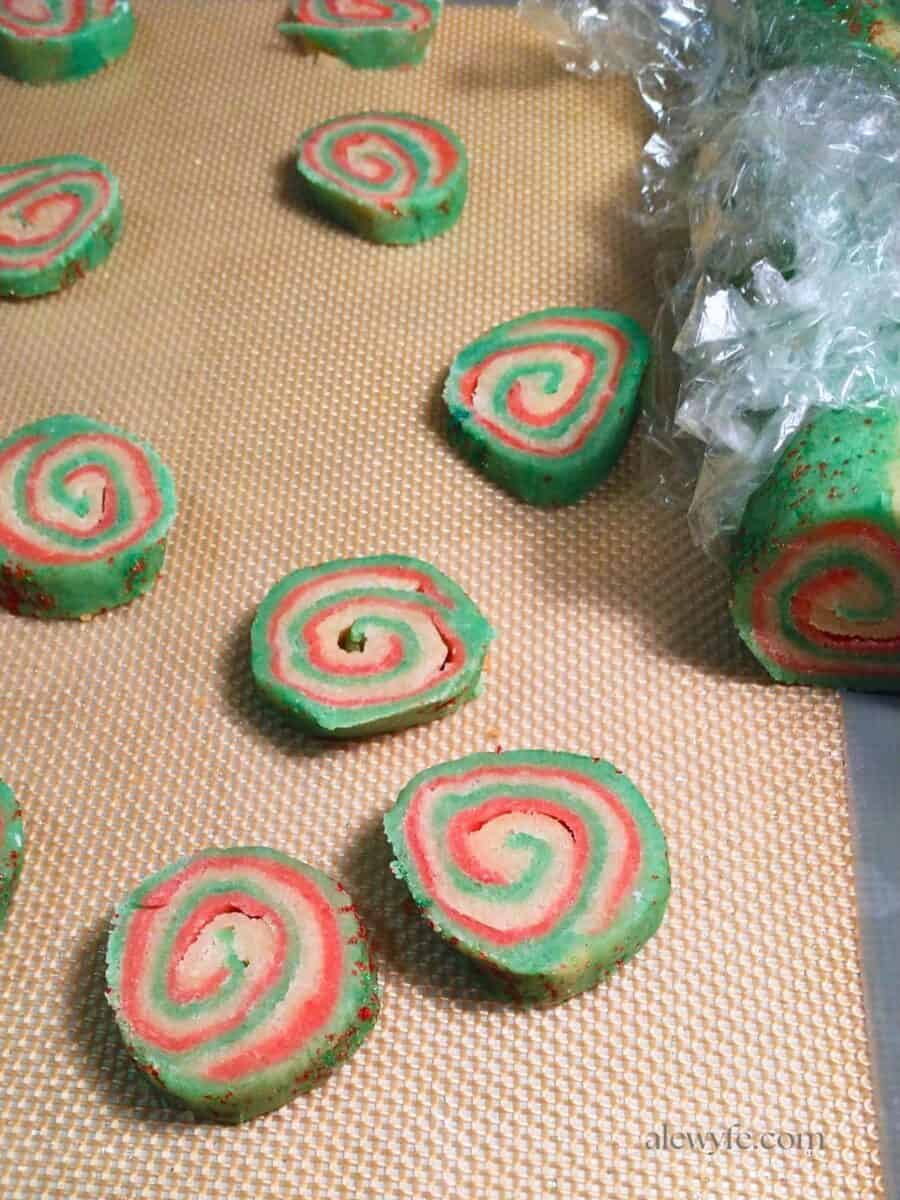
- Using the mat or parchment and a dough scraper, working from the long side, roll up the layers into a log. Gently roll the log together under your palms to make it into a roughly even shape about 2″ in diameter.
- Try to press the layers together and roll the dough log tightly. Small air-gaps will fill in when the cookies bake, but large ones may leave hollow spots in your cookie spirals.
- You can also roll the cookie logs in colored sugar or sprinkles for more sparkle.
chill or freeze:
- If the dough is still cold, you can immediately slice and bake the cookies.
- If you are working in a hot kitchen and the dough has warmed, chill the dough logs so that the cookies keep their shape when baked.
- You can also wrap well and refrigerate or freeze the dough at this point (see below for tips).
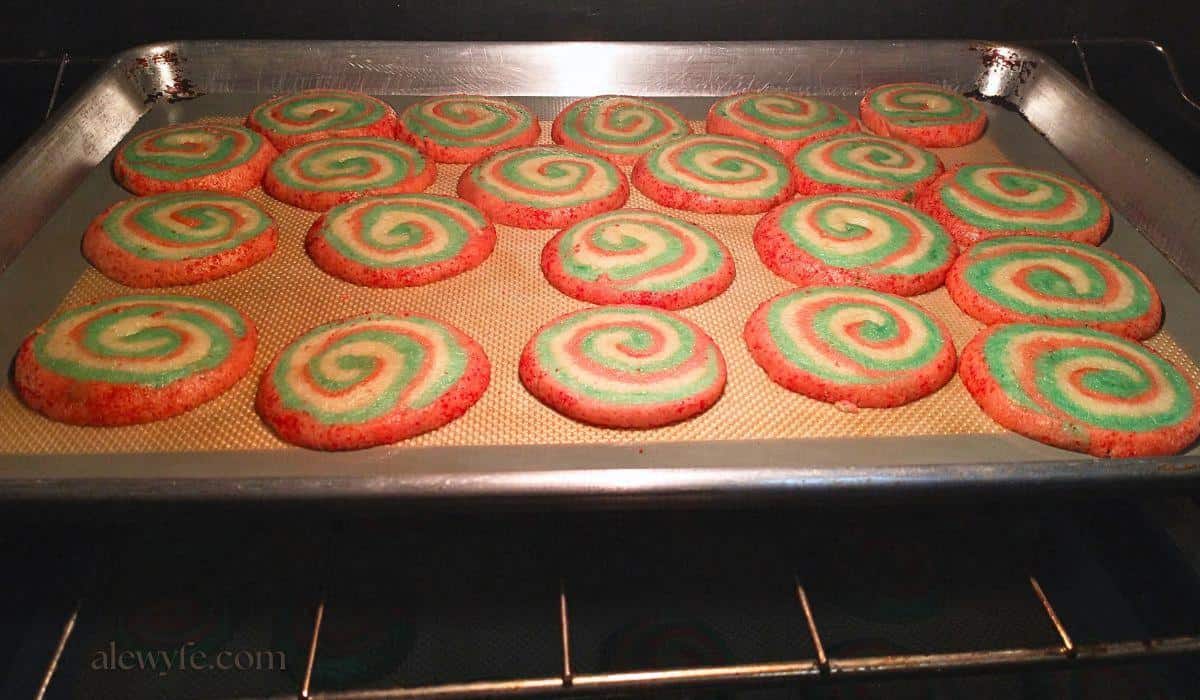
slice & bake:
- Unwrap the cookie dough log and cut into 1/4″ slices.
- Place on a cookie sheet, with an inch or so between the cookies bake evenly. They will spread only a little. If you are baking one of the variations that uses less flour, leave more room between the cookies.
- Bake in a 400F oven for 10-15 minutes, or until they are just beginning to color a bit on the bottoms and the tops are set.
Refrigerator Cookie Recipe Variations
You can reduce AP flour to 1⅔ cups for tender-crisp regular refrigerator cookies (not pinwheels, as this dough is too soft to roll and stack, even well chilled), or 1½ cups for delicate drop cookie wafers.
To the plain dough, you can add ½ cup chopped nuts, dried fruit, chocolate or flavored chips (use mini-chips or finely chopped ingredients if you are still trying to make pinwheel cookies). You can shape the dough into simple logs, and slice and bake plain cookies, or roll the logs in chopped nuts, sprinkles, or colored sugars.
Chocolate Pinwheels: Divide the dough in half. Add 1 oz of melted baking chocolate to half of the dough, and proceed as above to chill dough, roll & shape the spiral dough logs, re-chill, and bake.
Storage & Make-Ahead Tips
You can make the dough and chill it for up to a week. Before rolling and shaping the dough, wrap it tightly or store it in an airtight container so it doesn’t dry out, which will make it difficult to roll out. Refrigerate the shaped, un-cut logs of cookie dough tightly wrapped in parchment or plastic wrap.
You can freeze the dough, preferably ready to thaw, slice, and bake, for up to three months. You can safely freeze it longer, but it may pick up off-flavors from the freezer or get freezer burned. Tightly wrap the dough logs in plastic or parchment, and place these in a zip-lock bag, or over-wrap them with foil or freezer paper.
Store the baked cookies in a tightly sealed tin or container for up to two weeks (if they last that long). You can also freeze the baked cookies for several months.


Old-Fashioned Pinwheel Icebox Cookies
Ingredients
- 1 cup sugar
- ½ cup butter
- 1 large egg
- 1 tsp vanilla extract
- ½ tsp lemon or orange zest (substitute ¼ tsp lemon extract or other flavoring extracts)
Dry Ingredients
- 1 ¾ cup all purpose flour
- 1 ½ tsp baking powder
- ½ tsp salt
Instructions
cream butter & sugar:
- Whip the softened butter together with the sugar, either with the paddle attachment on your mixer or a sturdy spoon and bowl.
- Scrape down the horn of the bowl of the mixer periodically and mix until light and fluffy.
add egg & flavorings:
- Crack the egg into a small bowl, and then add to the creamed butter and sugar mixture.
- Mix well until fully incorporated and fluffy.
- Add the vanilla, and either the citrus zest, or any other extracts, spices, or flavorings.
- For best results, tint the dough mixture now if you are making pinwheel cookies (this will require making a separate batch of dough for each color).
sift & mix dry ingredients:
- Measure the flour into a medium mixing bowl.
- Sift the baking powder and salt into the flour, and whisk or sift the dry ingredients until they are well combined.
mix final dough:
- Add the dry ingredients to the butter & sugar mixture.
- Either stir and fold to mix, or pulse on low speed in your stand mixer until the mixture forms a stiff dough. Mix just until there are no pockets of dry ingredients. Don’t overmix the dough.
divide, tint, & chill dough:
- If you are just making a small batch of cookies, divide and tint the dough after mixing, though you will get better results by making one batch of dough for each color as recommended above.
- Wrap the dough tightly with plastic wrap, or place in airtight storage containers.
- Chill the dough for 8-24 hours before rolling and shaping.
roll out & shape logs:
- Line a clean work surface with a non-stick silicone baking mat or parchment paper. Dust this very lightly with flour if the dough is sticky at all.
- Choose a color for the outside of the cookie log, and flatten it on the mat. Cover with a second non-stick baking mat or sheet of parchment or plastic wrap.
- Roll out into a roughly 10″x14″ rectangle. Carefully peel off the top layer of baking mat or wrap (chill briefly if the dough has softened to make it easier to work with). A bench scraper is helpful here! Set the rolled layer aside.
- Repeat this process with the second layer. It’s ok if these are a little messy looking (see photo). Just try to get thin, even layers that are roughly the same size.
- Using the mat or parchment, pick up one sheet and lay the two dough-sides together. Gently roll over the top to press them together. If the dough is too soft or sticky to work, chill the layers briefly.
- If you are doing a tri-color spiral cookie, repeat this process a third time.
- Using the mat or parchment and a dough scraper to lift and compress the dough, working from the long side, roll up the layers into a log. Gently roll the log together under your palms to make it into a roughly even shape about 2″ in diameter.
- Try to press the layers together and roll the dough log tightly. Small air-gaps will fill in when the cookies bake, but large ones may leave hollow spots in your cookie spirals.
- You can also roll the outside of the cookie logs in colored sugar or sprinkles for more sparkle.
chill or freeze:
- If the dough is still cold, you can immediately slice and bake the cookies.
- If you are working in a hot kitchen and the dough has warmed, chill the dough logs so that the cookies keep their shape when baked.
- You can also wrap well and refrigerate or freeze the dough at this point (see below for tips).
slice & bake:
- Unwrap the cookie dough log and cut into 1/4″ slices.
- Place on a cookie sheet, with an inch or so between the cookies bake evenly. They will spread only a little. If you are baking one of the variations that uses less flour, leave more room between the cookies.
- Bake in a 400℉ oven for 10-15 minutes, or until they are just beginning to color a bit on the bottoms and the tops are set.
Notes
To the plain dough, you can add ½ cup chopped nuts, dried fruit, chocolate or flavored chips (use mini-chips or finely chopped ingredients if you are still trying to make pinwheel cookies). You can shape the dough into simple logs, and slice and bake plain cookies, or roll the logs in chopped nuts, sprinkles, or colored sugars. Chocolate Pinwheels: Divide the dough in half. Add 1 oz of melted baking chocolate to half of the dough, and proceed as above to chill dough, roll & shape the spiral dough logs, re-chill, and bake.