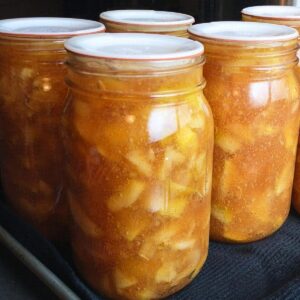
CANNING: Homemade Spiced Apple Pie Filling (with Clear Jel)
This homemade apple pie filling recipe uses a thickener that's safe for canning, so you can have jars of almost-instant pies on your pantry shelf year round!A freshly baked warm apple pie is one of the basic pleasures of fall, especially when you make them with a flaky butter crust and perfectly spiced apples. Quantities shown are for a batch of 7 quarts, or you can multiply and use the single quart quantities in parentheses to customize for your batch size. Prep time is an estimate for a full-size batch done by hand, and mostly the time for peeling, coring, and slicing apples. You can reduce this for smaller batches, or if you have a hand-cranked apple peeler & corer, or more hands to speed up the work.
Equipment
- glass canning jars, rings, and new lids
- large heavy-bottomed jam or sauce pot
- Jar tongs & canning funnel
Ingredients
Apples:
- 6 quarts sliced fresh apples, blanched 21-24 cups (3 ½ cups for one quart)
Clear Jel Mixture:
- 5 ½ cups granulated sugar (¾ c + 2 tbsp for one quart)
- 1 ½ cups Clear Jel (¼ c Clear Jel for one quart)
- 2 ½ cups cold water (½ c water for one quart)
- 5 cups apple juice or cider (¾ c apple juice for one quart)
- 2 tsp ground cinnamon (½ - ¾ tsp of cinnamon or apple pie spice for one quart, or use a pinch of each of the spices below plus cinnamon for one quart)
- ½ tsp ground nutmeg (⅛ tsp for one quart, or see above)
- ¼ tsp ground ginger
- ¼ tsp ground allspice
- ⅛ - ¼ tsp ground cloves
- ¼ - ½ tsp kosher salt (optional, not in USDA recipe)
- 3 - 7 drops yellow food coloring (1 drop for one quart, optional)
Add after clear jel thickens:
- ¾ cup bottled lemon juice (2 tbsp lemon for one quart)
Instructions
peel and slice apples:
- Prepare a 4-8 quart container with a quart or two of cold water and either a splash of lemon juice, a teaspoon of ascorbic acid powder, or several crushed vitamin C tablets. This is will protect the cut apple slices from browning and discoloring.
- Wash the apples before slicing. Using a sharp paring knife or peeler, peel each apple, core it, and cut into 1/4″-1/2″ slices.
- I like to leave some of the peels on for texture, but if your fruit has been waxed or don’t like peels in your pies, you should peel them completely.
- I often make a second, small bowl of the vitamin C water to dunk the apple as I peel and slice it. This will wash off any small bits of seed, core, or peel. Then, transfer the apple slices to the large container of acidulated water.
- Immediately dunk the apple slices into the vitamin C water to prevent the apples from oxidizing and browning.
- Keep working in batches until all of the apples have been peeled and sliced.
blanch the apple slices:
- You will need about one gallon of boiling water in a blanching pot for the next step. Bring the pot to a boil.
- Blanch the sliced apples six cups at a time in the boiling water. Cook for one minute after the water returns to a boil, then remove them with a slotted spoon or strainer.
- Place the blanched apples in a covered pot or bowl and keep them warm while you continue to blanch the remaining apple slices in batches and make the pie filling base.
prepare canning pot & jars:
- Wash your canning jars and rings with hot, soapy water and rinse well.
- Inspect the jars for cracks, nicks, or defects in the sealing surface, and discard any damaged jars.
- Fill your canning pot with water and bring it up to a low simmer. You can pre-heat and sterilize your jars if you like, though it isn’t necessary as long as they’re clean.
cook the Clear Jel base:
- In a pot large enough to hold the total mixture of apples and other ingredients, combine the sugar, Clear Jel, and the cold water to make a slurry.
- Whisk well to dissolve and remove any clumps. Add the apple juice and any ground spices you may be using.
- Cook over medium-high heat, stirring frequently, until the mixture thickens and begins to bubble.
combine apples with filling:
- Remove from the heat or reduce it to low.
- Add the lemon juice and whisk until well combined.
- Raise the heat back to medium and bring back to a boil for one minute, stirring constantly
- Remove from the heat again, then fold in the warm, blanched apple slices (or pour the Clear Jel mixture into the pot with the warm apple slices).
fill jars:
- Remove the pot from the heat, and immediately pack the hot apple pie filling into the prepared canning jars.
- Use a jar funnel if you have one to keep the jar rims cleaner, and carefully ladle the thickened peach pie filling into the jars.
- Using a de-bubbling tool, chopstick, or thin spatula, stir gently to remove air bubbles. Top up jars with more filling if needed after removing any large air bubbles.
- Leave a full 1″ headspace in the jars. This thick pie filling mixture tends to expand while it’s in the canner, so leave the full amount of head-space so that your jars seal properly!
- Wipe the jar rims with a damp, clean cloth to remove any residue.
water-bath:
- Using jar tongs or a jar rack, carefully place the filled jars of apple pie filling into the hot water bath.
- Make sure the jars are covered by at least one and preferably two inches of boiling water. Top up the pot with hot water from a kettle if necessary.
- Cover the pot, checking until the pot of water has returned to a rolling boil.
- Start a timer for 25 minutes once the water bath is boiling, and cover the pot.
- Adjust the processing time for elevations higher than 1001 ft (see chart in recipe notes for longer processing times for higher elevations).
- After the 25 minutes are up, turn off the heat, and set another timer for 5 minutes, leaving the pot covered and the jars undisturbed.
cool, check seals, store:
- Remove the jars from the canner when the 5 minute timer is done, and set them on a folded towel or wire rack to cool.
- Leave the jars undisturbed overnight (or until completely cooled, at least 8-12 hours).
- Sealed jars with metal lids will not flex when the seal is pressed, and the lid has a firm vacuum seal with the jar.
- Any jars of apple pie filling that did not seal can be reprocessed with new lids within 24 hours of canning. For any jars that didn’t seal, check the jar rim surface for chips and the ring for dents.
- If you don’t want to re-can the jars that didn’t seal, they may be immediately refrigerated and used first.
- Gently wash jars or wipe with a damp cloth to remove any sugary residue or hard water deposits from the canning bath.
- Clearly label your jars with the name and date of your product, and store them in a cool, dark pantry. Home canned goods are best consumed within 12-18 months.
Notes
Altitude Adjustment: Processing times for water-bath canning should be extended when canning at higher altitude. (0-1000 ft: 25 minutes) (1001-3000 ft: 30 minutes) (3001-6000 ft: 35 minutes) (6001 ft & above: 40 minutes)
Notes on Nutritional Information: Values shown are an estimate for a full quart of pie filling. Please divide quantities by the number of servings for your dish to get a better estimate for individual serving values when you prepare your pies.
Nutrition
Calories: 1022kcalCarbohydrates: 263gProtein: 1gFat: 2gSaturated Fat: 0.2gPolyunsaturated Fat: 0.3gMonounsaturated Fat: 0.1gSodium: 103mgPotassium: 673mgFiber: 11gSugar: 219gVitamin A: 237IUVitamin C: 31mgCalcium: 53mgIron: 1mg
Tried this recipe?Let us know how it was!
