CANNING: Homemade Apple Pie Filling (with Clear Jel)
- Apple Pie Filling Ingredients
- Kitchen Equipment Needed
- How to Can Apple Pie Filling with Clear Jel
- Pantry Storage Tips
- How to Re-Thicken Separated Clear-jel Filling
- CANNING: Homemade Spiced Apple Pie Filling (with Clear Jel)
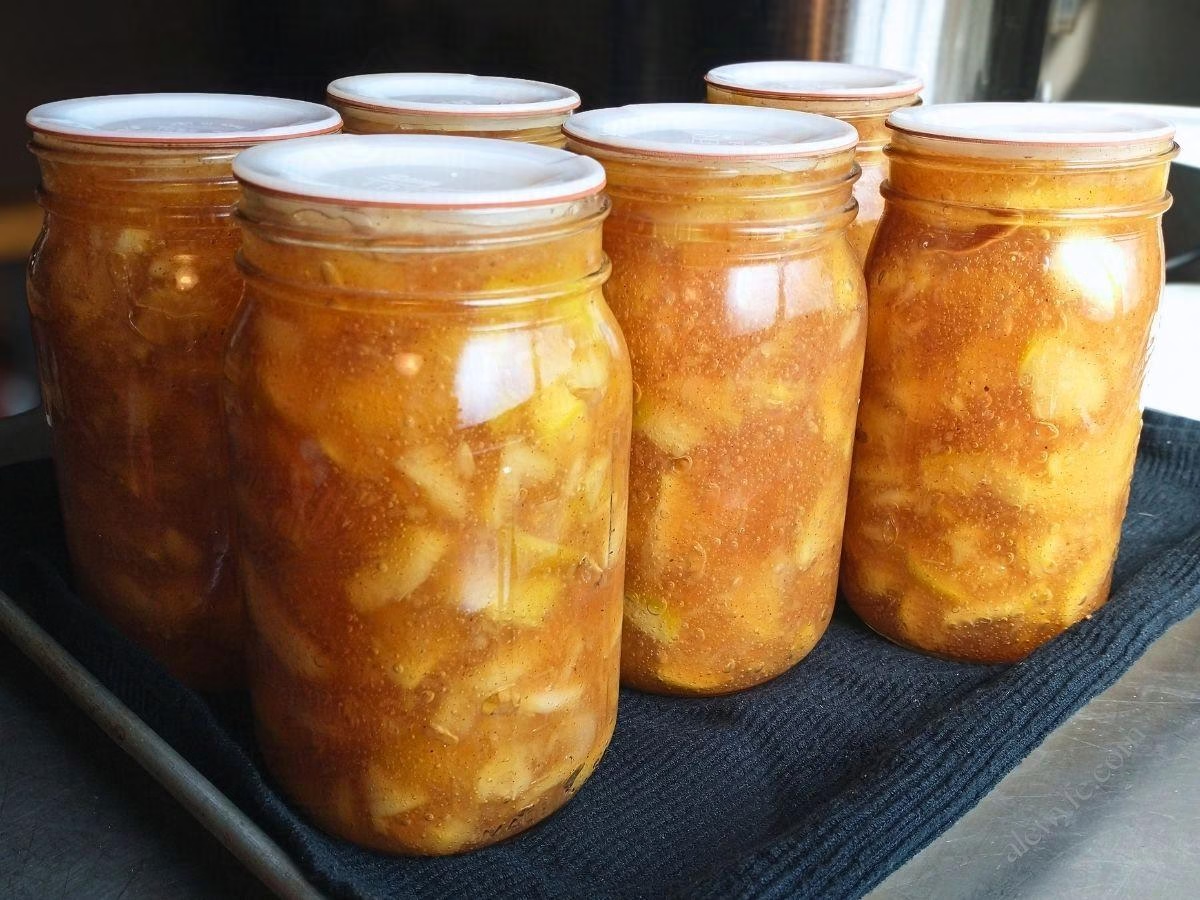
A freshly baked warm apple pie is one of the basic pleasures of fall, especially when you make them with a flaky butter crust and perfectly spiced apples. This homemade apple pie filling recipe uses a thickener that’s safe for canning, so you can have jars of almost-instant pies on your pantry shelf year round! Can this apple pie filling when apples are at the peak of ripeness at your local orchards or on sale at the market at harvest time.
Now I don’t know about you, but I don’t always have the time or patience to sit and core, peel, and slice all those baking apples when I just want a quick dessert. The solution? Do a big batch and put ’em up all at once! Yes, you still have to prep the apples, but you can do it on a weekend or other day where you have a few hours of free time. Or, enlist the help of friends or family, make it a work party, and divide up the jars when you’re done.
You can use your home-canned apple pie filling for more than just pies! It’s a shortcut to baking quick apple turnovers, cobbler, dump cakes, fruit bars, or filled crepes and blintzes, or use it for a fruity pancake or waffle topping. Try it as a simple ice cream sundae topping (with chopped walnuts and crumbled shortbread cookie or buttery pastry), or use your apple pie filling for breakfast pastries like apple danishes, coffeecakes, kringles, & filled croissants.
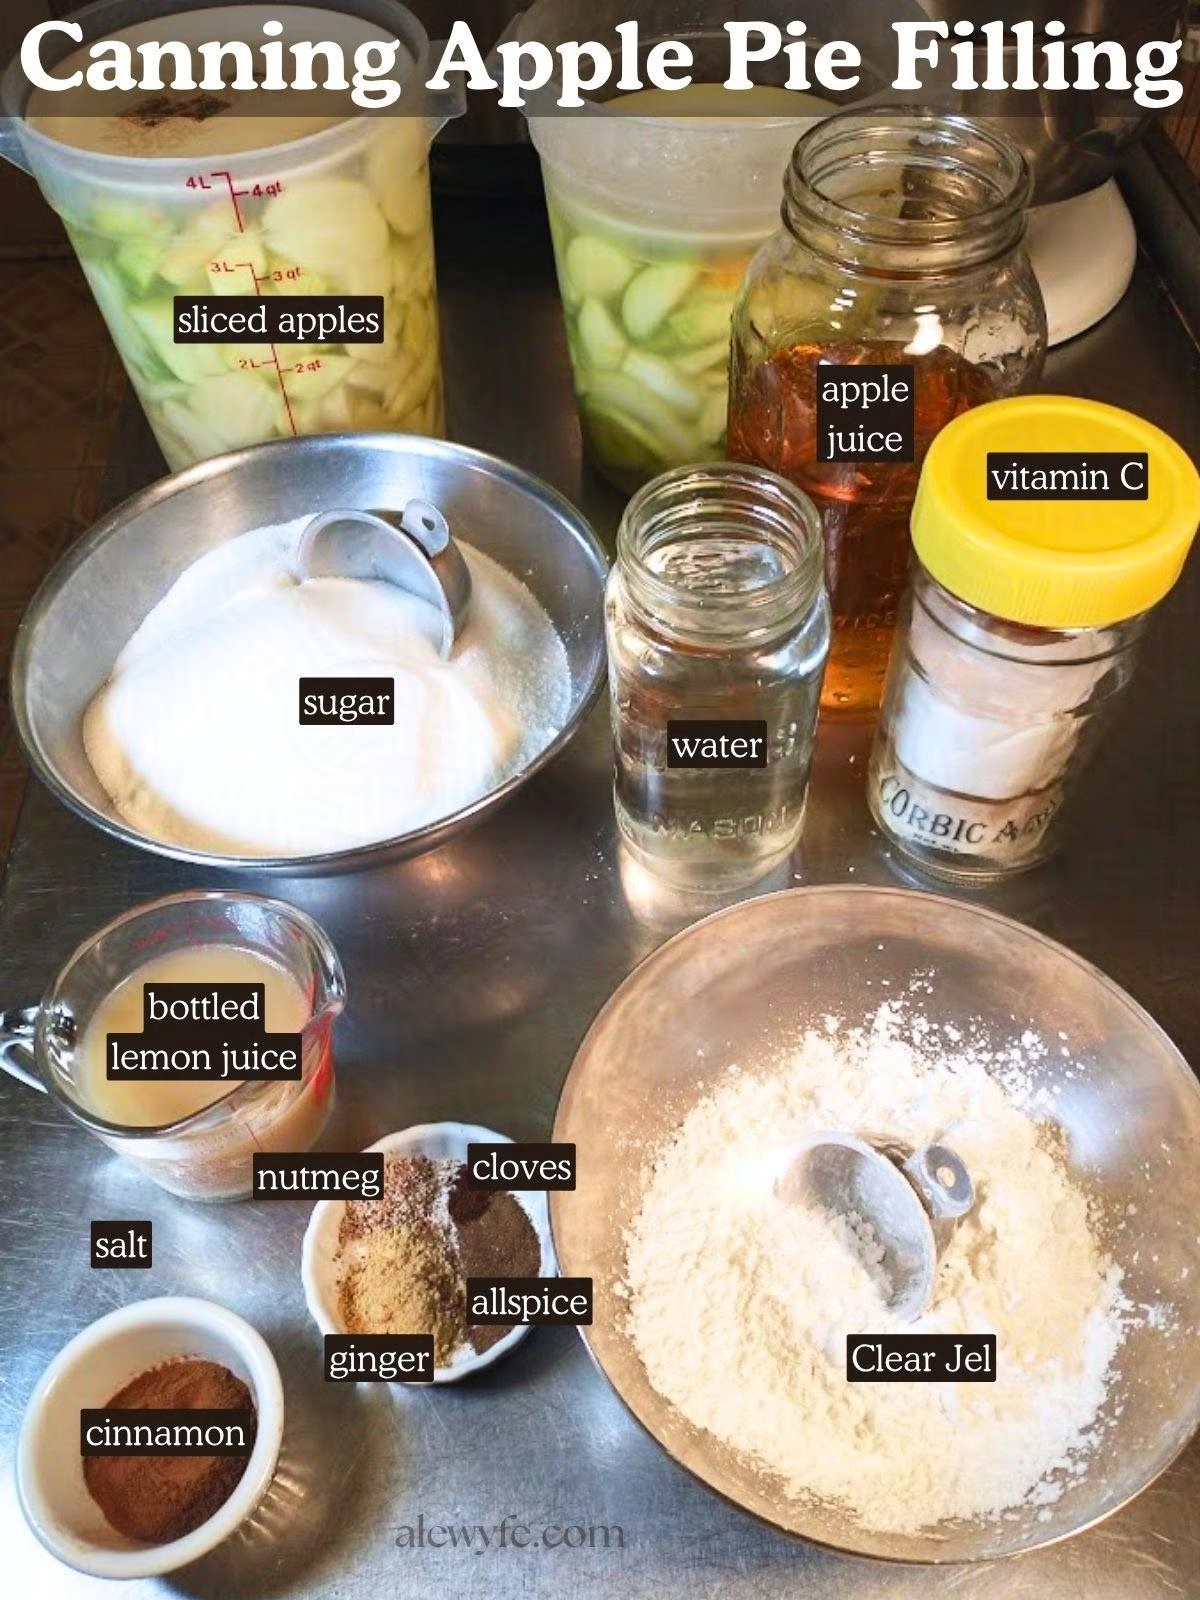
Apple Pie Filling Ingredients
Apples:
You can use any firm, ripe baking type apple, or even better, a blend of several baking varieties to make the best apple pie filling. The USDA recipe for this recommends peeling them, but you can also leave the peels on (per a tested recipe for apple rings from Bernardin). It’s really up to you, and what texture you prefer. The peels are rich in fiber and nutrients, but can get tough or leathery in storage.
I recommend peeling your apples if they have been waxed or sprayed with pesticides, and if they’re organic, it’s just a matter of preference! Either way, wash your apples well before coring and slicing them for the pie filling.
Some recommended firm apple varieties for baking:
An ideal baking apple for pie filling has a balance of tart and sweet flavor, and firm flesh that keep it’s shape when cooked. You can mix two or more varieties of apple for an even richer, more complex flavor and texture!
- Granny Smith
- Jonagold
- Jonathan
- Cortland
- Golden Delicious
- Rome
- Northern Spy
- Mutsu
- Pink Lady
- Braeburn
- Honeycrisp
- Stayman (Winesap)
Avoid these softer apples which lose their shape when heated, best saved for applesauce, apple butter, or eating fresh:
- McIntosh
- Red Delicious
Sugar:
Use white granulated sugar for your apple pie filling, to let the tart spiced flavor of the fresh apples shine through. This pie filling will be quite sweet. You can safely reduce the sugar a little bit if you prefer, but try it as-written first. The sugar helps preserve the firm texture and color of the apples as well as making the filling sweet.
Clear-Jel:
Clear Jel is a thickener that behaves very similarly to cornstarch or arrowroot, but unlike those, it is both safe to can and retains its thickening power after the canning process. Clear Jel is a modified food starch, and is heat-resistant, safe for canning, and forms a shelf-stable gel for at least a year if properly canned or frozen.
You must use a cook-type Clear Jel starch for this recipe. Cornstarch, flour, and other regular starches can interfere with the heat penetration during processing that is essential to make sure your canned foods are safe and harmful bacteria are destroyed. If you want to use those other starches to thicken your pie filling, you need to can plain apples for baking, and add the cornstarch or flour after you open the jar to bake your pies.
See the pantry storage tips below for more information about storing Clear-jel pie fillings (and how to rescue a separated pie filling).
Lemon juice:
Use bottled lemon juice, not fresh, for this apple pie filling canning recipe. Bottled lemon juice has a standardized acidity level, which ensures your jam will be the correct pH for water-bath canning.
If you are not canning the filling, you can use fresh lemon juice.
Flavoring:
The original recipes for apple pie filling from the USDA use just cinnamon and maybe a bit of nutmeg, but I like to use a more complex sweet spice blend to really capture the essence of fall in this pie filling. I also add a pinch of salt, which helps balance the otherwise cloying sweetness of the apples, sugar, and spices. You can use my suggestions, or make your own spice blend, but make sure you don’t overpower the flavor of your fresh apples! You can always add more spices when you bake, but you can’t take it out.
I also use a cinnamon stick or two in the poaching liquid for the apples to add another layer of flavor. You can follow my example here or use plain water, as you like. I save this apple cinnamon flavored poaching liquid afterwards, and use it as a base for a spiced apple wine recipe… you need brewing equipment and pectic enzyme (since the apples were boiled) but I’ll write up this recipe and share a link here when it’s done if you want to try it! You could also use it as a base for a simple syrup, or use it for a batch of apple iced tea or apple scrap jelly.
I use a blend of cinnamon, allspice, ginger, nutmeg, and cloves. You can also use a commercial apple pie spice blend, or pumpkin pie spice. Whatever you use, make sure your spices are fresh and aromatic, and adjust the seasonings to taste before canning.
Kitchen Equipment Needed
large stockpot or saucepan:
You’ll need several pots to make this apple pie filling. You’ll need a pot that can hold about a gallon of of boiling water to blanch the sliced apples in 6 cup batches.
This recipe is written for a big batch of 7 quarts of pie filling, though I have also included the quantities for a single quart batch in the notes, so you can scale it up to the number of jars or apples you have to work with, or whatever your pots can accommodate.
You’ll need another large, heavy bottomed stockpot large enough to hold all of the recipe ingredients. You will cook the sugar and Clear Jel mixture in this, and then add the hot blanched apple slices and briefly cook the whole mixture together. Opt for a pot that is too large over one that is too small for this, as this will help to contain any spatters for less mess! A thick bottom will help protect your apple pie filling from scorching, but you can make do with a thin one if you moderate your heat and stir more often.
quart or smaller canning jars and new lids:
I recommend canning this pie filling in quart jars for pies, and in smaller jars for making hand pies, small pies, or using it as a fruit topping. Processing time is the same for quart or smaller jars.
You can also portion and freeze this recipe if you prefer. Use any freezer safe airtight container, label, and use within one year to prevent freezer-burn.
large canning pot:
You need a large canning pot with a lid that will hold all of your canning jars with room for at least an inch of rapidly boiling water to cover the lids. You can use any pot with a lid that will hold all of your jars, plus enough boiling water to cover by an inch or two and room at the top for a vigorous boil.
It’s okay to stack the jars if your pot is tall enough, but it’s best to use a jar rack or a perforated steamer insert separating between the layers so that the jars don’t jostle and break.
sturdy whisk & heat-resistant spoons:
You need to whisk the powdered Clear Jel together with the sugar to remove any lumps, and then mix in the cold water well. Then you’ll want to continue to stir with either a sturdy whisk or spoon as you heat it, so that the pie filling thickens evenly.
A slotted spoon or wire strainer is also helpful for blanching the apple slices and removing them from the poaching liquid.
Canning funnel, ladle, jar tongs, and rack:
These tools are optional but make the job of filling your jars with your hot apple pie filling, and getting them into and out of the hot water bath a lot easier and safer!
It’s best to use a canning pot with a false bottom or fitted with a jar rack to keep your canning jars from scorching or breaking on the bottom. This lets the heat circulate evenly around the jars, and protects the bottoms of the pie filling jars from burning.
If you don’t have a jar rack, use a silicone trivet or extra canning jar rings (tie them with butcher’s twine so they form an elevated platform above the bottom of the pot for your jars), or even an old folded cotton kitchen towel under the jars (make sure it’s 100% cotton so that it doesn’t melt!).
You can read more about these and our recommendations in our guide to canning equipment if you don’t already have these or are new to canning.
How to Can Apple Pie Filling with Clear Jel
peel and slice apples:
- Prepare a 4-8 quart container with a quart or two of cold water and either a splash of lemon juice, a teaspoon of ascorbic acid powder, or several crushed vitamin C tablets or Ball Fruit Fresh.
- This is will protect the cut apple slices from browning and discoloring.
- I often make a second, small bowl of the vitamin C water and keep it next to my cutting board to dunk the apple as I peel and slice it.
- This will wash off any small bits of seed, core, or peel. Then, transfer the rinsed apple slices to the large container of acidulated water.
- Wash the apples before slicing.
- Using a sharp paring knife or peeler, peel each apple, core it, and cut into 1/4″-1/2″ slices.
- Immediately dunk the apple slices into the vitamin C water to prevent the apples from oxidizing and browning.
- I like to leave some of the peels on for texture, but if your fruit has been waxed or don’t like peels in your pies, you should peel them completely.
- Save the peels and cores for making apple cider vinegar, apple scrap jelly, or give them to your chickens or compost bin!
- Keep working in batches until all of the apples have been peeled and sliced.
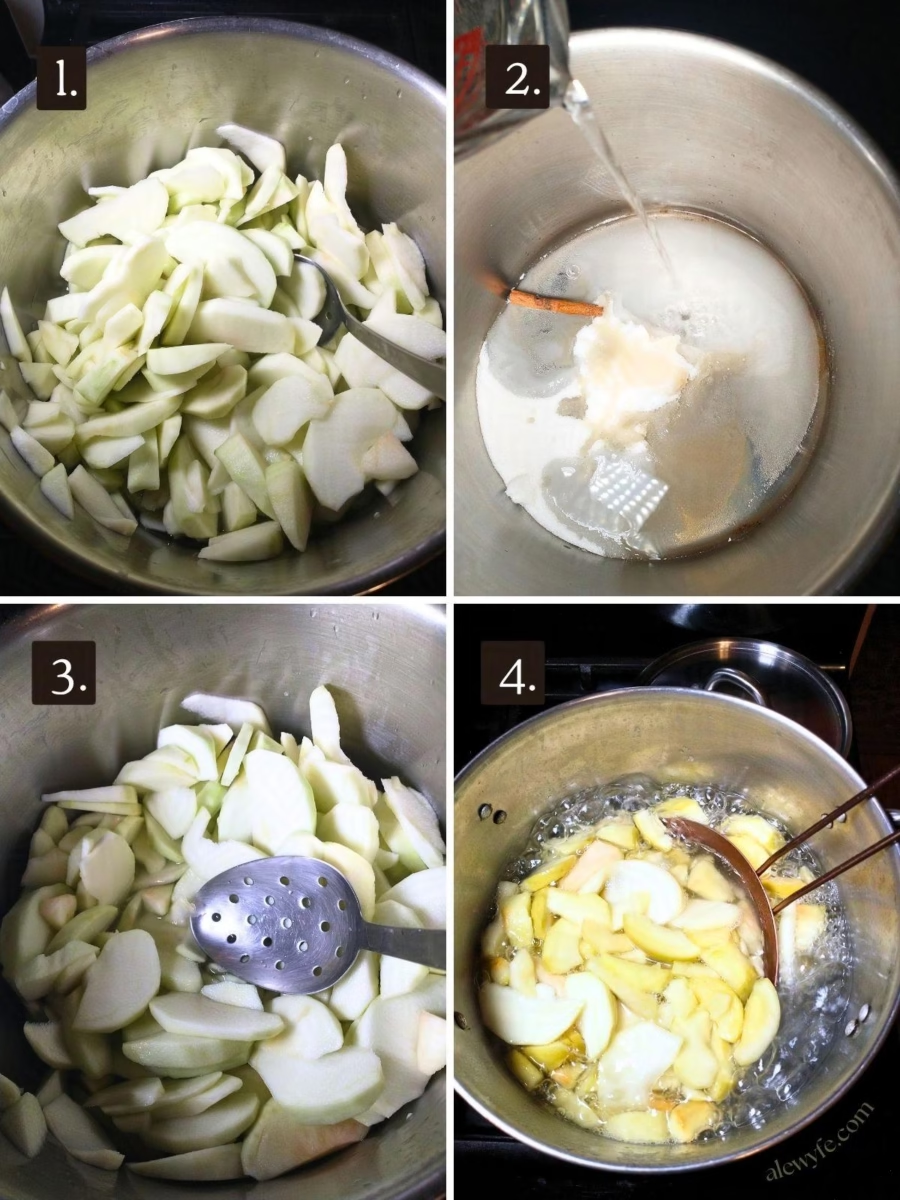
blanch the apple slices:
- You will need about one gallon of boiling water in a blanching pot for the next step. Bring the pot to a boil.
- If you’d like, you can add a cinnamon stick or other whole spices (in a sachet or tea ball to contain any loose spices) to the poaching liquid to flavor it.
- Blanch the sliced apples six cups at a time in the boiling water.
- Cook each batch for one minute after the water returns to a boil, then remove them with a slotted spoon or strainer.
- Place the blanched apples in a covered pot or bowl and keep them warm while you continue to blanch the remaining apple slices in batches and make the pie filling base.
prepare canning pot & jars:
- Wash your canning jars and rings with hot, soapy water and rinse well.
- Inspect the jars for cracks, nicks, or defects in the sealing surface, and discard any damaged jars.
- Fill your canning pot with water and bring it up to a low simmer. You can pre-heat and sterilize your jars if you like, though it isn’t necessary as long as they’re clean.
- Do not pre-boil modern canning lids. For reusable lids (Tattler/Harvest Guard or Weck or Crown type glass jar lids), follow manufacturer directions.
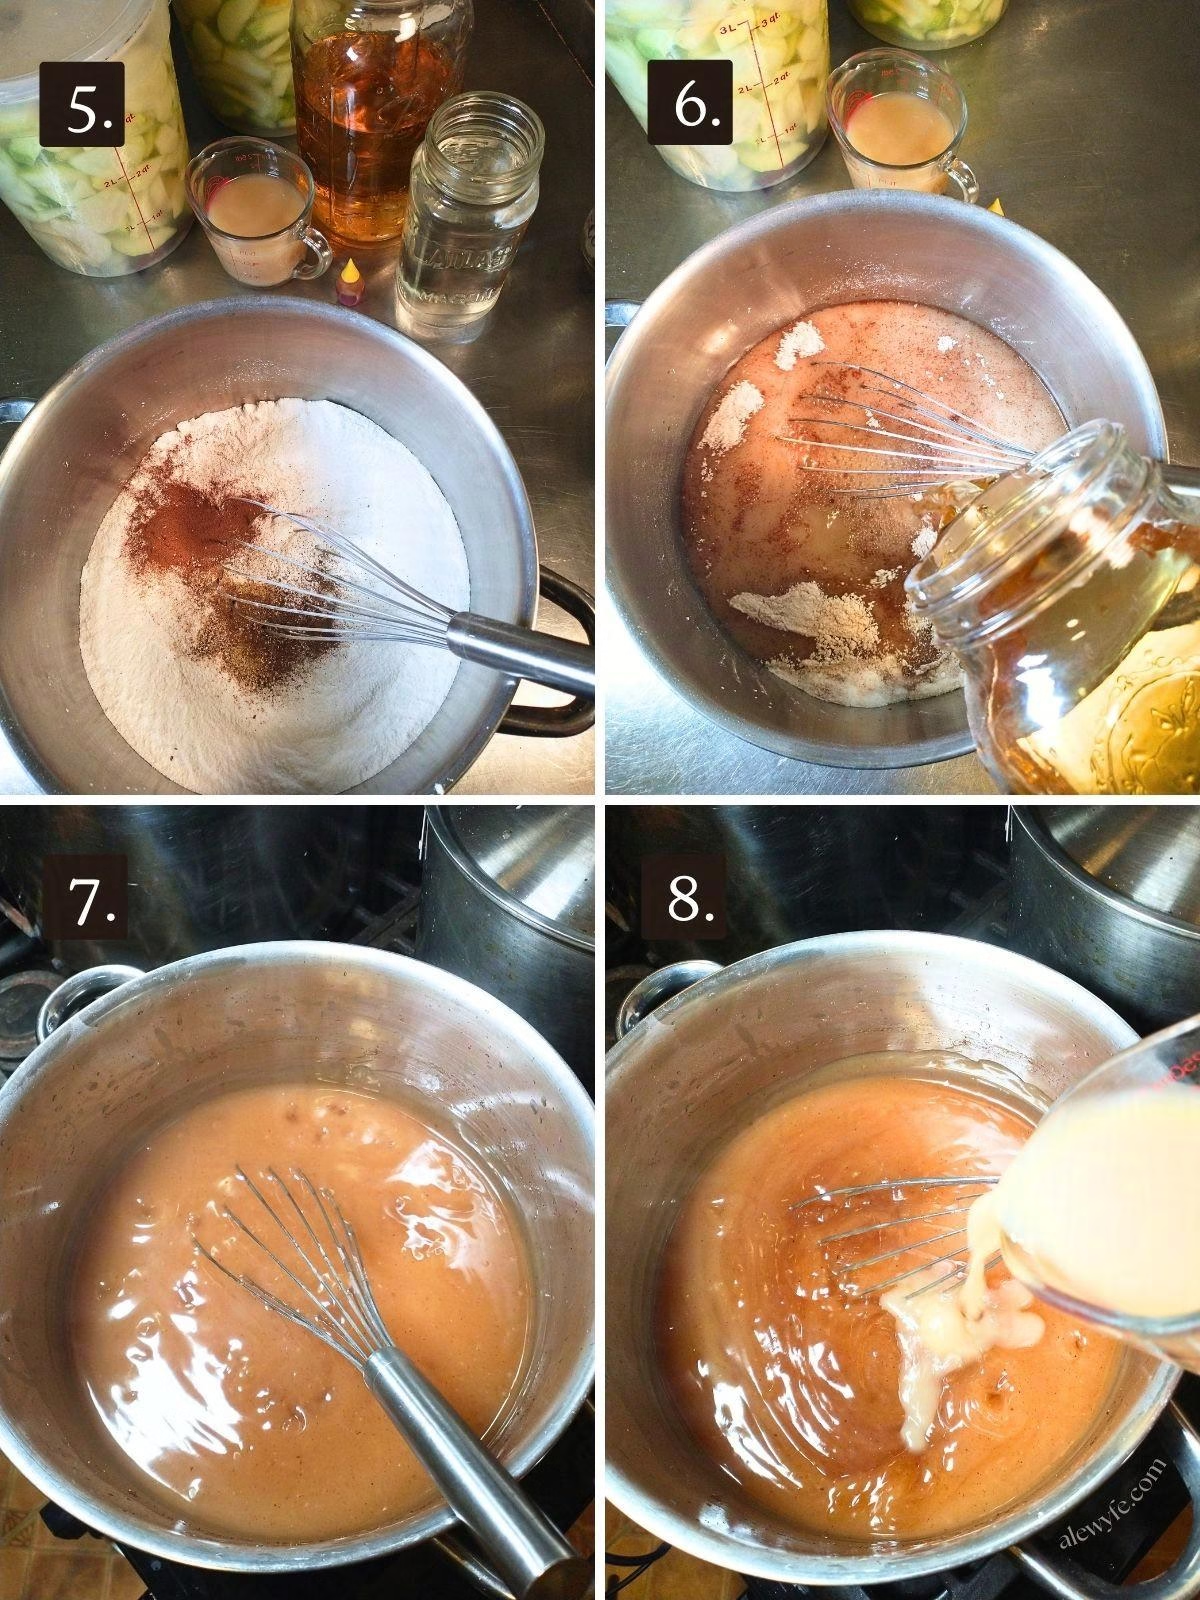
cook the Clear Jel base:
- In a pot large enough to hold the total mixture of apples and other ingredients, combine the sugar, Clear Jel, and the cold water to make a slurry.
- Whisk well to dissolve and remove any clumps. Add the apple juice and any ground spices you may be using. If you are adding food coloring, add this now.
- Cook over medium-high heat, stirring frequently, until the mixture thickens and begins to bubble, and shows thick tracings where you have whisked or stirred the mixture.
- Keep stirring while the mixture is thickening so that it does not scorch, and so that it thickens evenly.
combine apples with filling:
- Remove the Clear Jel mixture from the heat or reduce it to very low.
- Add the lemon juice and whisk until well combined.
- Raise the heat back to medium and bring back to a boil for one minute, stirring constantly.
- Remove from the heat again, then fold in the warm, blanched and drained apple slices (or pour the Clear Jel mixture into the pot with the warm apple slices).
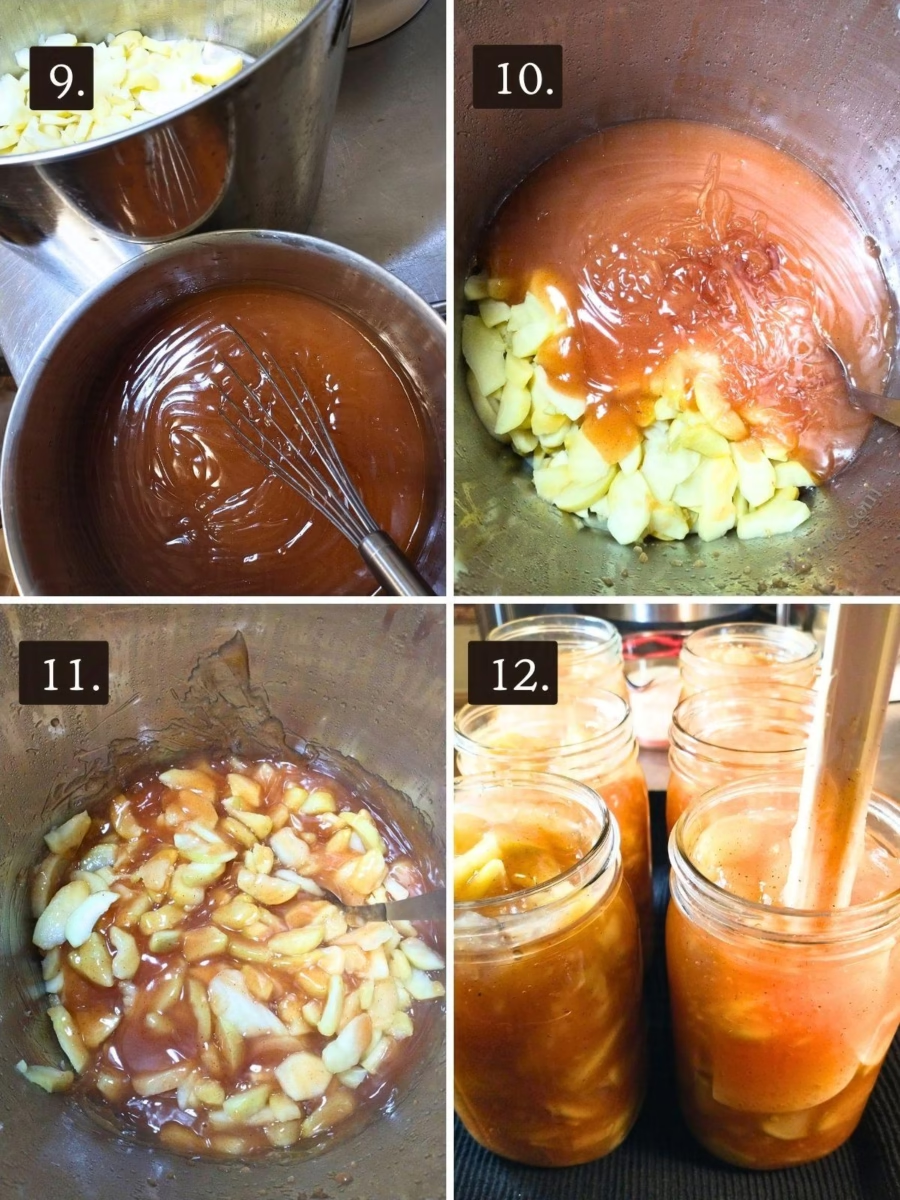
fill jars:
- Remove the pot from the heat, and immediately pack the hot apple pie filling mixture into the prepared canning jars.
- Use a jar funnel if you have one to keep the jar rims cleaner, and carefully ladle the thickened apple pie filling into the jars.
- Using a de-bubbling tool, chopstick, or thin spatula, stir gently to remove air bubbles. Top up jars with more filling if needed after removing any large air bubbles.
- Leave a full 1″ headspace in the jars. This thick pie filling mixture tends to expand while it’s in the canner, so leave the full amount of head-space so that your jars seal properly!
- Wipe the jar rims with a damp, clean cloth to remove any sticky residue.
water-bath:
- Using jar tongs or a jar rack, carefully place the filled jars of apple pie filling into the hot water bath.
- Make sure the jars are covered by at least one and preferably two inches of boiling water. Top up the pot with hot water from a kettle if necessary.
- Cover the canning pot, checking until the pot of water has returned to a rolling boil.
- Start a timer for 25 minutes once the water bath is boiling, and cover the pot.
- Altitude Adjustment: Processing times for water-bath canning should be extended when canning at higher altitude. (0-1000 ft: 25 minutes) (1001-3000 ft: 30 minutes) (3001-6000 ft: 35 minutes) (6001 ft & above: 40 minutes)
- After the 25 minutes (adjusted for altitude) are up, turn off the heat, and set another timer for 5 minutes, leaving the canning pot covered and the jars undisturbed in the water bath.
cool, check seals, store:
- Remove the jars from the canner when the 5 minute timer is done, and set them on a folded towel or wire rack to cool. Use your jar tongs again or the jar-lifter rack… I prefer removing the jars individually with jar tongs so they don’t clang together, break, or drip as much, even if I’m using a jar lifter rack.
- Leave the jars of pie filling undisturbed overnight (or until completely cooled, at least 8-12 hours).
- Do not tighten or remove the jar rings until they are completely cooled (disregard for Tattler or Harvest Guard reusable lids, follow manufacturer directions to tighten rings after canning).
Pantry Storage Tips
After jars are cooled and seals are set (I leave them at least overnight but no more than 24 hours), check that all jars of pie filling are sealed, carefully remove the rings, wash jars, and label them before storing.
Check for seals:
- Sealed jars with metal lids will not flex when the seal is pressed, and the lid has a firm vacuum seal with the jar.
- Any jars of pie filling that did not seal can be reprocessed with new lids within 24 hours of canning. For any jars that didn’t seal, check the jar rim surface for chips and the ring for dents.
- If you don’t want to re-can the jars that didn’t seal, they may be immediately refrigerated and used first.
Wash & store:
- Gently wash jars or wipe with a damp cloth to remove any sugary residue or hard water deposits from the canning bath.
- Clearly label your jars with the name and date of your product, and store them in a cool, dark pantry.
- Do not store jars of canned goods with the rings on. This can trap moisture, leading to rust, or cause false seals that can conceal spoiled product.
- Store your sealed jars of apple pie filling in a cool, dark pantry.
- Temperature swings and direct sunlight will shorten the shelf life and damage the quality & flavor of your home canned foods.
- Home canned goods are best consumed within 12-18 months, but should be safe much longer as long as the seal is intact and the jars show no signs of spoilage.
- Discard the contents of any jars that lose their seals in storage, bubble or hiss when opened, or have an off smell or visible signs of spoilage, and sterilize jars before reuse.
- Once you open a jar of apple pie filling, use it right away, and refrigerate any leftovers. They’ll last for up to a week in the fridge.
How to Re-Thicken Separated Clear-jel Filling
- Pie fillings thickened with Clear-jel will begin to separate with extended storage, so only can as much of this recipe as you plan to use within 12-18 months.
- Older pie filling will still be safe to eat (as long as proper canning & storage procedures are followed), but will need remixing and probably re-thickening if the gel separates (also known as syneresis – the gel thickener contracts into a thicker gel with watery liquid floating to the top).
- If you would like to rescue a separated pie filling, make a slurry with the separated liquid from the jar and a tablespoon or two of cornstarch or flour. Whisk this mixture to dissolve any lumps, and then heat over medium-low heat in a saucepan large enough to hold all of the filling. Continue to stir the slurry until the mixture thickens sufficiently.
- Add more cornstarch and cold water slurry if needed to reach the desired consistency, and then pour the remaining pie filling into the pot.
- Fold in the fruit mixture, and stir until it is heated through and uniform.
- Your filling is now ready to use for pies, hand pies, cobblers, or other fruit desserts.
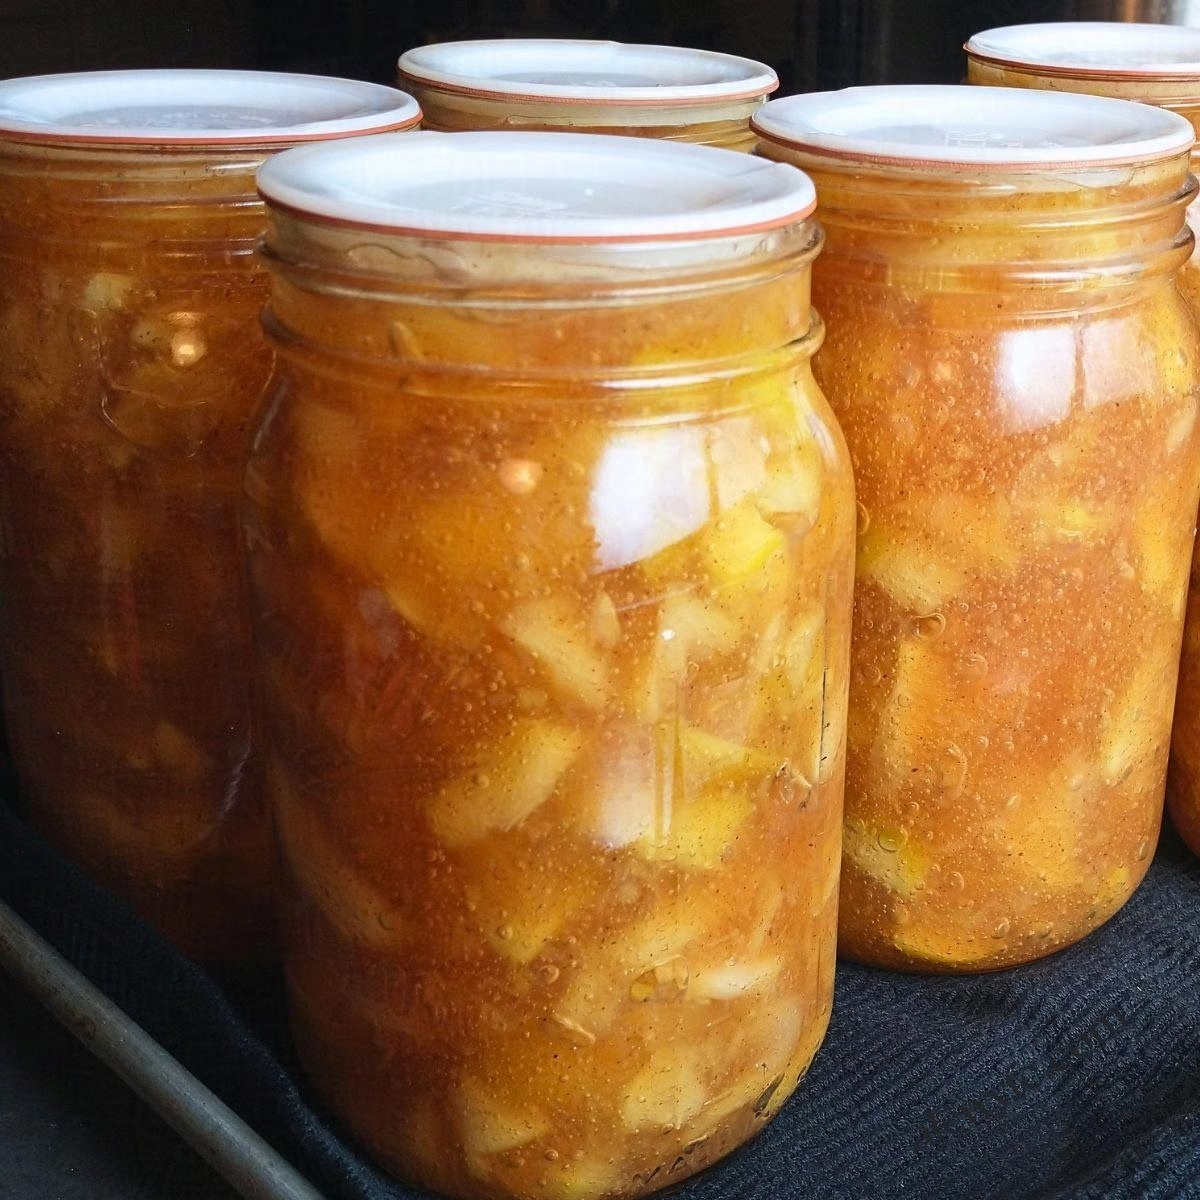
CANNING: Homemade Spiced Apple Pie Filling (with Clear Jel)
Equipment
- glass canning jars, rings, and new lids
- large heavy-bottomed jam or sauce pot
- Jar tongs & canning funnel
Ingredients
Apples:
- 6 quarts sliced fresh apples, blanched 21-24 cups (3 ½ cups for one quart)
Clear Jel Mixture:
- 5 ½ cups granulated sugar (¾ c + 2 tbsp for one quart)
- 1 ½ cups Clear Jel (¼ c Clear Jel for one quart)
- 2 ½ cups cold water (½ c water for one quart)
- 5 cups apple juice or cider (¾ c apple juice for one quart)
- 2 tsp ground cinnamon (½ – ¾ tsp of cinnamon or apple pie spice for one quart, or use a pinch of each of the spices below plus cinnamon for one quart)
- ½ tsp ground nutmeg (⅛ tsp for one quart, or see above)
- ¼ tsp ground ginger
- ¼ tsp ground allspice
- ⅛ – ¼ tsp ground cloves
- ¼ – ½ tsp kosher salt (optional, not in USDA recipe)
- 3 – 7 drops yellow food coloring (1 drop for one quart, optional)
Add after clear jel thickens:
- ¾ cup bottled lemon juice (2 tbsp lemon for one quart)
Instructions
peel and slice apples:
- Prepare a 4-8 quart container with a quart or two of cold water and either a splash of lemon juice, a teaspoon of ascorbic acid powder, or several crushed vitamin C tablets. This is will protect the cut apple slices from browning and discoloring.
- Wash the apples before slicing. Using a sharp paring knife or peeler, peel each apple, core it, and cut into 1/4″-1/2″ slices.
- I like to leave some of the peels on for texture, but if your fruit has been waxed or don’t like peels in your pies, you should peel them completely.
- I often make a second, small bowl of the vitamin C water to dunk the apple as I peel and slice it. This will wash off any small bits of seed, core, or peel. Then, transfer the apple slices to the large container of acidulated water.
- Immediately dunk the apple slices into the vitamin C water to prevent the apples from oxidizing and browning.
- Keep working in batches until all of the apples have been peeled and sliced.
blanch the apple slices:
- You will need about one gallon of boiling water in a blanching pot for the next step. Bring the pot to a boil.
- Blanch the sliced apples six cups at a time in the boiling water. Cook for one minute after the water returns to a boil, then remove them with a slotted spoon or strainer.
- Place the blanched apples in a covered pot or bowl and keep them warm while you continue to blanch the remaining apple slices in batches and make the pie filling base.
prepare canning pot & jars:
- Wash your canning jars and rings with hot, soapy water and rinse well.
- Inspect the jars for cracks, nicks, or defects in the sealing surface, and discard any damaged jars.
- Fill your canning pot with water and bring it up to a low simmer. You can pre-heat and sterilize your jars if you like, though it isn’t necessary as long as they’re clean.
cook the Clear Jel base:
- In a pot large enough to hold the total mixture of apples and other ingredients, combine the sugar, Clear Jel, and the cold water to make a slurry.
- Whisk well to dissolve and remove any clumps. Add the apple juice and any ground spices you may be using.
- Cook over medium-high heat, stirring frequently, until the mixture thickens and begins to bubble.
combine apples with filling:
- Remove from the heat or reduce it to low.
- Add the lemon juice and whisk until well combined.
- Raise the heat back to medium and bring back to a boil for one minute, stirring constantly
- Remove from the heat again, then fold in the warm, blanched apple slices (or pour the Clear Jel mixture into the pot with the warm apple slices).
fill jars:
- Remove the pot from the heat, and immediately pack the hot apple pie filling into the prepared canning jars.
- Use a jar funnel if you have one to keep the jar rims cleaner, and carefully ladle the thickened peach pie filling into the jars.
- Using a de-bubbling tool, chopstick, or thin spatula, stir gently to remove air bubbles. Top up jars with more filling if needed after removing any large air bubbles.
- Leave a full 1″ headspace in the jars. This thick pie filling mixture tends to expand while it’s in the canner, so leave the full amount of head-space so that your jars seal properly!
- Wipe the jar rims with a damp, clean cloth to remove any residue.
water-bath:
- Using jar tongs or a jar rack, carefully place the filled jars of apple pie filling into the hot water bath.
- Make sure the jars are covered by at least one and preferably two inches of boiling water. Top up the pot with hot water from a kettle if necessary.
- Cover the pot, checking until the pot of water has returned to a rolling boil.
- Start a timer for 25 minutes once the water bath is boiling, and cover the pot.
- Adjust the processing time for elevations higher than 1001 ft (see chart in recipe notes for longer processing times for higher elevations).
- After the 25 minutes are up, turn off the heat, and set another timer for 5 minutes, leaving the pot covered and the jars undisturbed.
cool, check seals, store:
- Remove the jars from the canner when the 5 minute timer is done, and set them on a folded towel or wire rack to cool.
- Leave the jars undisturbed overnight (or until completely cooled, at least 8-12 hours).
- Sealed jars with metal lids will not flex when the seal is pressed, and the lid has a firm vacuum seal with the jar.
- Any jars of apple pie filling that did not seal can be reprocessed with new lids within 24 hours of canning. For any jars that didn’t seal, check the jar rim surface for chips and the ring for dents.
- If you don’t want to re-can the jars that didn’t seal, they may be immediately refrigerated and used first.
- Gently wash jars or wipe with a damp cloth to remove any sugary residue or hard water deposits from the canning bath.
- Clearly label your jars with the name and date of your product, and store them in a cool, dark pantry. Home canned goods are best consumed within 12-18 months.
Notes
Nutrition
More Fruit Canning Recipes:
- Homemade Peach Pie Filling (with Clear Jel)
- Canning Apple Slices for Baking
- Homemade Spiced Apple Butter
- How to Make Traditional Beef or Venison Mincemeat (pressure canning recipe)
- Pear Halves in Vanilla or Cinnamon Syrup (water-bath canning recipe)
- Cinnamon or Spiced Summer Peaches (Easy Raw-Pack Water-Bath Recipe)
- Bourbon Brown Sugar Peach Jam (water-bath canning recipe)
- Whiskey Peach Brown Sugar Compote (water-bath canning recipe)
- Ginger Peach Butter
- Spicy Peach BBQ Sauce Canning Recipe
- Fiery Habanero Peach Salsa
Southern Favorite Baking Recipes

- How to Make a Classic Southern Pecan Pie
- Cranberry Apple Crumble Pie
- Fast Fried Apple Fritters
- Southern Cast-Iron Skillet Cornbread
- Green Chile & Cheese Cornbread
- How to Make Butter-Swim Biscuit Mix for Fresh Biscuits in a Flash!
- Butter-Swim Sausage Biscuit Sandwiches with Cheese & Hot Pepper Jelly
- Southern Sharp Cheddar Sausage Balls