BREW: How to Make Pear Wine
- Pear Wine Recipe Ingredients
- Kitchen Equipment Needed
- How to Make Pear Wine
- Cellar & Age your Pear Wine
- Homemade Pear Wine
This homemade farmhouse pear wine recipe is more robust than a perry (pear cider), and a lot easier to make. It’s a pale straw-hued white fruit wine, with a lovely pear aroma and light body.
This is a strong, still country wine, and ferments with the whole fruit so you don’t need a cider press or a source for freshly pressed pear juice. It’s a great way to use surplus ripe pears in the fall, especially if you have a pear tree or find a good sale on fresh pears.
Our family can only use so many canned or dried pears, and when all our pears are ripening at once, it’s a great way to deal with the bounty that our Bartlett tree drops on us without wasting them! It’s also a good way to use “ugly” pears that need a lot of trimming, like a lot of the fruit from our un-sprayed organic tree.
Or, if you have space in a chest freezer, you can freeze the pears as they ripen and make this pear wine when you have the time. You can also just buy frozen pear halves or slices to use for your wine… it’s a pretty forgiving method, but make sure you use ripe fruit with a good flavor for your wine!
Pear Wine Recipe Ingredients
Pears:
Use fresh or frozen ripe pears. I prefer to freeze the fruit first if possible to get a better juice yield from the fruit. When the fruit freezes, ice crystals pierce the cell walls, leading to better juice and flavor extraction. It also kills any fruit fly or other pest eggs (eww, gross!) that didn’t get washed off.
Sugar:
Use granulated white sugar to boost the natural sugar content in the fruit. This additional sugar is the main difference between a perry (pear cider) and a stronger pear wine.
You can also use a light-flavored honey to make a pear mead, but the weight conversion is not exactly the same. I recommend practicing with fruit wines until you feel comfortable with the process before moving on to more expensive ingredients for mead-making.
Wine yeast:
You can experiment with different yeasts for your pear wine, but it’s best to stick to strains that are recommended for fermenting white wines or fruit wines.
Do not use bread yeast or beer yeast – the former will taste absolutely terrible and the latter is not optimized for the alcohol content, acidity, and flavor profiles you want from your pear wine.
Additives & other ingredients:
There are a few commonly used additives that make up a tiny volume of this recipe but have a huge impact on the flavor and fermentation.
acid blend:
This is a blend of winemaking acids, usually tartaric acid, citric acid, and malic acids, extracted from fruit. It’s used to balance the acidity in wines, both for flavor and to help create a happy pH for the yeast to work in.
You could substitute food-grade citric acid if you don’t have acid blend, but it’s inexpensive and lasts basically forever if you keep it dry- this half pound bag isn’t a lifetime supply but will last you for years unless you’re brewing everyday? You can also buy smaller quantities if you don’t brew often or have limited storage space, but it’s cheaper in bulk.
pectic enzyme:
Pectic enzyme will help make sure you get a sparkling clear wine at the end, and also helps break down the fruit a bit so you get a better flavor and juice extraction from your fresh or frozen pears.
Pears, like all pome fruits, are rich in pectin. That’s great, if you’re making jelly, but can create a persistent cloudy haze in your finished wine that will take forever to clear without adding clarifiers (which can also strip out some of the color and flavor of your wine).
You can avoid this by not boiling your fruit mixture (just covering it with boiling water and steeping) and also by adding pectic enzyme to your wine must and fruit mixture and letting it work for an hour before you add the yeast to start fermentation. This natural enzyme will break down the pectin so that it doesn’t form an unsightly haze in your wine.
yeast nutrient:
There are several different formulations of this available, the simplest and cheapest of which is either straight DAP (diammonium phosphate crystals) or DAP and urea. I’ll use these in beer brewing, but for my wines and meads I prefer to use a better quality wine yeast nutrient.
I generally use either Fermax or Wyyeast Wine Yeast “Vintner’s Choice” yeast nutrient. These are formulated specifically for the nutritional needs of wine yeast. These have additional ingredients to support the health of the yeast in the more difficult fermentation environments of higher gravity wines and meads.
wine tannin:
Tannins add balance, bitterness, and structure to your wine. You will get some naturally occurring tannin from the pear skins, stems, and cores, but it’s best to add some powdered commercial wine tannin to make sure you get a tasty wine that isn’t flabby or insipid. A little goes a long way, and it keeps for a very long time if you store it properly, so I recommend adding this to your brewing kit.
You can use standard wine tannin, but if you have a colorless oak gall tannin designed for white wines, like FT Blanc (available from some wine-making suppliers), it will help preserve the pale, delicate color of your pear wine.
Campden tablet:
A crushed campden tablet, added to the wine mixture after heating and well before adding the yeast, gives a measured dose of sulphites that will kill off any contaminants like wild yeasts and bacteria that made it through freezing and the quick boiling water sanitation of the fruit. This ensures a better chance of getting a lovely, clean-tasting pear wine at the end and not a funky fruit vinegar or wild brew.
Wild fermentations can be fun things to play with, but can also be total failures. Start playing around with them after your cellar is full of bright, clean tasting homebrews, and after you’re an expert in telling dangerous mold growth from a wild fermentation pellicle. Good healthy wild fermentations are possible, but you are also likely to end up with a funky one that will give you a headache (or salad dressing) at best and a total waste at worst.
The campden tablets you want are KMS, or potassium metabisulfate, not the SMS, or sodium metabisulfate tablets. Store these in a sealed glass or plastic jar away from moisture, or they’ll lose potency.
SMS powder and tablets, which are usually cheaper and also stronger, are fine for sanitizing equipment but can give an off-flavor to your finished wines. Since it delivers a more potent dose of sulphite, some people are more sensitive to this. Use SMS for cleaning and KMS for adding directly to your actual wine must.
Kitchen Equipment Needed
Primary fermentation vessel:
For the primary fermentation with the fruit, you’ll need a wide mouth glass or food-grade plastic vessel that will hold four to five gallons for a full batch. This will allow enough room for the fruit and a vigorous primary fermentation without overflowing and making a big mess.
An excellent primary container for fruit wines like this is a Big Mouth Bubbler from Northern Brewer. It has a wide mouth for easy access and cleaning and plenty of space for a three to five gallon batch of wine or mead. I have a smaller version of this that I use for one gallon batches, and it’s fantastic.
You can also use a small four to five gallon food-grade plastic bucket (budget-friendly and stacks for storage if you’re in a small space), food-safe glazed ceramic crock and muslin cover, or other fermentation container with an airlock in the lid.
carboy, demijohn, glass jugs, or secondary bucket:
After the primary fermentation has completed (usually 14-20 days), siphon and rack the pear wine off the fruit and yeast sediment and into a narrow-mouthed three gallon jug or demijohn, or you can split the batch into three one gallon glass jugs fitted with airlocks and stoppers.
You can use a clean, three to five gallon food grade plastic bucket in a pinch, or a five gallon carboy, but it’s best to move your wine to a vessel that minimizes oxidation. Plastic buckets are somewhat less impermeable to oxygen, and have a larger surface area. It’s better to split the wine into smaller containers so that you can top them up or minimize the head-space.
Age the wine in this secondary container for up to a year before bottling, but at least 30 days. You’ll want to have at least a few of these jugs or carboys if you’re doing any amount of small-batch wine, mead, or cider making (or even micro batches of beer). That way, you can make more wine while your older batches are bulk aging.
Nylon mesh brew bag:
A heat-resistant nylon brewing bag isn’t essential, but it’s really nice to have. It can safely stand up to the hot sugar water mixture without melting or leaching nasty stuff into your wine.
The fine mesh contains the pear pulp, skins, and seeds as well as a lot of the sediment during primary fermentation so they are easy to remove. It filters out any coarse chunks that might clog or get stuck in your siphon hose during racking. You don’t need an extra-large brew-kettle sized bag like you’d use for BIAB beer making. A smaller bag that is just big enough to hold the fruit is fine, and easier to keep submerged.
If you don’t have one, you can let the fruit float in the fermenter, and use a sanitized wire strainer or coarse filter funnel to remove the fruit chunks during the first racking, but this is messy, and more likely to introduce contaminants into your wine.
You can use a glass fermentation weight in the bag to keep it submerged if you have one, or just push the bag under the must with a sanitized spoon for the first few days.
Hydrometer and test jar:
A hydrometer isn’t strictly necessary to make this wine, but it’s invaluable for tracking the progress of your fermentation and ensuring your wine is fully done and ready to bottle. It will also let you calculate the alcohol content of your wine.
You can also use a digital refractometer if you have one, which will give you instant readings with just a drop of wine, which is very convenient, and less wasteful if you do frequent sampling.
How to Make Pear Wine
prep equipment & ingredients:
- Sanitize your primary fermenter (either a three gallon wide mouth glass jar or a 3-5 gallon food grade bucket with an airlock, or crock and muslin cover).
- Clean and sanitize all of your other equipment. Assemble all ingredients and measuring tools and make sure you have everything ready to use.
- Weigh out the sugar in a large clean mixing bowl or small bucket and set aside.
- If you are using a glass fermenter, fill the fermenter with half of the water. Bring the other half of the water up to a boil in a stockpot, and let cool slightly. For a plastic or other heat-resistant container, you can heat most or all of the water.
add pears & additives:
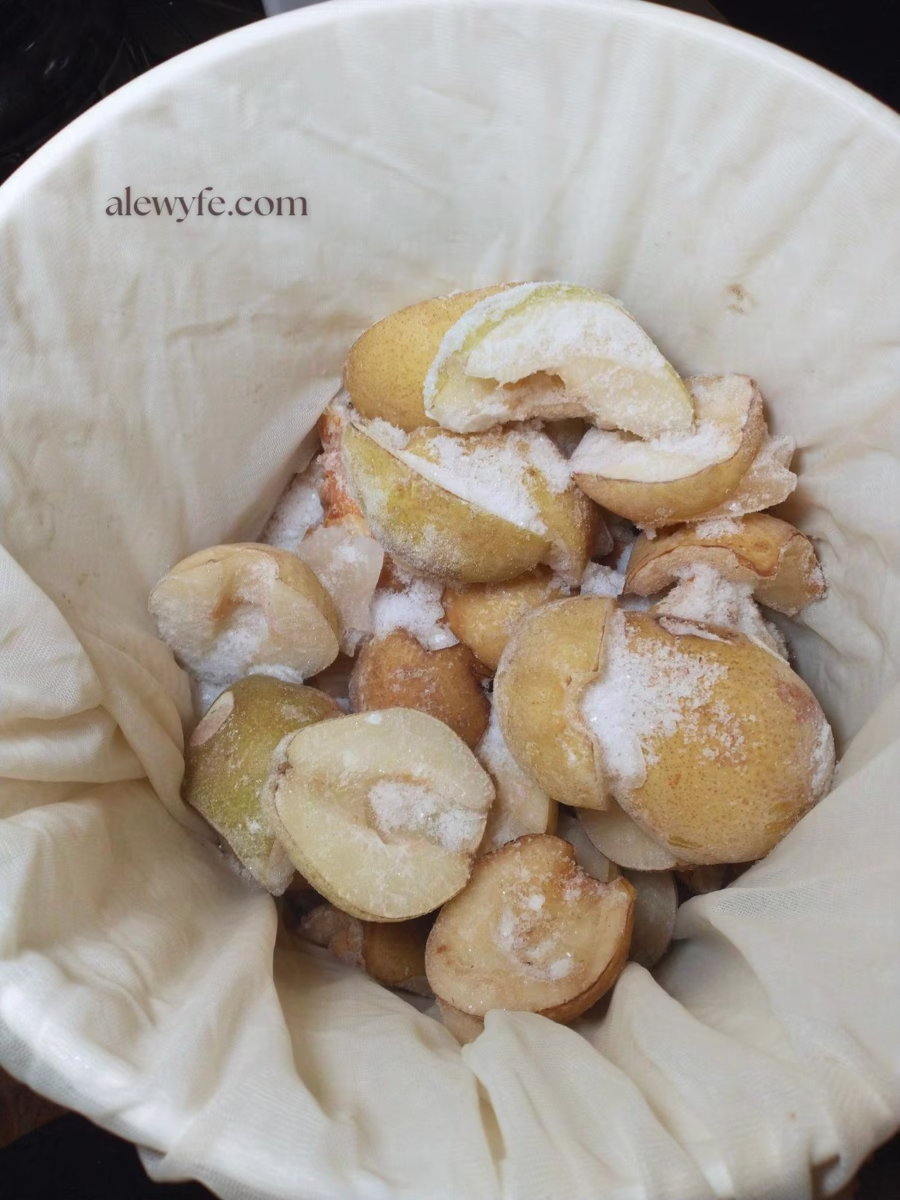
- If you are using fresh pears, wash them well, remove any damaged or spoiled fruit, and chop the pears roughly. (wash fresh pears before freezing if you are using frozen fruit).
- Add the fresh or frozen pears to a clean and sanitized nylon brewing bag. I like to add either glass fermentation weights or a sanitized small glass mason jar to help keep the bag submerged in the fermenter.
- Squeeze and crush the pears in the bag to break up the fruit and extract some of the juice. If your pears are frozen, partially thaw them before squeezing.
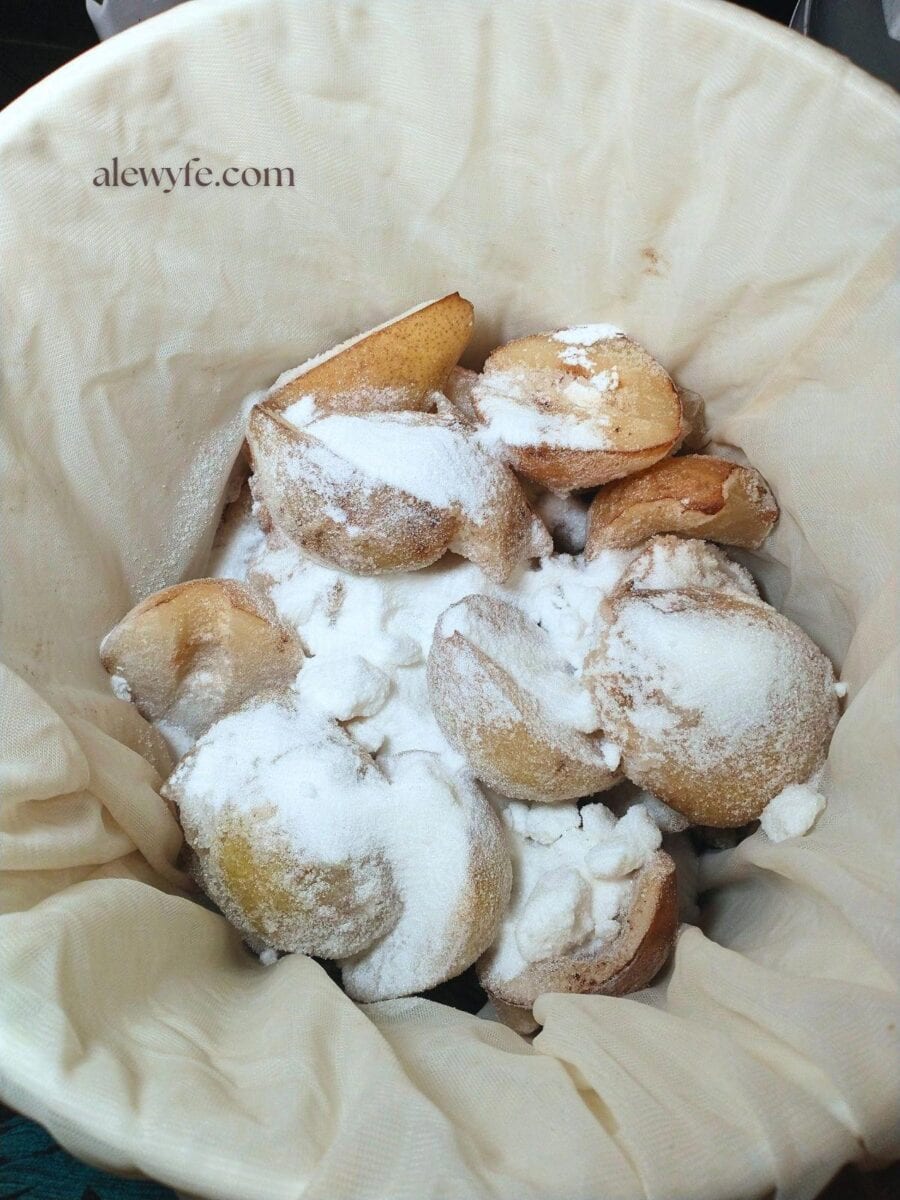
- Add the sugar to the fruit bag in the fermenter, pour the boiling water over, and stir.
- Tie off the bag, and use a clean long-handled spoon to press the bag down into the liquid until it is submerged (it may still float up if you haven’t added weights, this is okay.
- Add the pectic enzyme & acid blend. Stir and wait 30 minutes to an hour for the enzyme to work.
- Add the yeast nutrient and wine tannin (tannins can interfere with the action of the pectic enzyme so it’s best to add them after the enzyme has had a chance to work). Stir again with your sanitized spoon.
check OG & add campden:
- Check the specific gravity of the must using a hygrometer and test jar or a refractometer. Record this in your notes or label your fermenter. This is your original gravity (OG). This number will give you a baseline for monitoring your fermentation progress, and you can use it to calculate the alcohol content of your finished wine.
- Crush one campden tablet (KMS) over the pear wine must, stir, and cover with the lid and airlock or tightly secure a fabric cover. You want to let out CO2 but keep out fruit flies… I prefer a lid and airlock but some people like to do a more open traditional fermentation.
pitch yeast & ferment:
- Wait a full 24 hours for the campden tablet to work and dissipate, then add your packet of wine yeast. If you add them together, the campden tablet will kill or deactivate the yeast, so pay attention to the timing. If you wait too long and your fermenter is not well-sealed, your wine must may spoil.
- Sprinkle the yeast over the top of the wine must (or re-hydrate it according to manufacturer’s instructions and pitch into your fermenter).
- Replace the lid and airlock. Place in a warm, dark place and check on it frequently. It should show signs of initial fermentation after 6-12 hours, with vigorous bubbling in the airlock within 48 hours.
- If it isn’t fermenting, check the temperature and move it into a warmer place. If it still doesn’t take off, you may need to re-pitch with a fresh packet of wine yeast.
remove fruit bag & first racking:
- After about two to three weeks, or when the fermentation has greatly slowed (between 10-20 days), check the specific gravity (SG) and make note of it.
- Using a sanitized spoon or clean hands, remove the nylon bag from the fermenter, and very gently squeeze to extract all the liquid.
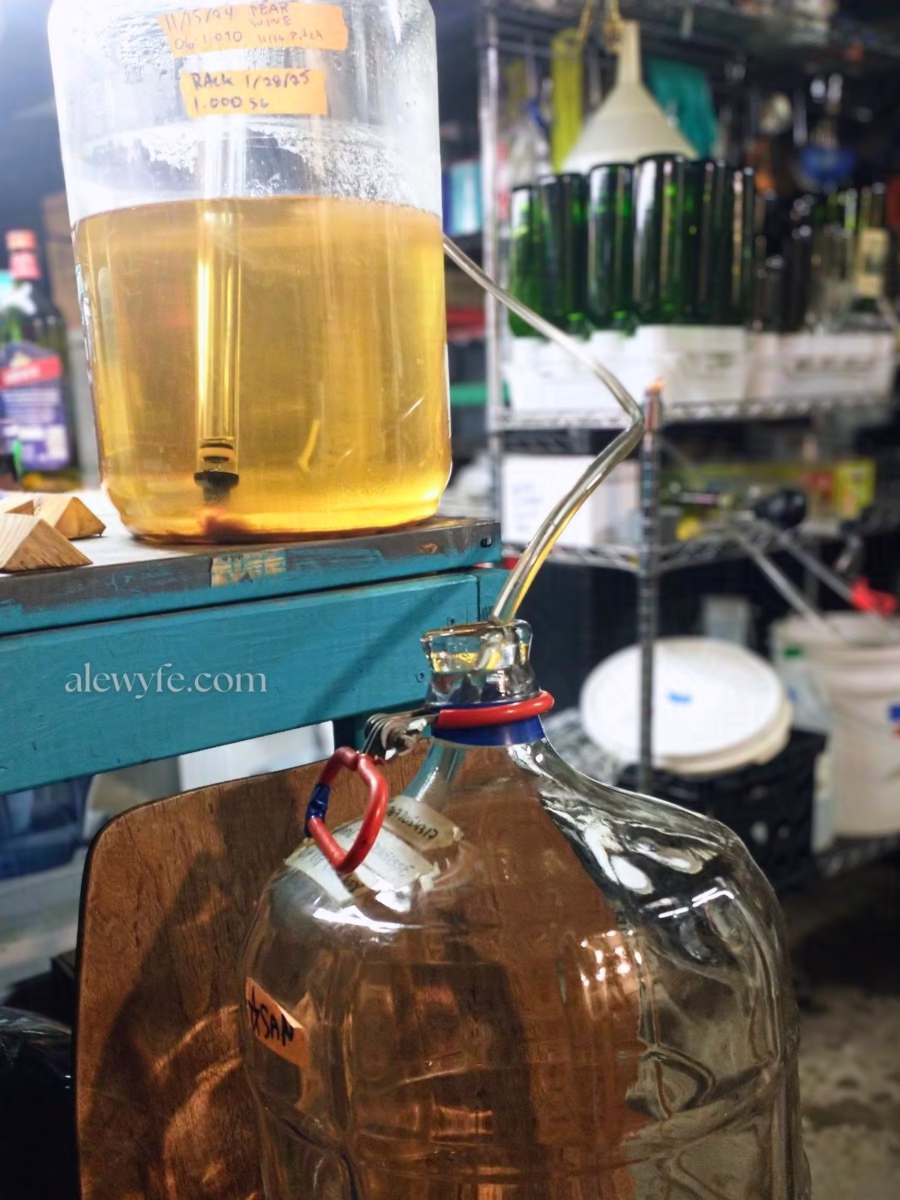
- Rack (siphon from fermenter into jug) into your secondary fermentation container (probably a glass jug or carboy). Replace the airlock.
- If you didn’t use a strainer bag, instead of racking, you’ll want to gently pour your wine through a large mesh colander and then a sanitized fine filter funnel into your fermenter. You will have to stop and clear the sediment from the colander and filter funnel when it gets clogged.
check SG, rack again & bulk age:
- If your pear wine has thrown a lot of sediment in the container, you can carefully rack it into a clean and sanitized fresh jug after a few weeks. This is optional, for better clarity or an extended bulk aging (between 2-6 months).
- You may want to do a third racking a few days to a week before bottling (being careful to minimize splashing so that this delicate wine doesn’t oxidize) to get your wine very clear.
- If you are doing a long aging before bottling, You may want to add a trace amount of sulphites to protect the wine from oxidation and infection. Rinse the jug or carboy with sulphite solution before racking, or add a quarter to a half of a crushed campden tablet.
- When your wine is perfectly clear and the SG has not dropped in at least two weeks, rack into your clean and sanitized bottling bucket or carboy. Make sure it’s fermented all the way before bottling so that you don’t make bottle bombs or end up with leaking or popping corks.
- This, plus added clarity, is a good reason to let your wines bulk age in the carboy or in gallon jugs with airlocks before bottling them. You want to make sure the wine is sparkling clear and has dropped all the sediment so that you don’t have sediment in the bottle to cloud your finished wine.
stabilize & back-sweeten or condition (optional):
- If you want to bottle your pear wine with residual sweetness (or especially if you want to back-sweeten them with additional honey or sugar), you should first add wine stabilizer (potassium sorbate) to keep it from re-fermenting in the bottles.
- You can use wine conditioner, which is a sweetener with added stabilizer (and sometimes glycerin for mouthfeel).
- Follow dosing directions on the stabilizer (usually a half-teaspoon of potassium sorbate per gallon of wine) and wine conditioner packaging.
- A little bit of bottle fermentation can add a hint of sparkle, but too much can push out the corks, or worse, make bottle grenades. It can also add sediment to your wine you worked so hard to get clear, so make sure your wine is fermented to dryness if you are not using a stabilizer when bottling, especially if you are using corked bottles and not swing-tops!
bottle your pear wine:
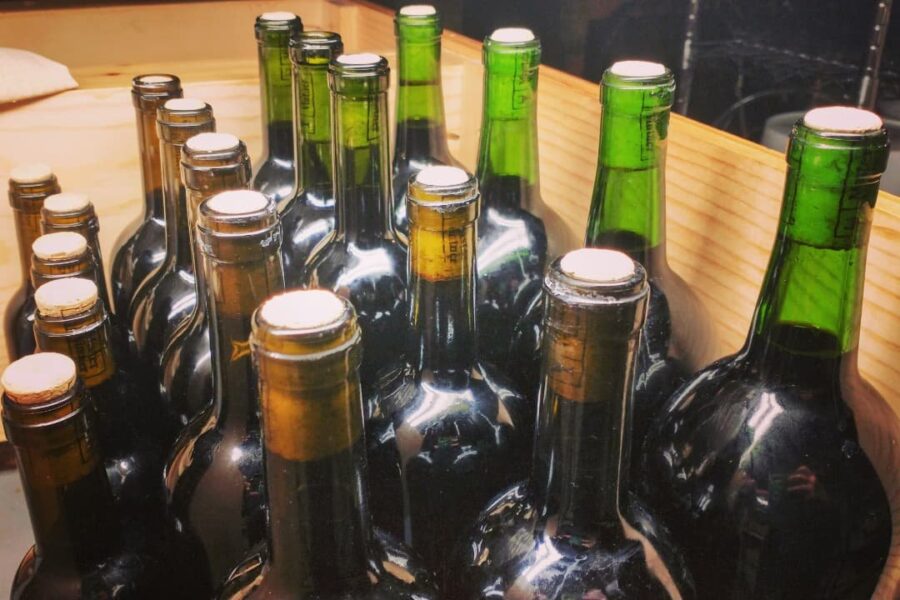
- Bottle your finished pear wine in sanitized swing top bottles or wine bottles with corks. Swing top bottles are convenient and good for short term storage. Bottles with corks are better if you plan to age your wine for more than a few months, but you’ll need a corker.
- Wash and scrub your wine bottles with a bottle brush or bottle washer, rinse well with hot water, and then sanitize with a no-rinse sanitizer.
- Rinsing the bottles with a sulphite solution is good for bottling wines as it will both sanitize the bottles and add a bit of protection to the wine against oxidation at bottling, but you can use any no-rinse sanitizer that is safe for brewing (I like Star-San).
- If you have a bottling bucket with a spigot, you can rack your finished wine into the bucket for bottling, use a racking cane with a bottling valve, or rack the wine off and sediment into a clean, sanitized carboy or glass jugs and then carefully pour it into your prepared bottles. Whichever method you use, try to minimize splashing and air contact to protect your wine from oxidation.
Cellar & Age your Pear Wine
- Bottles with natural corks need to sit upright for a day or two before being turned on their sides for storage to make sure they don’t leak. Corks need time to fully expand after being compressed in the corker, then the corks should be in contact with the wine so they don’t dry out. If you used synthetic corks, you can store your bottles either upright or on their sides. Swing-top bottles should be stored upright.
- Label & cellar-age your pear wine for at least one month somewhere cool and dark. Ideal cellar temperatures are between 45℉ to 65℉ (7℃ to 18℃) and 60%-80% humidity. If you don’t have a basement, wine fridge, or other temperature-controlled spot, try to find a closet or other place out of direct light, and that has minimal temperature swings.
- It is safe to drink immediately but like most wine, it tastes much better with a bit of time in the bottle. Sample some periodically and take notes to find what you prefer!


Homemade Pear Wine
Equipment
- 1 3-5 gallon bucket or wide mouth fermenter
- 1 lid with airlock for gallon jar, or butter muslin & twine
- 1 3-5 gallon jug, carboy, or demijohn
- 1 lid or stopper with airlock for jug
- 1 fine mesh drawstring nylon brewing bag (optional, but makes racking & removing fruit sediment easier)
- 1 stainless or plastic spoon
- hydrometer & test jar or refractometer
- siphon tubing & racking cane or autosiphon
- no-rinse brewery cleaner & sanitizer
Ingredients
- 12 lbs fresh or frozen ripe pears
- 9 quarts water
- 12 cups sugar (84-86 oz by weight)
- 2 tbsp acid blend or citric acid
- ¾ tsp pectic enzyme
- 1 tsp yeast nutrient (Wyeast wine yeast nutrient or similar)
- 1 tsp wine tannin (use colorless oak gall tannin like FT Blanc if possible to preserve delicate color)
- 1 each KMS Campden tablet
- 1 packet wine or champagne yeast
Instructions
prep equipment & sugar
- Sanitize your primary fermenter (either a three gallon wide mouth glass jar or a 3-5 gallon food grade bucket with an airlock, or crock and muslin cover).
- Clean and sanitize all of your other equipment. Assemble all ingredients and measuring tools.
- Weigh out the sugar in a clean bowl or bucket and set aside.
- If you are using a glass fermenter, fill the fermenter with half of the water. Bring the other half of the water up to a boil in a stockpot, and let cool slightly. For a plastic or other heat-resistant container, you can heat most or all of the water.
add pears & additives
- If you are using fresh pears, wash them well, remove any damaged or spoiled fruit, and chop the pears roughly. (wash fresh pears before freezing if you are using frozen fruit).
- Add the fresh or frozen pears to a clean and sanitized nylon brewing bag. I like to add either glass fermentation weights or a sanitized small glass mason jar to help keep the bag submerged in the fermenter.
- Squeeze and crush the pears in the bag to break up the fruit and extract some of the juice. If pears are frozen, let them thaw partially before squeezing.
- Add the sugar to the fruit bag in the fermenter, pour the boiling water over, and stir.
- Tie off the bag, and use a clean long-handled spoon to press the bag down into the liquid until it is submerged (it may still float up if you haven’t added weights, this is ok.
- Add the pectic enzyme & acid blend. Stir and wait 30 minutes to an hour for the enzyme to work.
- Add the yeast nutrient and wine tannin (tannins can interfere with the action of the pectic enzyme). Stir again with your sanitized spoon.
check OG & add campden
- Check the specific gravity of the must using a hygrometer and test jar or a refractometer. Record this in your notes or label your fermenter. This is your original gravity (OG).
- This number will give you a baseline for monitoring your fermentation progress, and you can use it to calculate the alcohol content of your finished wine.
- Crush one campden tablet (KMS) over the pear wine must, stir, and cover with the lid and airlock or tightly secure a fabric cover. You want to let out CO2 but keep out fruit flies… I prefer a lid and airlock but some people like to do a more open traditional fermentation.
check OG, pitch yeast & ferment
- Wait a full 24 hours for the campden tablet to work and dissipate, then add your packet of wine yeast. If you add them together, the campden tablet will kill or deactivate the yeast, so pay attention to the timing. If you wait too long and your fermenter is not well-sealed, your wine must may spoil.
- Sprinkle the yeast over the top of the wine must (or re-hydrate it according to manufacturer’s instructions and pitch into your fermenter).
- Replace the lid and airlock. Place in a warm, dark place and check on it frequently. It should show signs of initial fermentation after 6-12 hours, with vigorous bubbling in the airlock within 48 hours.
- If it isn’t fermenting, check the temperature and move it into a warmer place. If it still doesn’t take off, you may need to repitch with a fresh packet of wine yeast.
remove fruit bag & first racking
- After about two to three weeks, or when the fermentation has greatly slowed (between 10-20 days), check the specific gravity (SG) and make note of it.
- Using a sanitized spoon or clean hands, remove the nylon bag from the fermenter, and very gently squeeze to extract most of the liquid.
- Rack (siphon from fermenter into jug) into your secondary fermentation container (probably a glass jug or carboy). Replace the airlock.
- If you didn’t use a strainer bag, instead of racking, you’ll want to gently pour your wine through a large mesh colander and then a sanitized fine filter funnel into your fermenter. You will have to stop and clear the sediment from the colander and filter funnel when it gets clogged.
check SG, rack again & bulk age
- If your pear wine has thrown a lot of sediment in the container, you can carefully rack it into a clean and sanitized fresh jug after a few weeks. This is optional, for better clarity or an extended bulk aging (between 2-6 months).
- You may want to do a third racking a few days to a week before bottling (being careful to minimize splashing so that this delicate wine doesn't oxidize) to get your wine very clear.
- If you are doing a long aging before bottling, You may want to add a trace amount of sulphites to protect the wine from oxidation and infection. Rinse the jug or carboy with sulphite solution before racking, or add a quarter to a half of a crushed campden tablet.
- When your wine is perfectly clear and the SG has not dropped in at least two weeks, rack into your clean and sanitized bottling bucket or carboy. Make sure it’s fermented all the way before bottling so that you don't make bottle bombs or end up with leaking or popping corks.
- This, plus added clarity, is a good reason to let your wines bulk age in the carboy or in gallon jugs with airlocks before bottling them. You want to make sure the wine is sparkling clear and has dropped all the sediment so that you don't have sediment in the bottle to cloud your finished wine.
bottle your pear wine
- Bottle your finished pear wine in sanitized swing top bottles or wine bottles with corks. Swing top bottles are convenient and good for short term storage. Bottles with corks are better if you plan to age your wine for more than a few months, but you'll need a corker.
- Wash and scrub your wine bottles with a bottle brush or bottle washer, rinse well with hot water, and then sanitize with a no-rinse sanitizer.
- Rinsing the bottles with a sulphite solution is good for bottling wines as it will both sanitize the bottles and add a bit of protection to the wine against oxidation at bottling, but you can use any no-rinse sanitizer that is safe for brewing (I like Star-San).
- If you have a bottling bucket with a spigot, you can rack your finished wine into the bucket for bottling, use a racking cane with a bottling valve, or rack the wine off and sediment into a clean, sanitized carboy or glass jugs and then carefully pour it into your prepared bottles. Whichever method you use, try to minimize splashing and air contact to protect your wine from oxidation.
cellar & age your pear wine
- Bottles with natural corks need to sit upright for a day or two before being turned on their sides for storage to make sure they don’t leak. Corks need time to fully expand after being compressed in the corker, then the corks should be in contact with the wine so they don't dry out. If you used synthetic corks, you can store your bottles either upright or on their sides. Swing-top bottles should be stored upright.
- Label & cellar-age your pear wine for at least one month somewhere cool and dark. It is safe to drink immediately but like most wine, it tastes much better with a bit of time in the bottle. Sample some periodically and take notes to find what you prefer!
Notes
More winemaking and homebrewing recipes:

Working on this recipe now. I have lots of pears so using more pears than recipe suggested. Questionnaires by your sugar in recipe. It says 12 cups then in parentheses, (36 oz). What does this mean? 12 cups sugar does not equal 36 oz. Please explain.
Hi Karen! Thanks for catching that… I think I transposed a 3 for an 8 from my chicken-scratch brewing notes when I was typing up the recipe. The volume measurement is correct, and should be about 84 oz in weight (give or take an oz or two, with white sugar being 7 oz per cup by weight).