BAKE: Mint Chocolate Chip Biscotti
- Mint Chocolate Chip Biscotti Ingredients
- Kitchen Equipment Needed
- How to Make Mint Chocolate Chip Biscotti
- Storage & Gift Ideas
- Mint Chocolate Chip Biscotti
These mint chocolate chip biscotti are crispy cookies meant for dunking, with bittersweet chocolate chips and crunchy almonds. I like to have these as an afternoon snack, paired with a mug of steaming hot coffee, cocoa, or a peppermint mocha, though they’re also nice with a cup of peppermint tea.
They’re a perfect minty pick-me-up for an afternoon slump or a quick breakfast treat!
The secret to these crunchy, long-lasting (that is, if you don’t eat them all right away) cookies is in the baking. They’re twice baked, first as a flat oblong roughly shaped loaf, then cooled, thinly sliced, and baked again.
If you want to make them extra fancy, garnish these cooled mint chocolate chip biscotti cookies with a drizzle of melted dark or white chocolate or almond bark candy coating. You can also dip one end in the melted chocolate if you prefer that look.
Sprinkle the chocolate-drizzled biscotti with sliced almonds, crushed peppermint candy, or sprinkles while the chocolate garnish is still warm and melted to make these into adorable Pinterest-worthy treats for a holiday party or cookie tray.
They make great homemade gifts, especially since they have a decent shelf-life so your recipient has time to enjoy them, and are sturdy enough to be mailed if you package them well. Perfect for your Christmas cookie boxes or a holiday brunch!

Mint Chocolate Chip Biscotti Ingredients
Flour:
All-purpose white flour, preferably unbleached, or a blend of all-purpose and whole wheat flour for a heartier cookie with a less delicate flavor.
Sugar:
We use granulated white sugar in these cookies. You could substitute turbinado (Sugar in the Raw) sugar, but don’t use brown sugar, as the added moisture will keep your cookies from getting crisp.
Eggs:
Use large fresh whole eggs. Eggs provide the moisture and are the binder that holds this dough together. They’re also a good source of protein, which makes these cookies a healthy, balanced breakfast, right?
Nuts:
You can use whole or chopped fresh almonds. I like to use whole almonds for these mint chocolate chip biscotti, to add crunch and visual contrast. The almonds add flavor, protein, and healthy unsaturated fats!
You can substitute hazelnuts, walnuts, or other nuts, or leave them out if you’re baking for anyone who might have a nut allergy.
Chocolate Chips:
I like to use a bittersweet chocolate chip in these, but you could also make them with milk or white chocolate chips, or a mix of chocolate and mint-flavored chips.
Baking Powder:
Double acting baking powder makes bubbles when it gets wet, and rises again in the heat of the oven. I prefer to use aluminum-free baking powder in all my baking if I can get it.
Mint:
Most of the mint flavor in these biscotti comes from the mint extract, but I also like to add chopped fresh mint leaves to the cookies. If you don’t have fresh mint leaves, you can skip it, or add a tablespoon of crumbled dried mint.
Want even more minty goodness? Substitute mint-flavored chips for some of the chocolate chips, or decorate the finished cookies with melted chocolate or almond bark candy coating, and sprinkle them with crushed peppermint candies or candy canes (you can buy these pre-crushed, especially around the winter holidays, which saves a bit of work and mess).
Vanilla:
Use a good quality real vanilla extract for best results. I also like to add a hint of almond extract if I’m baking these cookies with whole almonds. Skip it if you’re using a different kind of nut in your biscotti.
Salt:
Baked goods without salt taste flat. There’s a small amount in this recipe, but it’s important. I use kosher salt, sea salt, or Himalayan pink salt.
Kitchen Equipment Needed
Mixing bowl and spoon:
Medium to large mixing bowl and a sturdy wooden spoon or spatula. You don’t need a mixer for this quick and simple dough. It’s easy to mix by hand and comes together quickly without a lot of fuss.
Baking sheet and liner:
I do most of my baking on plain, uncoated half sheet pans, lined with parchment or silicone nonstick baking sheets. You can use nonstick baking or cookie sheets if you prefer.
These crunchy cookies are baked twice, and I use the same pans for the second baking. If you use nonstick liners or parchment, you don’t even need to wash them between the first and second bake.
You form the dough into two roughly shaped rectangles by patting it out directly on the cookie sheets, then bake them. Then, let them cool on wire racks and next slice them into the familiar biscotti shape. You can re-bake them right away, or let them sit overnight if you need to split the baking project up into shorter chunks.
Serrated bread knife:
It’s easiest to slice the half-baked loaves into individual cookie slices with a long, thin, sharp serrated bread knife. Use long sawing strokes to slice the slabs of cookie dough without crumbling. If some of your cookies break, well, bake them anyway… they’ll still taste good!
Try to make the biscotti slices an even thickness. This will help them cook evenly during the second bake. You can make them thicker or thinner, but I aim for about a half inch in thickness.
Thicker slices will take longer to bake to crispness, and thinner ones will bake faster, so adjust baking time as needed. You may want to reduce the heat in your oven slightly if you made very thick slices… I wouldn’t go thicker than an inch.
How to Make Mint Chocolate Chip Biscotti

mix dry ingredients:
- Preheat your oven to 350℉ (180℃ or gas mark 4).
- In a medium-large mixing bowl, combine the flour, sugar, salt, almonds, chocolate chips, and chopped mint leaves.
- Using a fine mesh sieve or sifter to remove any lumps, add the baking powder to the bowl.
- Stir or whisk to combine all ingredients well.
mix wet ingredients:
- Break the eggs into a small bowl or large measuring cup.
- Add the vanilla and mint extract, and optional almond extract and green food coloring.
- If you are tinting your dough, make the egg mixture a much brighter green than you want the dough to be, as the flour and other ingredients will absorb and mute the vibrancy of the color.
- Using a fork or whisk, break the yolks and stir the egg mixture until the yolks and whites are well-combined.
mix dough:
- Pour the egg mixture into the bowl of dry ingredients.
- Using a wooden spoon, dough whisk, sturdy spatula, or clean hands, fold and stir the mixture until the wet and dry ingredients are combined.
- The dough will look very dry at first. This is normal. Keep mixing! The flour will absorb the egg and make a stiff but slightly sticky dough.
shape loaves:
- Place a nonstick silicone liner or a sheet of parchment on your baking sheet. (You can also use butter or baking spray to keep your cookie loaves from sticking during the first bake, or a nonstick pan).
- Divide the dough in half, and place each half on the sheet pan (I make two short logs, perpendicular to the long side of the pan, but you could also bake it in one long loaf. I find that two shorter loaves bake more evenly.
- Using your hands, shape each half into a flat oblong rectangle on the baking pan. Each “loaf” should be about 4-5″ wide and 10-12″ long, and from ½”-1″ thick.
- The shape of your loaf will determine the length and thickness of your biscotti, but they will rise and spread a bit when they bake. It’s okay if your loaves are a bit shaggy, and not completely smooth.
first bake:
- Bake the loaves for 15-20 minutes. They should be firm but not completely dry, and just starting to color.
- Remove from the oven, and as soon as they are cool enough to handle, let cool on a wire rack for 20-30 minutes. If you are making a double batch or multiple kinds of biscotti, you can bake the second batch while the first is cooling.

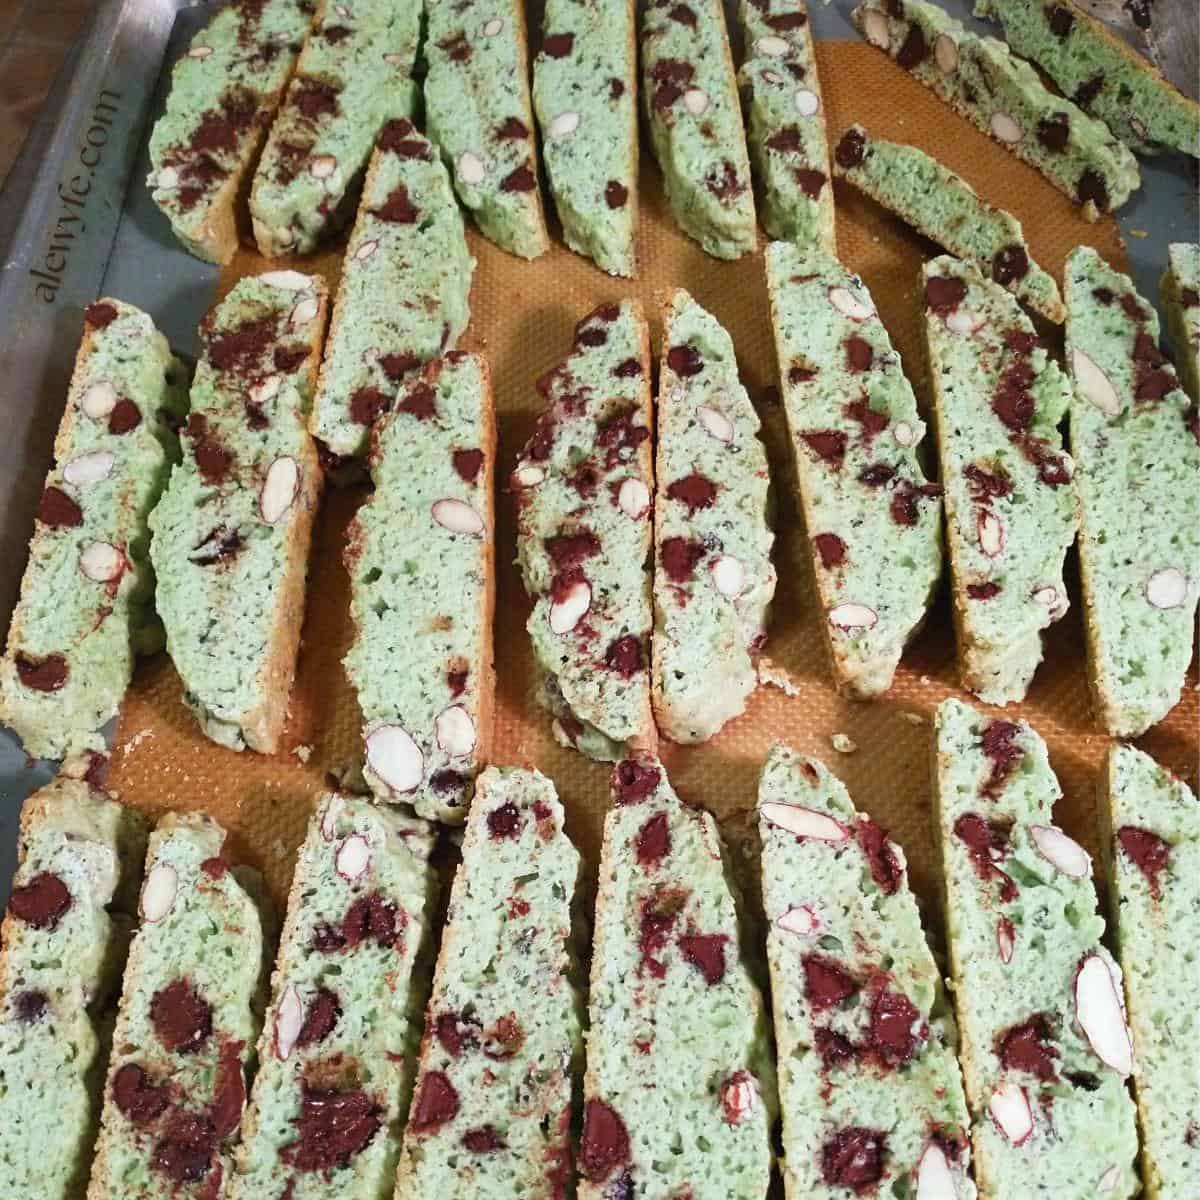
slice the biscotti:
- Slice the cookies across the short length into ½”-1″ thick biscotti.
- Thicker biscotti will take longer to bake but you can make them how you like them – just adjust the baking time as needed to dry them out completely.
second bake:
- Lay the slices flat on your cookie sheets and bake them again for another 10-15 minutes or until they are dry and crunchy.
- They will get crunchier as they cool, but make sure they’re completely dry.
- You may want to turn the cookies once during the bake, especially if you have made thicker biscotti, so that they dry evenly without burning.
- If they are not completely dry and crunchy once they cool after the second baking, you can bake them again. Removing all the moisture is key to the long shelf life of these cookies!
- If you made thicker slices, you may need to bake them longer to get them fully dry in the second bake. Lower the oven temperature if they begin to brown before drying out.
cool completely:
- You can turn off the oven before the cookies are completely dry, and leave them in with the door open or cracked to cool to make sure they get completely dry (just check to make sure they aren’t still baking or burning).
- I usually take them out of the oven, when they are dry and just beginning to color a bit, then cool them on wire racks.
- If you don’t have cooling racks, you can wait until the cookies are cool enough to handle, and lean them on the rim of the sheet pan so that air can circulate underneath.
garnish (optional):
- If you are decorating the cookies, wait until they are completely cool.
- Break off a one oz square of white almond bark, candy coating, or white chocolate, and melt it over a double boiler or carefully in the microwave.
- Check the chocolate or candy coating frequently- it goes quickly from solid to burnt if you aren’t careful!
- Stir, then use a spoon to quickly drizzle over the cookies, or use a parchment paper cone to pipe squiggles. Or, you can dunk one end of the cookies.
- While the chocolate or coating is still warm, sprinkle with sliced almonds, crushed peppermint candies, or sprinkles, if you like.
Storage & Gift Ideas
Store your mint chip biscotti in an airtight container once they are fully cooled, and any garnish/coating has completely set up. You want to make sure that any remaining moisture has time to evaporate, so that they don’t mold or get stale from condensation once you seal the container.
If properly stored, these last for a month or more. I like to put them in wide-mouth mason jars or metal tins, but you can also use zip-seal bags or plastic containers. You can freeze these, but they keep very well in the pantry as long as they’re in a sealed container.
If you are giving these as gifts, it’s nice to tie the container off with a colorful ribbon or twine, and tuck into a gift basket or bag with a jar of hot cocoa mix, gourmet coffee, or some fancy peppermint tea.

Mint Chocolate Chip Biscotti
Equipment
- parchment paper or silicone baking mats
- serrated bread knife
Ingredients
dry ingredients:
- 2 cups all purpose flour
- ¾ cup granulated sugar
- 2 tsp baking powder
- ½ tsp salt
- ½ cup bittersweet chocolate chips
- ½ cup almonds
- ¼ cup chopped fresh mint leaves loosely packed
wet ingredients:
- 3 large eggs
- 2 tsp vanilla extract
- 1 tsp mint extract
- ¼ tsp almond extract
- 4-6 drops green food coloring (optional)
Instructions
Mix the Biscotti Dough
- Preheat your oven to 350℉ (180℃ or gas mark 4).
- Line a half-sheet pan or large cookie sheet with parchment or a silicone baking mat. You can use butter or baking spray if you don't have those to keep your cookies from sticking during the first bake.
- In a medium-large mixing bowl, combine the flour, sugar, salt, almonds, chocolate chips, and chopped mint leaves.
- Using a fine mesh sieve or sifter to remove any lumps, add the baking powder to the bowl. Stir or whisk to combine all ingredients well.
- Break the eggs into a small bowl or large glass measuring cup, and stir them with a fork or whisk along with the mint, vanilla (and almond extract, if you're using it) and beat until the whites and yolks are combined.
- If you are tinting your dough, make the egg mixture a much brighter green than you want the dough to be, as the flour and other ingredients will absorb and mute the vibrancy of the color.
- Add the flavored & tinted egg mixture to the dry ingredients and mix well.
- Continue to fold and mix this together with a sturdy silicone spatula, a bowl scraper, or your hands, until it makes a stiff but sticky dough. It will be crumbly at first, then feel too wet. This is normal!
Shape and Bake the Cookies
- Divide the dough in half, and shape each half into a flat oblong rectangle on the baking pan. Each should be about 4-5" wide and 10-12" long, and from ½"-1" thick… the shape of your loaf will determine the length and thickness of your biscotti, but they will rise and spread a bit when they bake.
- Bake the loaves for 15-20 minutes. They should be firm but not completely dry, and just starting to color.
- Remove from the oven, and as soon as they are cool enough to handle, let cool on a wire rack for 20-30 minutes. If you are making a double batch or multiple kinds of biscotti, you can bake the second batch while the first is cooling.
- Slice the cookie loaves across the short length into ½"-1" thick biscotti (about a dozen slices per loaf).
- Thicker biscotti will take longer to bake but you can make them how you like them- just adjust the baking time as needed to dry them out completely. You may want to reduce the oven temperature slightly as well.
- Lay the slices flat on your cookie sheets and bake them again for another 10-15 minutes or until they are dry and crunchy. They will get crunchier as they cool, but make sure they're completely dry. You can leave them in the oven with the door cracked to cool to make sure (just check to make sure they aren't still baking).
- Store in an airtight container once they are fully cooled. If properly stored and baked until completely dry, these last for a month or more.
Notes
Nutrition
Liked this? Try these related recipes!

- Cinnamon Chocolate Chip Walnut Biscotti
- Spiced Cranberry Nut Biscotti
- London Fog Biscotti with Almond, Lavender, and Earl Grey
- Spekulatius (or Spekulaas) Shaped Spice Cookie
- Peanut Butter Oatmeal Trail Mix Cookies
- Nana’s Orange Creamsicle Dream Cookies
- How to Make Old-Fashioned Pinwheel Cookies
- Matcha Rice Krispies Treats with White Chocolate Chips & Brown Butter
- How to Make Iced Matcha Latte Concentrate
- Yennefer’s Lilac Witcher Wine
- How to Make Homemade Creme de Violettes Liqueur
- How to Make Elderflower Liqueur (Homemade St-Germain)