
CANNING: Taqueria-Style Pickled Jalapenos & Carrots (Jalapenos y Zanhorias Encurtidas)
- Taqueria-Style Pickled Jalapeno Ingredients
- Kitchen Equipment Needed
- How to Can Pickled Jalapenos and Carrots
- Pantry Storage Tips
- Taqueria-Style Pickled Jalapenos & Carrots (Jalapenos y Zanhorias Encurtido)
You can make homemade pickled jalapeno peppers and carrots just like the ones at your neighborhood taqueria. Or, if your local place doesn’t have jars of these spicy pickles hanging out on the tables or served up on their taco platters, it might be time to scope out a new hot spot… your kitchen (though, at the time of writing especially, you should definitely still be supporting your neighborhood taqueria if you’re lucky enough to have one)!
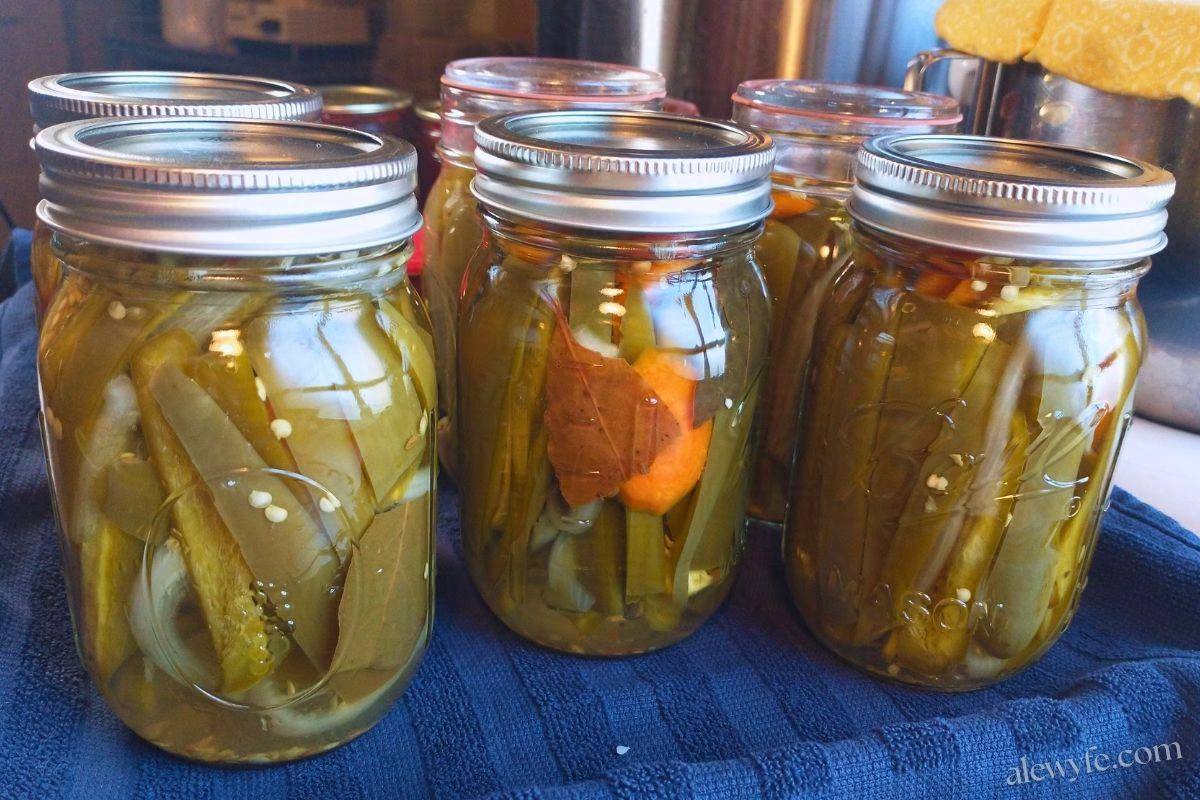
These jars of pickled peppers, carrots, and onion strips are perfect to top your favorite tacos, nachos, burgers, or spicy deli sandwiches. These pickles have a bold, bright flavor and a hearty heat that will perk up your favorite dishes.
This is adapted from a Ball recipe for home-style pickled jalapenos, with only safe modifications made. The original recipe is good, but quite plain, and I’ve added some more flavor to the pickling brine which I think takes these from kinda basic to bold, bright, and uh… another word that starts with b?
Alright… Let’s go pickle some pints of pickled peppers!
Taqueria-Style Pickled Jalapeno Ingredients
Jalapeno peppers:
Use fresh, firm, ripe green jalapeno peppers. You can also mix in some fully-ripe red jalapenos for color, or serrano peppers if you like it hot hot hot!
Onion:
The original recipe calls for white onion, which is what I recommend, but you can safely substitute yellow, red, or even sweet onions.
Carrots:
Orange carrots are traditional in this mixed vegetable pickle, but you could use yellow or rainbow carrots here instead if you want a more colorful pickle mix.
Vinegar:
This recipe uses plain white distilled vinegar. Make sure the vinegar is 5% acidity. You can safely substitute other vinegar (apple cider or white wine vinegar can be nice here) but make sure they have the same acidity level.
Water:
This dilutes the pickling brine so that it isn’t as overpowering. Make sure you measure accurately and don’t dilute the brine before canning!
You can add more vinegar to the brine if you like (I have very slightly increased the quantity) but do not use more than half water to vinegar (50:50) to make a safe pickle.
Seasonings:
The flavorings in the Ball recipe are pretty simple and straightforward… Pickling salt (substitute 2x kosher salt by volume) and white sugar flavor the brine, along with a freshly crushed garlic clove added to each jar of pickled peppers before processing (say that five times fast!).
If you’d like to add depth and make these pickles even better (and I do) you can add a teaspoon or two of toasted coriander or cumin seeds or some ground cumin, marjoram, or oregano to your brine. Use Mexican oregano if you can get it. You can also add a dried bay leaf to each jar to add flavor.
Pickle crisp:
If you want your pickled peppers and vegetables to keep more of their crunch even after processing, you can add a bit of Pickle Crisp (calcium chloride) to each jar.
You can use the Ball branded Pickle Crisp, which is often available at stores that sell canning supplies and occasionally grocery stores, or buy bulk calcium chloride online. A little goes a long way (1/8 tsp per pint jar, or .5 mL), and it keeps indefinitely on the shelf as long as it’s in a well-sealed container.
Kitchen Equipment Needed
chef’s knife & cutting board:
You’ll want a good, sharp chef’s knife or utility knife to seed and slice your peppers and onions into strips and your carrots into diagonal slices, as well as a vegetable peeler for the carrots.
This is easier if you have a large, sturdy chopping board (I prefer wood or bamboo). If your cutting board slides around on your counter, put a clean kitchen towel underneath it. Dampen the towel slightly if it still slides and it will stay in place. This makes cutting and prep work a lot easier and safer!
You may also want a large mixing bowl or other large, clean container to toss and mix the sliced peppers, carrots, and onion strips before packing them into jars, though if your cutting board is big enough you can just make piles and mix them as you fill the jars (getting about the same amount of peppers, carrots, and onion into each jar).
medium sauce pan or small stockpot:
You’ll need a 2-4 quart or larger to simmer your pickling brine mixture before canning. Make sure the pot is non-reactive stainless steel or enameled, since the brine is acidic. Don’t use an uncoated aluminum or cast-iron pot.
water bath canner or large stockpot:
You’ll need one large or two smaller stockpots or water-bath canning pots that can hold 6 pint jars, or you’ll need to process this in batches. You can also can part of this batch, and put a jar or two in the fridge to use first as fresh refrigerator pickles.
canning jars and lids:
You’ll need 6 pint mason jars and new canning lids with bands, or an equivalent combination of smaller jars.
Do not water-bath can your pickled peppers in jars larger than pints. There is no tested processing time listed for quart jars for these pickles.
Canning funnel, ladle, jar tongs, and rack:
These tools are optional but make the job of filling your jars, and getting them into and out of the hot water bath a lot easier and safer!
You can read more about these and our recommendations in our guide to canning equipment if you don’t already have these or are new to canning.
How to Can Pickled Jalapenos and Carrots
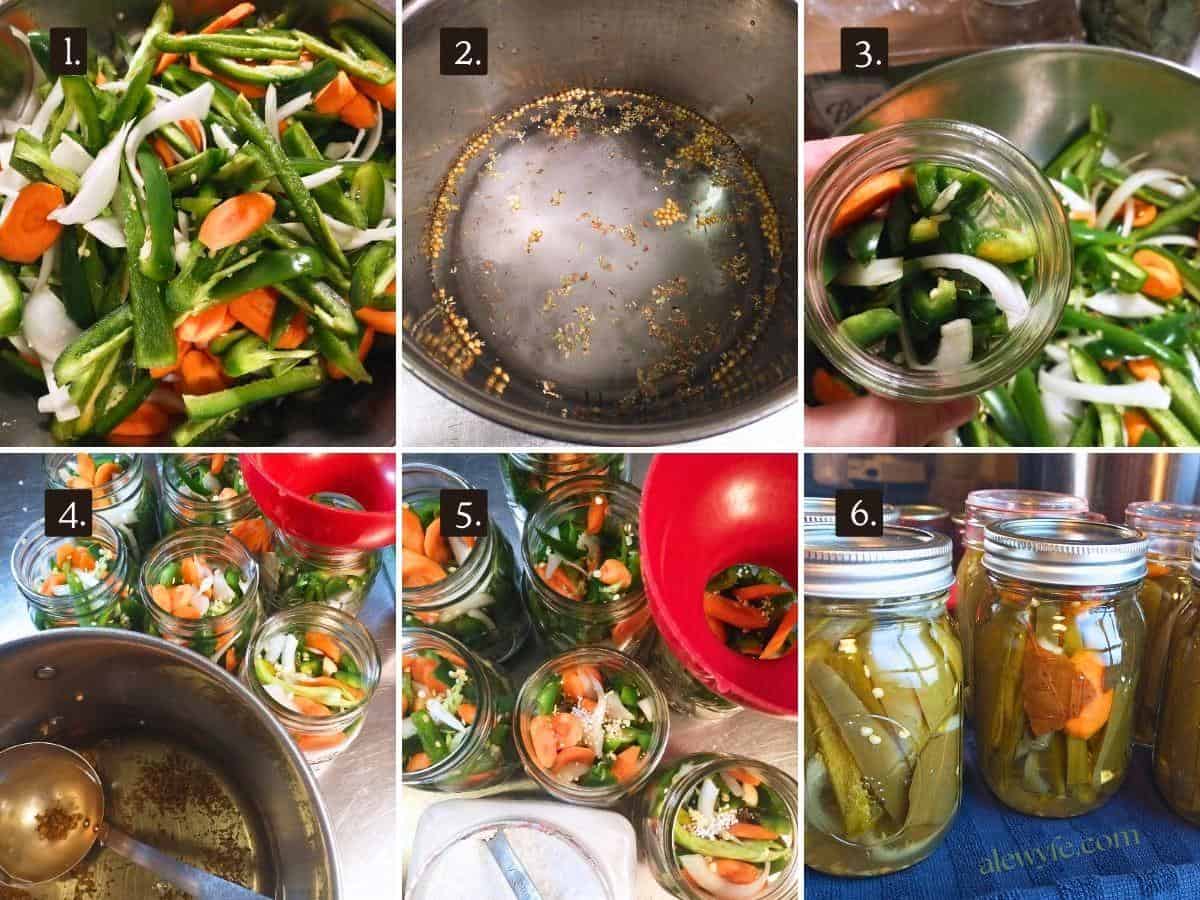
prep ingredients:
- Wash & cut jalapenos into strips, removing the seeds. I do a straight, shallow cut down along the stem, then rotate the pepper to cut the stem and seeds away leaving a relatively flat spiral cut pepper. You can also cut the peppers into halves or quarters, remove the seeds & stems, and then cut into strips
- Wash and peel the carrots, and cut them into 1/4″ thick rounds. I like to cut the rounds diagonally on a bias.
- Cut the onion in half, peel them, and cut into thin strips.
- Toss the peppers, carrots, and onions together in a large mixing bowl.
make brine:
- In a non-reactive (stainless, glass, or enamel) pot, heat the vinegar, water, salt, sugar, and the optional cumin, coriander, or oregano.
- Bring the pickling brine up to a boil while you prep and fill your jars.
prep jars and canner:
- Fill your water bath canner with water to a height that will cover your jars by several inches with room to boil vigorously.
- Wash your jars and lids with hot soapy water, rinse, and place the jars (but not the lids) in the canner as you bring the water up to a low simmer or at least 180℉.
- Protect your work surface- I like to use a baking sheet pan lined with an old kitchen towel, but you can also use a sturdy wire cooling rack or silicone mat. This helps protect the glass from temperature shocks and also makes for easier clean-up if you spill while filling the jars.
- Remove your canning jars from the canner (carefully, with tongs or jar lifters, tilting them out of the hot water) just before filling and place them on the towel or rack.
fill jars:
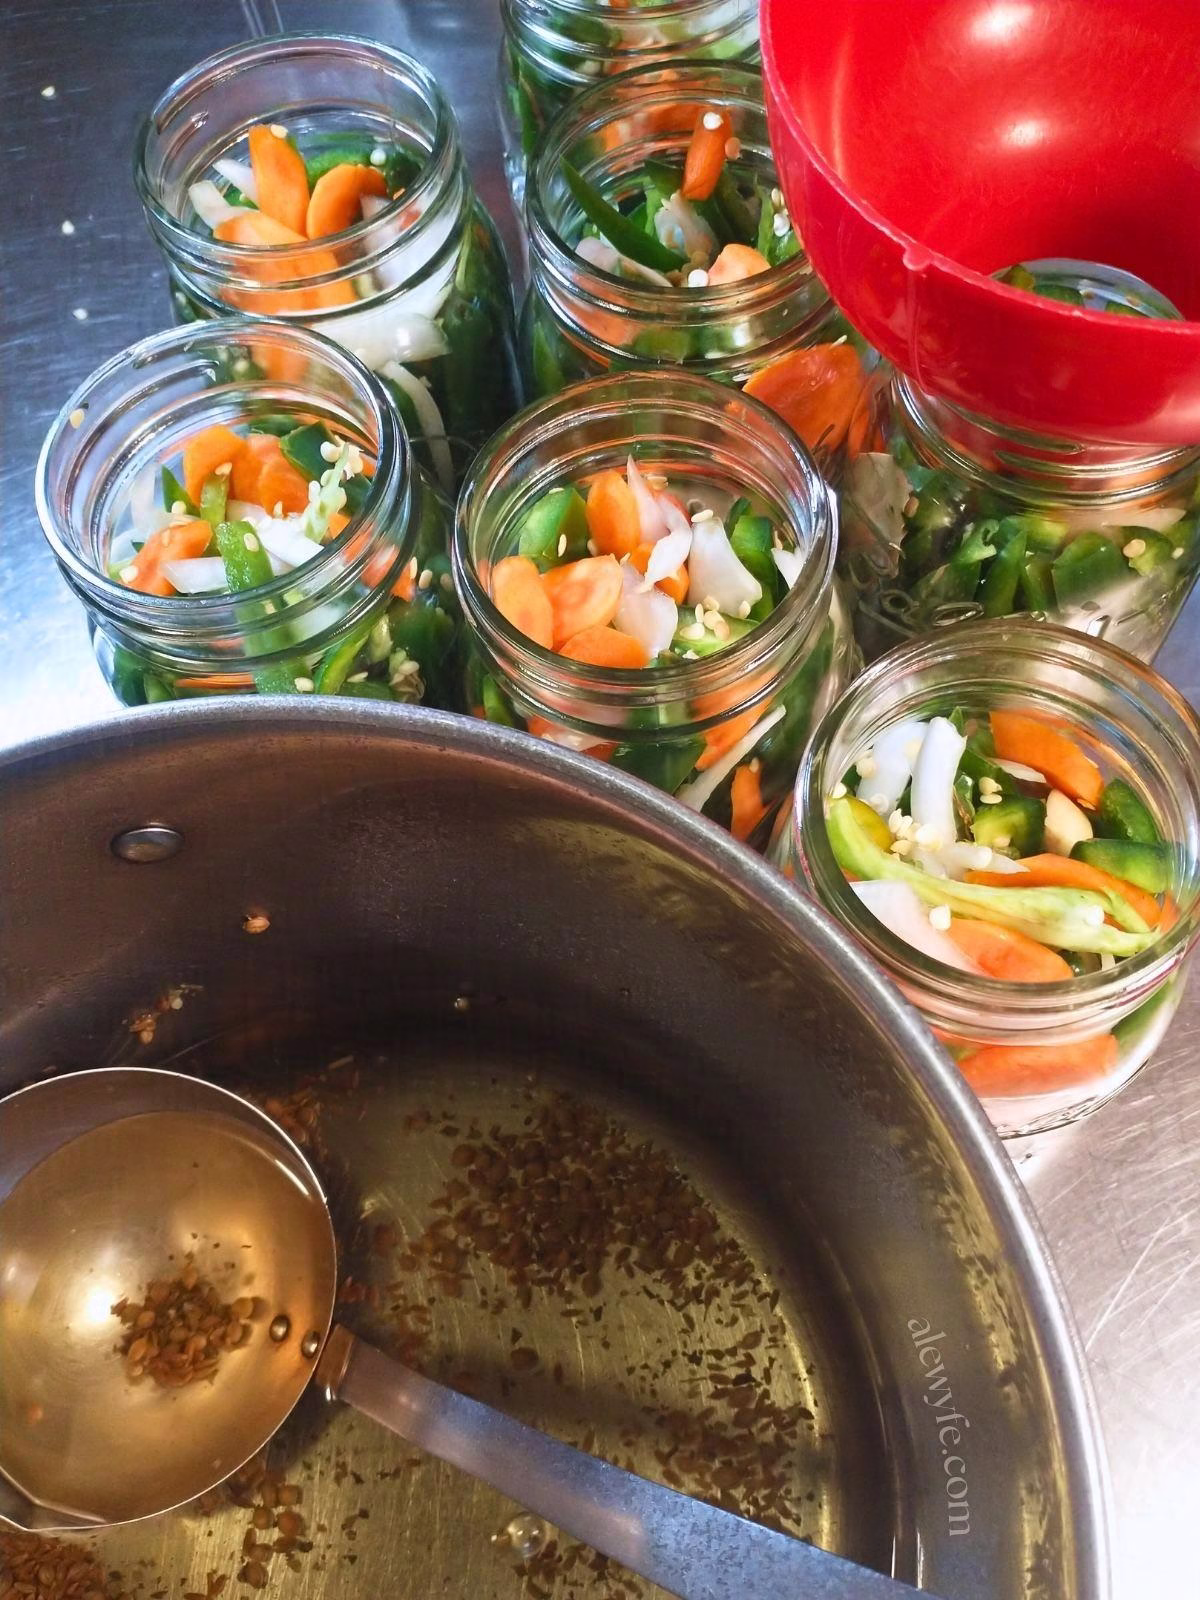
- Place one garlic clove in each jar, and a bay leaf (optional but nice).
- Pack the mixed jalapenos, carrots, and onions into the jars, leaving a 1/2″ headspace at the top.
- Ladle the hot pickling brine into the jars over the vegetables. If you added seasonings, try to evenly distribute them throughout the jars.
- If you are using Pickle Crisp (calcium chloride), add 1/8 tsp directly to each pint jar.
water-bath process pickles:
- Using jar tongs or a jar rack, carefully place the filled jars into the hot water bath.
- Make sure the jars are covered by at least one and preferably two inches of boiling water. Top up the pot with hot water from a kettle if necessary.
- Cover the pot, checking until the pot of water has returned to a rolling boil.
- Start a timer for 10 minutes once the water bath is at a full roiling boil, and cover the pot.
- After the 10 minutes are up, turn off the heat, and set another timer for 5 minutes, leaving the pot covered.
- Remove the jars from the canner, and set on a folded towel or wire rack to cool. Use your jar tongs again or the jar-lifter rack. Even if I’m using a jar-lifter rack with handles, I prefer removing the jars individually with jar tongs so they don’t clang together, break, or drip as much.
Pantry Storage Tips
- After jars have cooled completely (8-24 hours) remove the bands and check for seals. Make sure that the button on the lid is depressed and the jars have a good strong vacuum seal.
- Refrigerate any jars of pickles that did not seal and use them first. Or, you can reheat and reprocess them in a boiling water bath with new lids within 24 hours.
- Gently wash jars or wipe with a damp cloth to remove any sugary residue or hard water deposits from the canning bath.
- Clearly label your jars with the name and date of your product, and store them in a cool, dark pantry.
- For best quality, enjoy home-canned goods like these pickles within 12-18 months.
- The pickled jalapenos will still be safe to consume after that as long as it was properly processed and stored, and the jars are still sealed.
- However, older pickled peppers and vegetables may discolor and darken, and the flavor and nutritional value will decline over time, so it’s best to make just what you will use in a year or two at a time.
- Be generous and share the love with your friends… your homemade pickled jalapeno strips make a great gift for any friend who loves spicy food. Or, organize a pickle swap if you have other friends who can!

Taqueria-Style Pickled Jalapenos & Carrots (Jalapenos y Zanhorias Encurtido)
Equipment
- glass canning jars, rings, and new lids
- canning jar funnel
- jar lifters or tongs or jar rack with handles
Ingredients
- 3½ lbs jalapeno peppers seeded and quartered into strips
- 1 cup white onion peeled & thinly sliced, substitute: yellow, red, or sweet onion
- 2 large carrots washed, peeled, and thinly sliced
- 2¾ cups distilled white vinegar (5%)
- 2½ cups water
- 2 tbsp pickling salt
- 1 tbsp sugar
- 1 tsp coriander seeds optional
- ½ tsp cumin seeds optional
- ½ tsp dried Mexican oregano optional, substitute: regular dried oregano
- 6 cloves garlic peeled & crushed, one clove per jar
- 6 medium bay leaves optional, one per jar
- ⅛ tsp Pickle Crisp (calcium carbonate) optional, ⅛ tsp per jar
Instructions
prep ingredients:
- Wash & cut jalapenos into strips, removing the seeds. I do a straight, shallow cut down along the stem, then rotate the pepper to cut the stem and seeds away leaving a relatively flat spiral cut pepper. You can also cut the peppers into halves or quarters, remove the seeds & stems, and then cut into strips
- Wash and peel the carrots, and cut them into 1/4″ thick rounds. I like to cut the rounds diagonally on a bias.
- Cut the onion in half, peel them, and cut into thin strips.
- Toss the peppers, carrots, and onions together in a large mixing bowl.
make pickling brine:
- In a non-reactive (stainless, glass, or enamel) pot, heat the vinegar, water, salt, sugar, and the optional cumin, coriander, or oregano.
- Bring the pickling brine up to a boil while you prep and fill your jars.
prep jars and canner:
- Fill your water bath canner with water to a height that will cover your jars by several inches with room to boil vigorously.
- Wash your jars and lids with hot soapy water, rinse, and place the jars (but not the lids) in the canner as you bring the water up to a low simmer or at least 180℉.
- Protect your work surface- I like to use a baking sheet pan lined with an old kitchen towel, but you can also use a sturdy wire cooling rack or silicone mat. This helps protect the glass from temperature shocks and also makes for easier clean-up!
- Remove your canning jars from the canner (carefully, with tongs or jar lifters, tilting them out of the hot water) just before filling and place them on the towel or rack.
fill jars:
- Place one garlic clove in each jar, and a bay leaf (optional but nice).
- Pack the mixed jalapenos, carrots, and onions into the jars, leaving a 1/2″ headspace at the top.
- Ladle the hot pickling brine into the jars over the vegetables. If you added seasonings, try to evenly distribute them throughout the jars.
- If you are using Pickle Crisp (calcium chloride), add 1/8 tsp directly to each jar.
water-bath process pickles:
- Using jar tongs or a jar rack, carefully place the filled jars into the hot water bath.
- Make sure the jars are covered by at least one and preferably two inches of boiling water. Top up the pot with hot water from a kettle if necessary.
- Cover the pot, checking until the pot of water has returned to a rolling boil.
- Start a timer for 10 minutes once the water bath is at a full roiling boil, and cover the pot. Adjust the processing time if you're at a higher altitude (see notes).
- After the 10 minutes are up, turn off the heat, and set another timer for 5 minutes, leaving the pot covered.
- Remove the jars from the canner, and set on a folded towel or wire rack to cool. Use your jar tongs again or the jar-lifter rack. Even if I’m using a jar-lifter rack with handles, I prefer removing the jars individually with jar tongs so they don’t clang together, break, or drip as much.
- After jars have cooled completely (8-24 hours) remove the bands and check for seals. Make sure that the button on the lid is depressed and the jars have a good strong vacuum seal.
- Refrigerate any jars of pickles that did not seal and use them first. Or, you can reheat and reprocess them in a boiling water bath with new lids within 24 hours.
- Sealed and properly processed pickled peppers are best used within 12-18 months. Discard any jars that lose their seals during storage or show other signs of spoilage.
Notes
- 0-1,000 ft – use recipe time
- 1,001-3,000 ft – increase 5 minutes
- 3,001-6,000 ft – increase 10 minutes
- 6,001-8,000 ft – increase 15 minutes
- 8,001-10,000 ft – increase 20 minutes
Loved this? Try these related recipes!
- Festive Cranberry Jalapeno Salsa
- Roasted Tomato Salsa Ranchera
- Spiced Pear Chutney
- Whiskey Peach Brown Sugar Compote
- Spicy Peach BBQ Sauce Canning Recipe
- Horseradish Beet Relish
- Bread & Butter Pickles
- Fun Guys – How to Can Marinated Mushrooms
- Spicy Jalapeno Pickled Eggs (easy refrigerator pickle recipe)