BAKE: Homemade Pumpkin Crumpets
- Pumpkin Crumpet Ingredients
- Kitchen Equipment Needed
- How to Make Pumpkin Crumpets
- Storage & Serving Ideas
- Pumpkin Crumpets
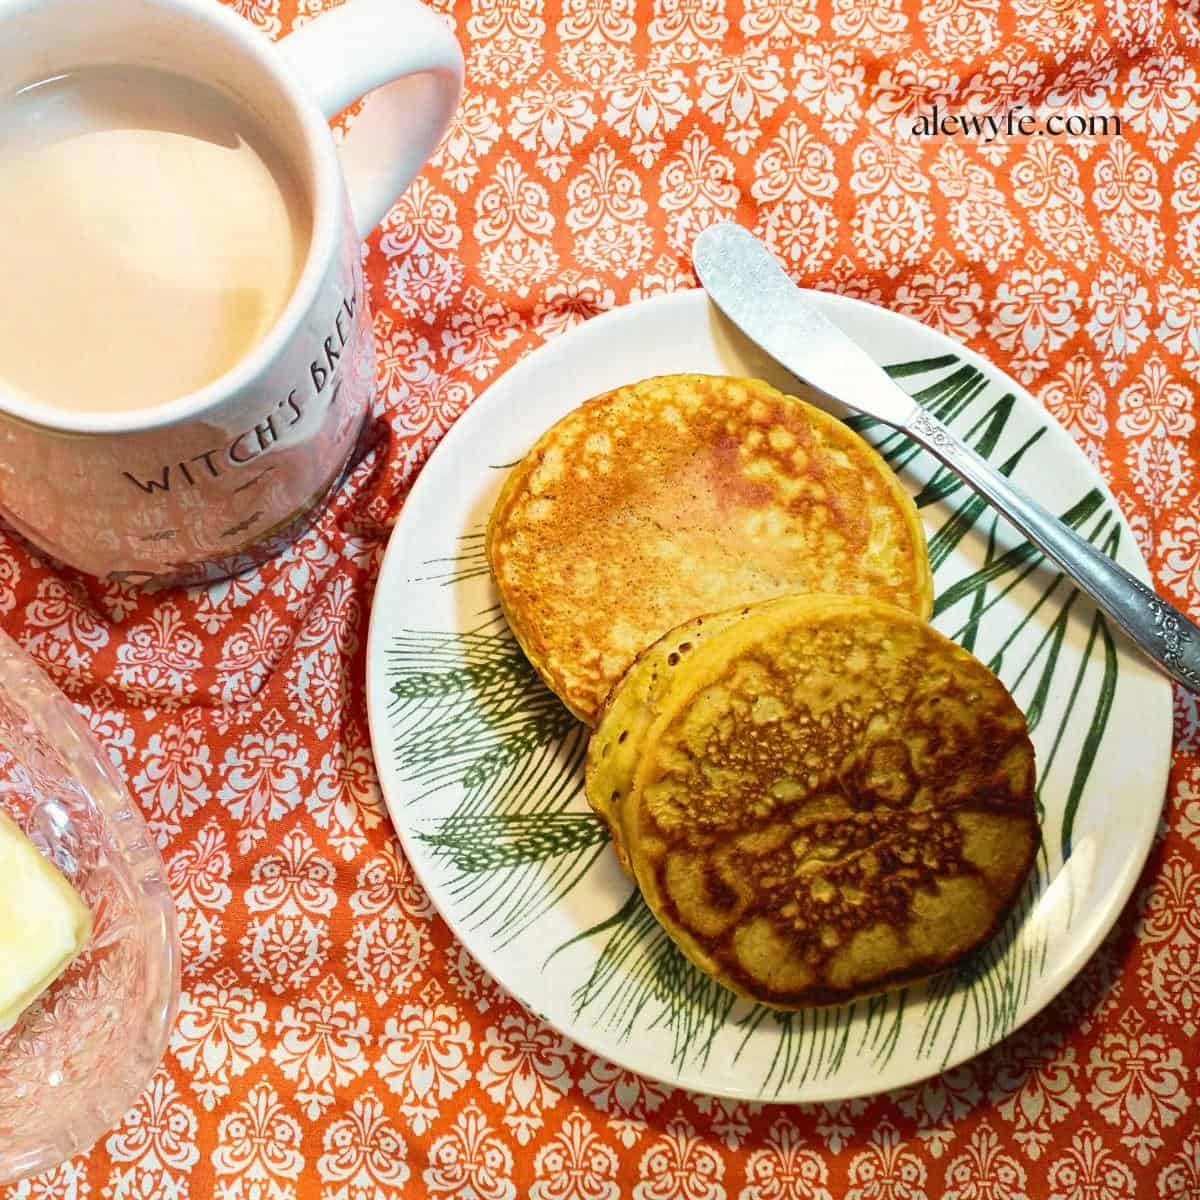
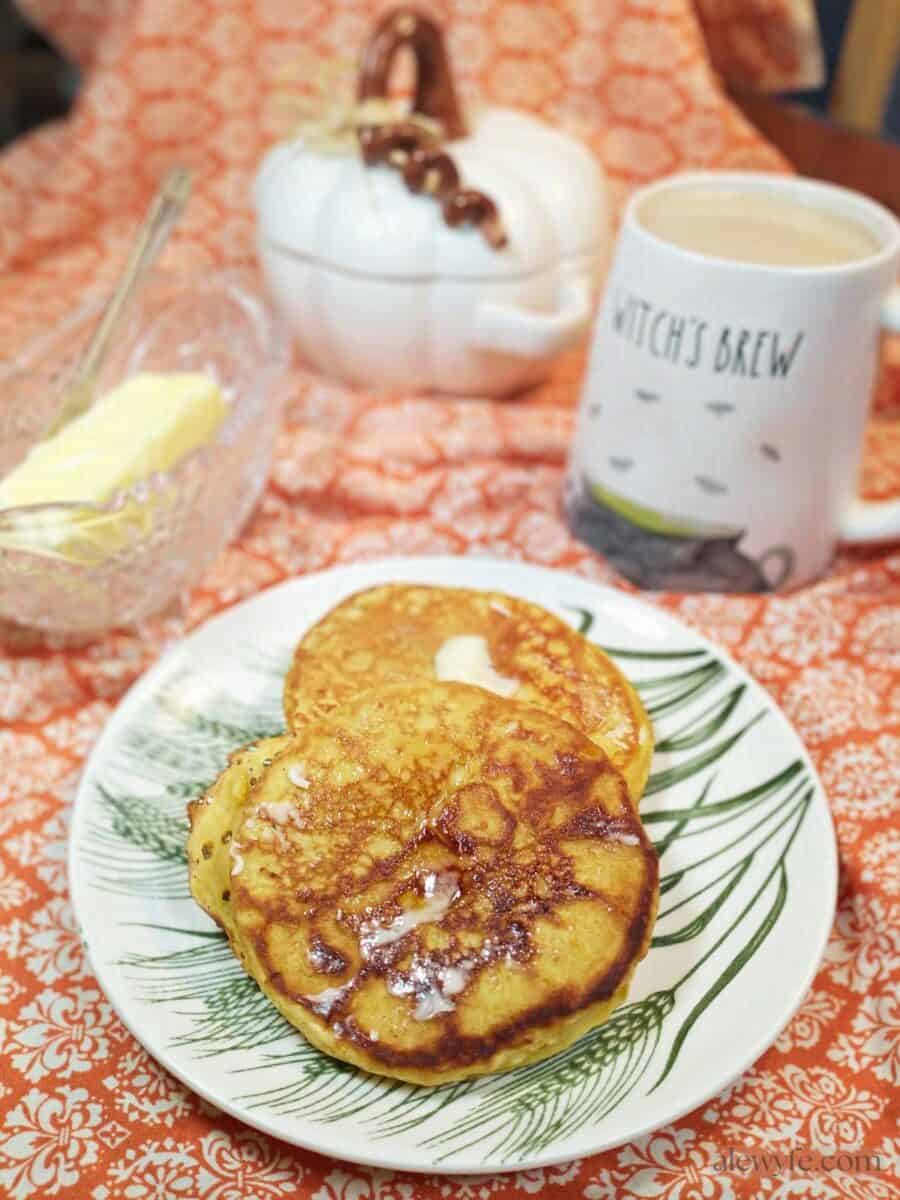
These warm and golden-hued pumpkin crumpets are a delicious treat for breakfast, second breakfast, or tea. A crumpet is a griddled flatbread that has a texture somewhere between English muffins and sourdough pancakes. These have just a hint of pumpkin flavor for a tasty autumn teatime snack and a nutritional boost over plain crumpets.
The crumpet batter takes just a few minutes to mix by hand, and uses a combination of yeast and baking powder to make them light and fluffy with little pockets to collect the melted butter and other toppings.
You can make the batter in advance and let it rise overnight in the fridge, or give it a quick rise at room temperature for an hour or so before cooking them off for an afternoon tea. The overnight rise gives a more complex flavor but either way, they’re so good!
You can keep them plain for them most versatility, or add sweet or savory spices to the batter if you like! I like them with sweet pumpkin spice mix added for a breakfast treat, or with a bit of ground cumin, coriander, or curry powder for a hearty savory snack to pair with cheese and cured meats.
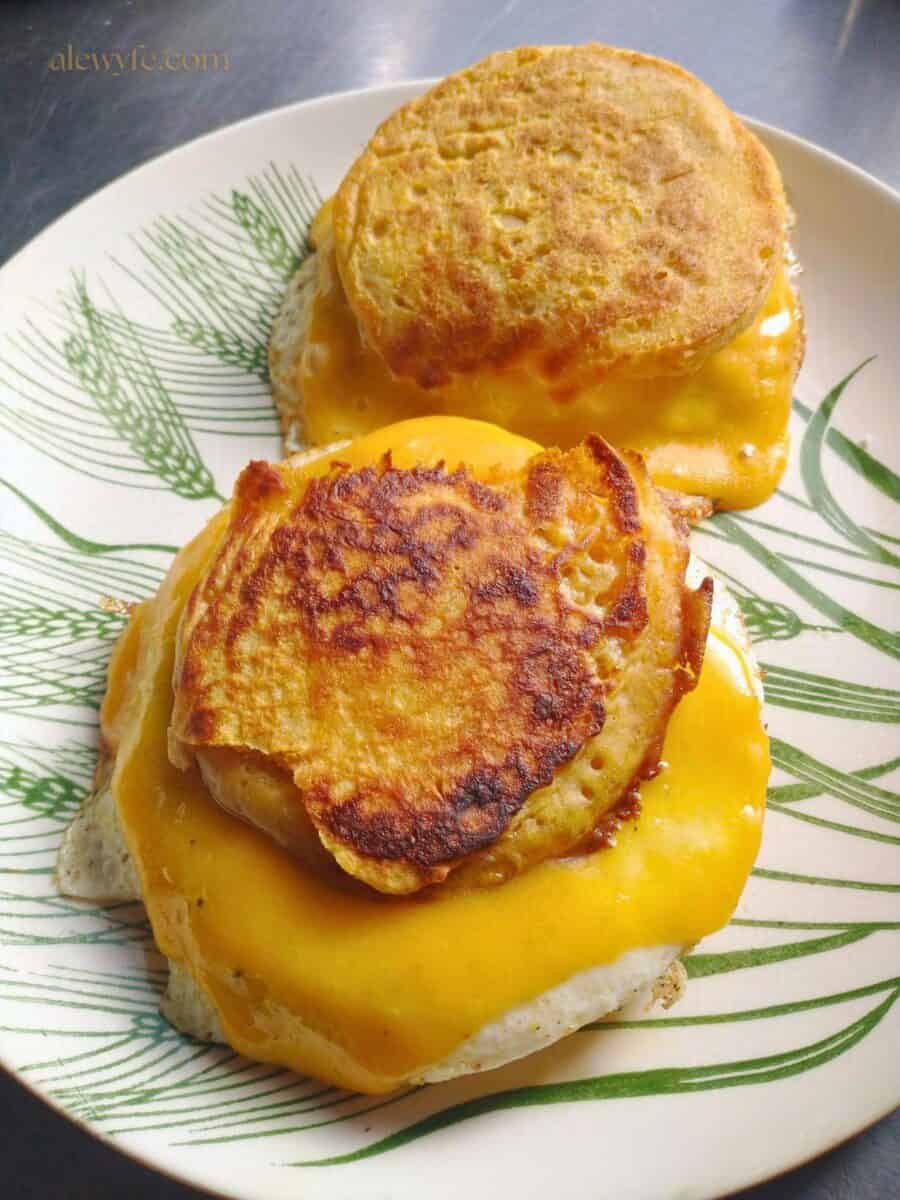
Serve them piping hot off the griddle, or toasted or re-warmed in a hot pan. They’re perfection simply slathered with a dab of melting butter. Spread them with sweet cream butter, jam, or apple butter, or top them with melted cheese and a fried egg for a savory breakfast sandwich or open-faced snack.
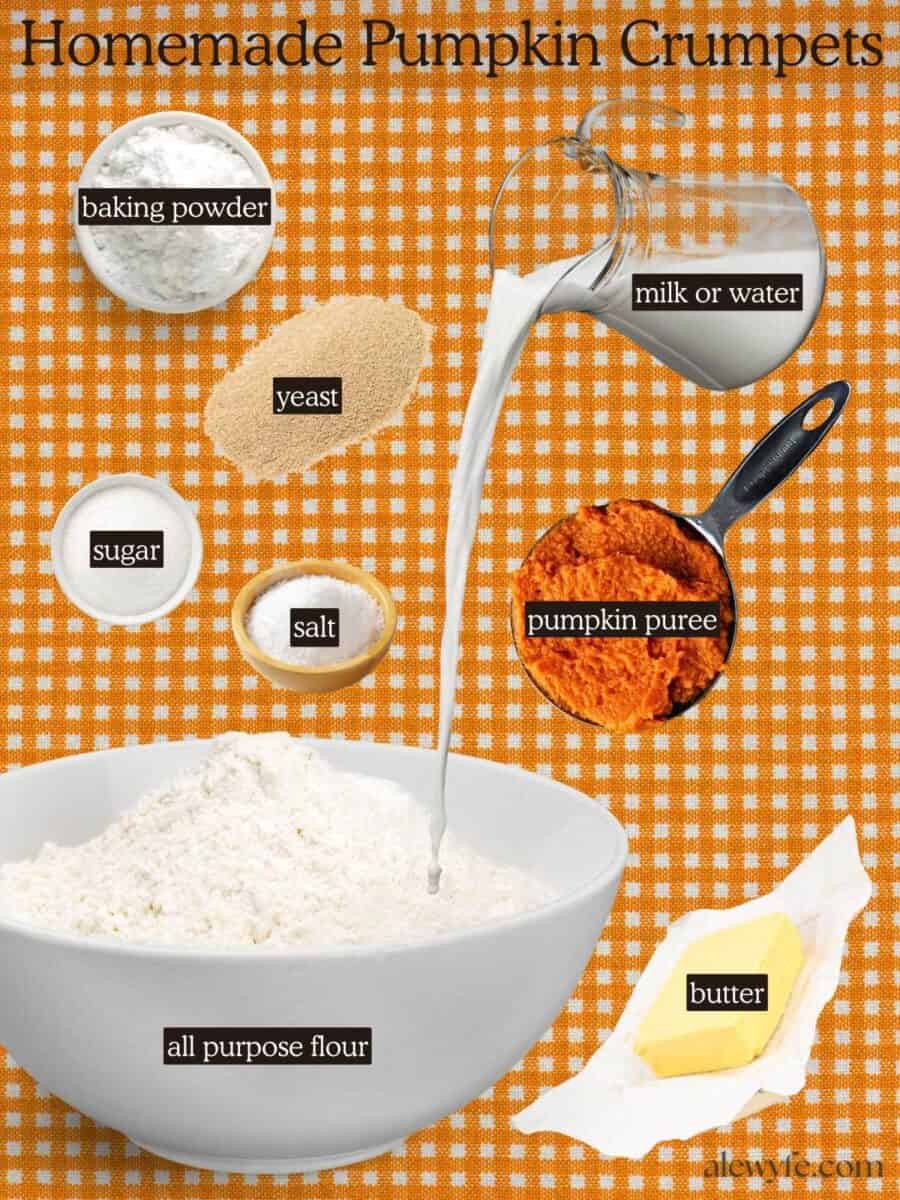
Pumpkin Crumpet Ingredients
Flour:
You can use all purpose white flour, or bread flour for a more substantial crumpet batter. You can also substitute whole wheat flour for half of the total flour for a denser but more nutritious whole grain pumpkin crumpet.
The recipe was tested with all purpose white flour, which has lower protein content than bread flour, yielding soft, tender crumpets. Substituting bread flour will make your crumpets less soft, but may support a larger, more open crumb structure. Experiment with different proportions and flour types and see what you prefer!
Pumpkin:
The pumpkin puree adds a lightly sweet roasted squash flavor and a bright orange color to these crumpets. I use canned pumpkin puree, but you can also use freshly roasted and pureed pumpkin or winter squash.
Pumpkin is nutritious, a good source of fiber, and adds antioxidants and vitamins to your crumpets. It’s a good way to sneak in some vegetables if you have kids or other picky eaters. We’re not going to say these are “health food” but they’re a bit more nutritious than plain crumpets, and hey, every bit counts when you’re trying to eat more fruits and vegetables!
Milk or water:
Milk adds flavor and makes a denser, more tender crumpet. You can use water or plant-based milk for a lighter or vegan crumpet. Or, use half milk and half water for a balanced mix between lightness and richness.
Yeast:
Use two teaspoons of active dry yeast. You can substitute instant dry yeast. This is just shy of a whole packet of yeast if you buy the individual packets.
I recommend buying your yeast by the jar or bulk brick package if you bake fairly often… it’s far more cost-effective than purchasing individual packets. I buy the bulk packages, keeping a small jar in the fridge for easy access, and store the rest in an airtight container in the freezer.
Baking Powder:
The baking powder plus yeast work together to make these pumpkin crumpets light and full of bubbly nooks and crannies. Use a double-acting or triple-acting baking powder, especially if you are doing the overnight rise.
Seasonings:
The basic pumpkin crumpet batter has a hint of white or brown sugar and salt. The sugar helps feed the yeast and keeps the crumpets moist, and the salt adds flavor.
If you like, you can add up to a teaspoon or so of pumpkin spice blend or cinnamon if you are serving your crumpets with sweet spreads. For savory crumpets, a similar amount of ground cumin, coriander, curry powder, or turmeric is nice.
Butter or oil:
There’s no fat added to the crumpet batter, but they’re cooked on a griddle in plenty of good butter, which makes them bake up tender and golden brown.
I like to use plenty of butter, which is traditional, but you can use coconut oil or other vegetable oil for a vegan or dairy-free version.
Kitchen Equipment Needed
Mixing bowl:
You can use a medium mixing bowl for the crumpet batter and wrap or cover it while the batter rests. If I’m doing an overnight cold rise, I like to mix the batter in a plastic container with a tightly fitting lid, like these round Cambro containers.
Griddle or large skillet:
I use a well-seasoned cast iron griddle to cook these crumpets, but if you don’t have a griddle, you can use one large or several smaller skillets.
Crumpet rings or stainless ring-cutters:
The crumpet batter is thin, and to get tall fluffy crumpets, you’ll need crumpet rings or metal molds. I use these 4″ stainless crumpet rings (you can also get smaller ones, if you want a more traditionally sized 3″ crumpet).
The crumpet rings are not a uni-tasker though… there are lots of kitchen uses for these metal rings! They’re also great for making perfectly round fried eggs, hamburger buns, sandwich rolls, or English muffins. You can also use them as tartlet rings for making sweet or savory individual tarts or meat pies.
How to Make Pumpkin Crumpets
prep ingredients:
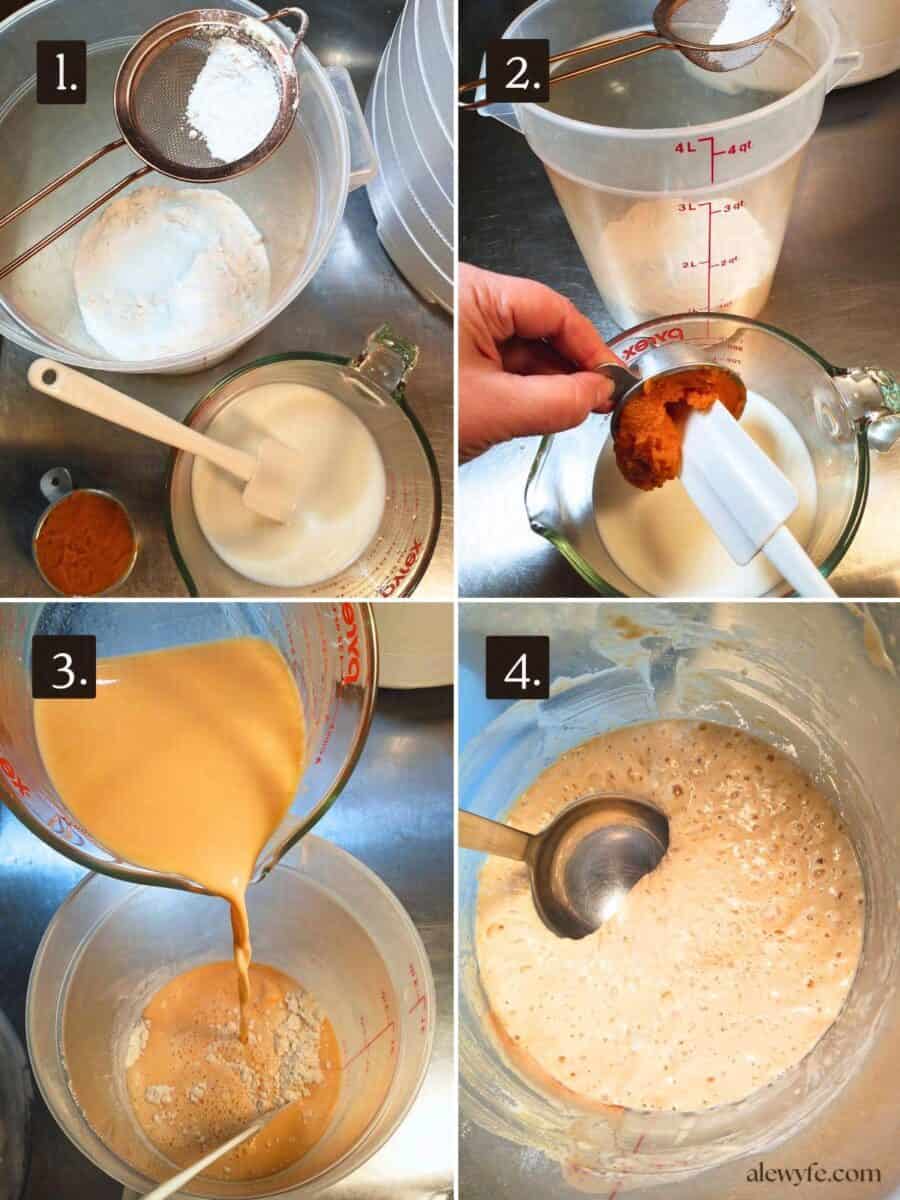
- Measure the dry ingredients (flour, salt, sugar, yeast, and baking powder) together in a large mixing bowl or plastic container with a lid (if you are doing the overnight rise).
- Sift the baking powder to remove any clumps, and whisk or sift everything together well.
make batter:
- In a smaller bowl or large liquid measuring cup, mix the milk and/or water and the pumpkin puree.
- Whisk or stir the liquid ingredients until there are no lumps and the pumpkin puree dissolves.
- Stir the liquid mixture into the dry ingredients.
- Mix the batter gently, stirring just until it is well mixed and uniform with no clumps of dry ingredients.
let batter rest:
- Cover the batter bowl with an airtight lid or wrap.
- Let the crumpet batter rest in a warm place for at least an hour, or until the surface of the batter is covered in bubbles.
- To make ahead, mix the batter to this point, cover well, and let rest in the refrigerator overnight.
- If you do the overnight rise, it’s best to remove the batter from the fridge at least 30 minutes before making the crumpets to let it warm to room temperature and wake up the yeast.
- The batter should be light and bubbly, and smell yeasty and fresh.
cook crumpets:
- Heat a large griddle or heavy non-stick/cast iron pans over medium-high heat.
- Test the griddle surface with a drop of water. When it dances and sizzles on the surface, it is ready. Reduce the heat slightly after the griddle is pre-heated.
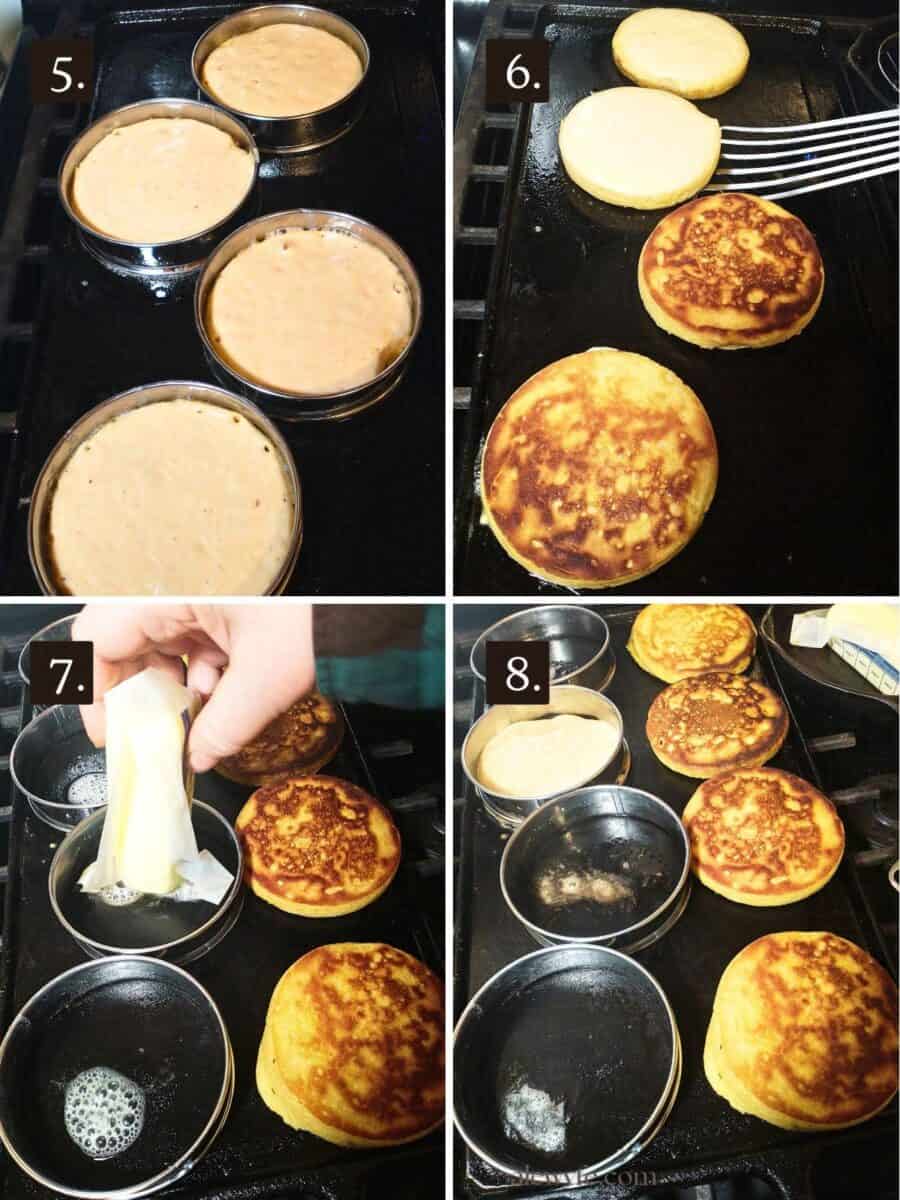
- If your crumpet rings are not non-stick, butter them for the first batch of crumpets (or if they begin to stick later).
- Place the crumpet rings or metal cookie cutters on the griddle, butter the griddle (I use a stick of butter and lightly touch it to the surface inside each ring.
- Immediately ladle about 1/4 – 1/3 cup of batter into each ring (use more for larger molds, less for smaller ones).
remove rings & flip:
- Let the crumpets cook for a few minutes.
- Gently spin the rings slightly. When the batter is mostly set and you can slide the crumpet on the pan, carefully remove the ring. They will be hot! I use my fingers but you probably want to use tongs or a hot pad.
- Remove the rings and carefully flip the crumpets when they have cooked at least halfway through. This is about 3-6 minutes on the first side, and 2-4 on the second for me, usually, though it varies with how large and thick you pour, how hot your burners are, and the thickness of your griddle (cast iron will retain heat better than a thinner griddle when the cold batter hits it).
- You may have to adjust the heat to find the “sweet spot” for your particular griddle and stove, where the crumpets cook through without burning. This might take a bit of trial and error since every stove is different.
finish cooking & serve:
- If the crumpets are not done all the way through, you can keep them on the edges of the pan to stay hot and keep cooking while you do fresh batches on the center of the griddle.
- Keep warm and serve immediately, or let the crumpets cool, then store in an airtight container.
- Refrigerate for longer storage (up to 3-4 days) or freeze leftovers.
Storage & Serving Ideas
These pumpkin crumpets are a tasty breakfast or tea snack. They can be split and toasted, and served simply buttered, or with apple, pumpkin or pear butter, or with your favorite jam or marmalade.
Or, you can use them for a delicious griddled breakfast sandwich. Use two thin crumpets for the sandwich, or carefully slice a thick one in half to split it like an English muffin. Keep it simple with just a fried egg or scrambled egg and a bit of melting cheddar, colby, or pepper jack cheese, or add bacon, a sausage patty, or a slice of ham for an even heartier breakfast or brunch.
Refrigerate these in an air-tight container for up to 3-4 days, or freeze them for longer storage. You can pop them in the toaster straight from the freezer, or let them thaw overnight in the fridge and toast or reheat them on a hot griddle.

Pumpkin Crumpets
Equipment
- large mixing bowl
- griddle or large saute pan
- crumpet rings (or use stainless ring or shaped cookie cutters)
Ingredients
Dry Ingredients
- 11 oz all purpose flour (about 2 ½ cups, fluffed and spooned to measure)
- 2 tsp instant dry yeast
- 2 tsp baking powder sifted
- 1 tsp salt
- 1 tsp sugar
- 1 tsp pumpkin pie spice, cumin, or curry powder (optional, for sweet or savory spiced scones)
Wet Ingredients
- 1 ⅔ cup milk or warm water I usually use about half whole milk, half lukewarm water
- ⅓ cup pumpkin puree
To Cook:
- 3 tbsp butter for griddle substitute coconut oil or plant-based butter for vegan crumpets
Instructions
prep ingredients:
- Measure the dry ingredients (flour, salt, sugar, yeast, and baking powder) together in a large mixing bowl or plastic container with a lid (if you are doing the overnight rise).
- Sift the baking powder to remove any clumps, and whisk or sift everything together well.
make batter:
- In a smaller bowl or large liquid measuring cup, mix the milk and/or water and the pumpkin puree.
- Whisk or stir the liquid ingredients until there are no lumps and the pumpkin puree is dissolved.
- Stir the liquid mixture into the dry ingredients.
- Mix the batter gently, stirring just until it is well mixed and uniform with no clumps of dry ingredients.
let batter rest:
- Cover the batter bowl with an airtight lid or wrap.
- Let rest in a warm place for at least an hour, or until the surface of the batter is covered in bubbles.
- To make ahead, mix the batter and let rest in the refrigerator overnight.
- If you do the overnight rise, it’s best to remove the batter from the fridge at least 30 minutes before making the crumpets to let it warm to room temperature and wake up the yeast.
- The batter should be light and bubbly, and smell yeasty and fresh.
cook crumpets:
- Heat a large griddle or heavy non-stick/cast iron pans over medium-high heat.
- Test the griddle surface with a drop of water. When it dances and sizzles on the surface, it is ready. Reduce the heat slightly after the griddle is pre-heated.
- If your crumpet rings are not non-stick, butter them for the first batch of crumpets (or if they begin to stick later).
- Place the crumpet rings or metal cookie cutters on the griddle, butter the griddle (I use a stick of butter and lightly touch it to the surface inside each ring.
- Immediately ladle about 1/4 – 1/3 cup of batter into each ring (use more for larger molds, less for smaller ones).
remove rings & flip:
- Let the crumpets cook for a few minutes.
- Spin the rings slightly, and when the batter is mostly set and you can slide the crumpet slightly in the pan, carefully remove the ring. They will be hot! I use my fingers but you probably want to use tongs or a hot pad.
- Remove the rings and carefully flip the crumpets when they are cooked at least halfway through. This is about 3-6 minutes on the first side, and 2-4 on the second for me, usually, though it varies with how large and thick you pour, how hot your burners are, and the thickness of your griddle (cast iron will retain heat better than a thinner griddle when the cold batter hits it).
- You may have to adjust the heat to find the “sweet spot” for your particular griddle and stove, where the crumpets cook through without burning. This might take a bit of trial and error since every stove is different.
finish cooking & serve:
- If the crumpets are not done all the way through, you can keep them on the edges of the pan to stay hot and keep cooking while you do fresh batches on the center of the griddle.
- Keep warm and serve immediately, or let the crumpets cool, then store in an airtight container.
- Refrigerate for longer storage (up to 3-4 days) or freeze leftovers.