CANNING: Homemade Spiced Apple Butter
- Making Apple Butter, Then and Now
- Spiced Apple Butter Ingredients
- Kitchen Equipment Needed
- How to Make Spiced Apple Butter
- Water-Bath Canning Instructions for Apple Butter
- Pantry Storage Tips
- Homemade Spiced Apple Butter
Spiced apple butter is one of the easiest homemade preserves you can make. It’s a thick, caramel-flavored spread made from fresh applesauce cooked down low and slowly, with added sugar, spices, and cider.
Some versions (like this one) include apple cider vinegar for balance, and to help the preserves last longer. This one is based on a tested USDA canning recipe with only safe modifications made, so you can can with confidence!
It’s heaven on a hot biscuit, flapjacks, or buttered toast, or layered between shortbread to make sandwich cookies or jam bars. Roll it up in crepes, or spread it between layers of thin pancakes piled high to make a traditional Appalachian apple stack cake.
You can pair your homemade apple butter with savory meals too, like roast pork, smoked or fried pork chops, or roasted chicken or turkey. It’s a natural pairing with Swabian, German and Polish favorites like potato pierogi, crispy potato pancakes, schnitzel and strudel, with a sweet-tart flavor that is so good.
Making Apple Butter, Then and Now
Apple butter was the first thing I learned how to can by myself. My parents planted several apple trees in our yard when I was a kid… We didn’t spray the trees, or do any sort of pest management, so the apples were always pretty wonky (much like the ones I grow now), but they made great apple butter!
It’s a perfect way to use a glut of imperfect apples, as you can trim off any bruised or damaged bits before cooking them down. And you don’t have to peel the apples first, which saves a ton of time and tedious labor!
Traditionally, making apple butter would be a community affair, with neighbors or extended families pitching in to chop and stir the simmering apples, cooking down in large kettles over open fires. There are still some small community festivals where you can go watch apple butter being made this old-fashioned way, but most of us now use more modern methods.
You can make apple butter on your stove top in a big pot with a thick bottom (so the apples don’t scorch). Or, save yourself some stirring, and use your Instant Pot or crock pot to cook your apples, and then slowly simmer the sweetened apple sauce into homemade spiced apple butter.

Spiced Apple Butter Ingredients
Apples:
Use firm, tart baking apples, and if possible, an assortment of different apple varieties for a more complex flavor. You can mix in some sweeter table apples, but make sure you use some tart ones to balance the very sweet flavor of the apple butter if you can.
Sugar:
You can use any type of sugar, but I like this mix of white and brown sugar. This adds the complexity and caramel-molasses flavor of brown sugar but still lets the apple flavor shine through.
Apple cider:
You can use apple juice, apple cider, or even water, but I like to use a good quality pressed apple cider if I can get it.
Apple cider vinegar:
Many apple butter recipes don’t use cider vinegar, but I like this version, which has an interesting sweet-tart balance of flavors. The acidity in the apple cider vinegar helps preserve the apple butter even after you open the jar. Keep opened jars of apple butter in the fridge, but the vinegar helps inhibit mold and other spoilage organisms even once the jars have been opened.
Spices:
Here’s where you can personalize this spiced apple butter recipe… you can add to or reduce the quantity of spices, change their proportion (within reason) and vary the blend to suit your taste and develop your own perfect blend.
I like to use a good quantity of cinnamon, and accent that with allspice, ginger, cloves, and freshly ground nutmeg, and a pinch of kosher salt to balance out the sweetness. Or use sea salt, Himalayan pink salt, or whatever you like. You can omit the salt if you’re on a sodium-restricted diet, or add more for a salted caramel apple butter.

Kitchen Equipment Needed
large pot (or 8 qt Instant Pot or Crock Pot):
If you are making your apple butter on the stove top, you’ll want a large, heavy bottomed pot that holds at least 8-10 quarts.
I like to use my large Instant Pot for this recipe, as you can set it and forget it, and even use the slow cooker function to cook the apples down and then reduce the apple butter overnight. This batch size will just fit in an 8 quart Instant Pot or similarly sized slow cooker. You can scale the recipe back to fit a 6 quart or smaller pot if you don’t have a large one.
You can leave the pot covered while you’re making the apple-sauce, but leave it uncovered or use the vented glass lid when you’re cooking down the apple butter, as the moisture needs to be able to escape.
food mill, sieve, strainer, or colander:
After simmering, the soft apples are passed through a food mill to remove the skins and puree the pulp into a soft paste. If you don’t have a food mill (I don’t), use a metal or sturdy, heat-resistant chinois sieve, colander, or wire strainer, and a stiff spoon or spatula to press the apples through the mesh.
You will need to work in batches until all the apples have been separated from their skins. Save the apple skins to make apple scrap vinegar, or feed them to your livestock or compost bins if you can!
half-pint or smaller canning jars and new lids:
You can put up spiced apple butter in quart or smaller jars, which is very convenient if you have a lot of apples to preserve, or if your family really loves apple butter!
Use smaller jars if you have a smaller household or less fruit to preserve. Apple butter keeps a long time in the fridge once it’s opened, but it’s still best to use jar sizes that you will go through somewhat quickly.
You can also portion and freeze this recipe if you prefer, in any freezer safe airtight container.
large canning pot:
You need a large canning pot with a lid that will hold all of your canning jars with room for at least an inch of rapidly boiling water to cover the lids. You can use any pot with a lid that will hold all of your jars, plus enough boiling water to cover by an inch or two and room at the top for a vigorous boil.
It’s ok to stack the jars if your pot is tall enough, but it’s best to use a jar rack or a perforated steamer insert separating between the layers so that the jars don’t jostle and break.
Canning funnel, ladle, jar tongs, and rack:
These tools are optional but make the job of filling your jars with hot apple butter, and getting them into and out of the hot water bath a lot easier and safer!
It’s best to use a canning pot with a false bottom or fitted with a jar rack to keep your canning jars from scorching or breaking on the bottom. You can use a silicone trivet if you don’t have a jar rack.
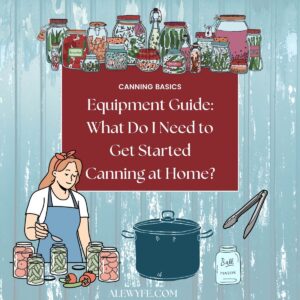
You can read more about these and our recommendations in our guide to canning equipment if you don’t already have these or are new to canning.
How to Make Spiced Apple Butter

Cook apple puree (photo 1 & 2):
- Wash the apples, core them, and trim any bruised spots. Chop them roughly into large chunks but leave the peels on.
- Combine prepared apples, cider or apple juice, apple cider, and salt in an 8 quart Instant Pot or a large heavy bottomed jam pot or saucepan.
- Bring to a simmer over med-high heat (use the Saute function on your Instant Pot), stirring frequently, then reduce heat to low, cover, and stir often to prevent scorching. Simmer until the apples are soft (this will vary depending on the ripeness and varieties of fruit, but at least 30-45 minutes).
- Simmer until the apples are soft. This will vary depending on the ripeness and varieties of fruit, but at least 45 minutes. You can also let the apples cook, covered, overnight using the slow cooker setting on medium or low.
Strain apples & make apple butter (photos 3-7):
- Remove from heat. Process the apple mixture with a food mill, or press the puree through a wire sieve or metal strainer to remove the peels and make a smooth puree.
- Return apple puree to cooking pot. Add the remaining ingredients- brown sugar, salt, and spices- and return to medium-low heat. Return to a simmer and stir often.
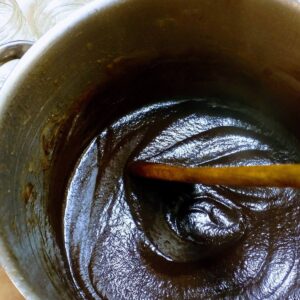
- Let your spiced apple butter simmer uncovered until it is quite thick, glossy, and caramel colored- this should take several hours. As the mixture reduces, lower the heat and stir more often to prevent scorching. Your spatula or spoon should leave a clear trail as you stir when the butter is finished.
- You can cool and freeze in appropriate containers for 6-12 months, refrigerate in clean jars for up to a few weeks, or can the apple butter for longer shelf life (recommended).

Water-Bath Canning Instructions for Apple Butter
prep jars and canner:
- When your apple butter is almost finished, fill your water bath canner with water to a height that will cover your jars by several inches with room to boil vigorously.
- Wash your jars and lids with hot soapy water, rinse, and place the jars (but not the lids) in the canner as you bring the water up to a low simmer or at least 180℉.
- Protect your work surface- I like to use a baking sheet pan lined with an old kitchen towel, but you can also use a sturdy wire cooling rack or silicone mat. This helps protect the glass from temperature shocks and also makes for easier clean-up!
- Remove your canning jars from the canner (carefully, with tongs or jar lifters, tilting them out of the hot water) just before filling and place them on the towel or rack.
fill jars (photo 8):
- Using a jar funnel if you have one, ladle the hot apple butter into the hot jars. Leave between ¼-½” of headspace at the top of the jars (slightly more if you are using reusable-style lids with gaskets like Weck or Tattler).
- Debubble the jars with a thin spatula, spoon, or debubbling tool, and wipe the tops of the jars with a clean paper towel or lint-free cloth that has been dipped in hot water or vinegar.
- Place the canning lids on the clean jar tops and screw down the rings- don’t overtighten, just snug.
water-bath process:
- Using your jar lifter, tongs, or the canning jar rack, carefully place the hot filled jars in the hot canner.
- Make sure you have adequate water covering the jars (at least 2″ over the tops of the jars). Top up with water from a hot kettle if needed.
- Start the timer for your water bath only after the water is at a rolling boil and all jars are in the canner. Process pint and smaller jars for 5 minutes and quart jars for 10 minutes (adjust for altitude if applicable, see recipe notes for chart) and then turn off the heat.
- Leave the jars in the canner, and set another timer for 5 minutes.
- Remove jars from the canner after 5 minutes, and place back on the towel-covered sheet pan or counter (put down a fresh towel if you spilled while filling the jars).
- Leave jars to cool slowly in a draft-free place. Do not touch rings until the jars are completely cool and sealed and do not stack jars.
Pantry Storage Tips
After jars are cooled and seals are set (I leave them at least overnight but no more than 24 hours), check that all jars are sealed, carefully wash jars, label them, and remove rings before storing.
- Sealed jars with metal lids will not flex when the seal is pressed, and the lid has a firm vacuum seal with the jar.
- Any jars that did not seal can be reprocessed with new lids within 24 hours of canning. For any jars that didn’t seal, check the jar rim surface for chips and the ring for dents.
- If you don’t want to re-can the jars that didn’t seal, they may be immediately refrigerated and used first.
- Gently wash jars or wipe with a damp cloth to remove any sugary residue or hard water deposits from the canning bath.
- Clearly label your jars with the name and date of your product, and store them in a cool, dark pantry.
- For best quality, enjoy home-canned goods like this spiced apple butter within 12-18 months.
- The apple butter will still be safe to consume after that as long as it was properly processed and stored, and the jars are still sealed. However, older canned goods may discolor and darken, and the flavor and nutritional value will decline over time.


Homemade Spiced Apple Butter
Equipment
- 1 heavy-bottomed jam or sauce pot At least 3 quarts in volume
- 1 immersion blender, blender, or food processor
- colander, sieve, or food mill
- water bath canner or large stockpot with rack
- glass canning jars, rings, and new lids quarter pint (4 oz), half pint (8 oz), or pint (16 oz)
- jar lifters or tongs or jar rack with handles
- canning jar funnel (optional but helpful for filling the jars)
- silicone or other heat-resistant spatula (optional but helpful)
Ingredients
simmer together:
- 8 pounds apples (pre-processing weight)
- 2 cups apple cider
- 2 cups apple cider vinegar (bottled for standardized 5% acidity)
- ½ tsp Himalayan pink salt or sea salt (substitute 1 tsp kosher salt)
add to apple sauce:
- 2 ¼ cups white sugar
- 2 ¼ cups packed brown sugar
- 2 tbsp ground cinnamon
- 2 tsp ground allspice
- 1 ½ tsp ground cloves
- 1 tsp ground ginger
- ½ tsp ground nutmeg
Instructions
Cook apple puree:
- Wash the apples, core them, and trim any bruised spots. Chop them roughly into large chunks but leave the peels on.
- Combine prepared apples, cider or apple juice, apple cider, and salt in an 8 quart Instant Pot or a large heavy bottomed jam pot or saucepan.
- Bring to a simmer over med-high heat (use the Saute function on your Instant Pot), stirring frequently, then reduce heat to low, cover, and stir often to prevent scorching. Simmer until the apples are soft (this will vary depending on the ripeness and varieties of fruit, but at least 30-45 minutes).
- Simmer until the apples are soft. This will vary depending on the ripeness and varieties of fruit, but at least 45 minutes. You can also let the apples cook, covered, overnight using the slow cooker setting on medium or low.
Strain apples & make apple butter:
- Remove from heat. Process the apple mixture with a food mill, or press the puree through a wire sieve or metal strainer to remove the peels and make a smooth puree.
- Return apple puree to cooking pot. Add the remaining ingredients- brown sugar, white sugar, and spices- and return to medium-low heat. Return to a simmer and stir often.
- Let the apple butter simmer uncovered until it is quite thick, glossy, and caramel colored- this should take several hours. As the mixture reduces, lower the heat and stir more often to prevent scorching. Your spatula or spoon should leave a clear trail as you stir when the butter is finished.
- You can cool and freeze in appropriate containers for 6-12 months, refrigerate in clean jars for a few weeks, or can the spiced apple butter for longer shelf life (recommended).
Water-Bath Canning Instructions for Apple Butter:
- When your apple butter is almost finished cooking, fill your water bath canner with water to a height that will cover your jars by several inches with room to boil vigorously.
- Wash your jars and lids with hot soapy water, rinse, and place the jars (but not the lids) in the canner as you bring the water up to a low simmer, or at least 180℉.
- Protect your work surface- I like to use a baking sheet pan lined with an old kitchen towel. Remove your canning jars from the canner (carefully, with tongs or jar lifters, tilting them out of the hot water) just before filling and place them on the sheet pan or counter lined with a towel. This helps protect the jars from temperature shocks and also makes for easier clean-up!
- Using a jar funnel if you have one, ladle the hot spiced apple butter into the hot jars. Leave between ¼-½" of headspace at the top of the jars (slightly more if you are using reusable-style lids with gaskets like Weck or Tattler).
- Debubble the jars with a thin spatula, spoon, or debubbling tool, and wipe the tops of the jars with a clean paper towel or lint-free cloth that has been dipped in hot water or vinegar.
- Place the canning lids on the clean jar tops and screw down the rings- don't overtighten, just snug. Using your jar lifter, tongs, or the canning jar rack, carefully place the hot filled jars in the hot canner.
- Make sure you have adequate water covering the jars (at least 2" over the tops of the jars). Top up with water from a hot kettle if needed.
- Start the timer for your water bath after the water is at a rolling boil and all jars are in the canner. Process pint and smaller jars for 5 minutes, and quart jars for 10 minutes (adjust for altitude if applicable, see notes below for chart) and then turn off the heat. Leave the jars in the canner, and set another timer for 5 minutes.
- Using jar tongs or a lifting rack, remove jars from the canner after 5 minutes, and place them back on the towel-covered sheet pan or counter (put down a fresh towel if you spilled while filling the jars).
- Leave jars to cool slowly in a draft-free place. Do not touch rings until the jars are completely cool and sealed and do not stack jars. I cover the jars with a kitchen towel if the kitchen is cold or drafty so that they cool slowly – this helps prevent siphoning.
- After jars are cooled and seals are set (I leave them at least overnight but no more than 24 hours), check that all jars are sealed, carefully wash jars, label them, and remove rings before storing.
- Sealed jars with metal lids will not flex when the seal is pressed, and the lid has a firm vacuum seal with the jar. Any jars that did not seal can be reprocessed the same day with new lids (check the jar tops again for chips and the ring for dents), or immediately refrigerated and used first.
Notes
| Process Time at Elevations of | ||||
| Style of Pack | Jar Size | 0 – 1,000 ft | 1,001 – 6,000 ft | Above 6,000 ft |
| Hot | Half-Pints or Pints | 5 min | 10 | 15 |
| Quarts | 10 min | 15 | 20 | |
Loved this? Try these related recipes!