
COOK: Yooper (ish) Pasties with Venison and Roasted Root Vegetables and Spent Grain Butter Crust
- What the heck is a Pasty?
- Comfort food, or family feud?
- Our Favorite: This Venison Pasty Recipe
- Making the Hot Water Pastry with Spent Grain Flour
- Venison and Roasted Root Vegetable Filling
- How to Assemble the Venison Pasties
- How to Freeze Pasties
- Yooper Pasties with Venison and Roasted Root Vegetables and Spent Grain Hot Water Pastry
I’m working on my (hopeful) future UP resident entrance exam submission by cooking up some pasties, both plain and fancy, and trying to perfect my venison pasty recipe… I assume this will be on the test? But wherever you live, these savory hot pockets of sturdy but tender buttery hot water crust and hearty meat and veggie fillings are absolutely delicious and worth the little bit of time they take to assemble.
These homemade pasties will have you dreaming of summer days picnicking on the Michigan shores of Lake Superior in no time (no Lower Harbor Park ore dock view included), or at least, in less time than it would take for you to drive there…unless you’re already up there, in which case, don’t rub it in, and save some snow for us till we get there, eh?
Speaking of snow, this venison pasty recipe freezes perfectly, so you should make a big batch! It would be a cruel joke if they didn’t, since it can be below freezing in most of the UP almost half the year? So make up a bunch of these venison pasties and put ’em in a cooler on your porch, and you’re good to go till spring!
(Unless a bear eats them. Which might happen.) So, maybe don’t do that, or at least don’t say we didn’t warn you… But seriously, don’t feed the bears… a fed bear is a dead bear, and that’s no joke. Your regular freezer will work just fine too (and is probably safer, for the bears, AND for your pasties, and the structural integrity of your cooler and porch).

What the heck is a Pasty?
(first off, it’s pahhh-stie, not pay-sty)
They’re the original hot pocket, with roots in Cornwall and other nearby regions in the UK, and make a hearty, portable meal meant to fuel a miner or laborer through a hard day toiling underground or in the fields.
With a hot pasty wrapped up in your pocket, you had a ready lunch that doubled as a hand warmer, and if it got cold before break time, just heat it up on a hot shovel over a coal brazer. Or I guess you could use a microwave now (less crispy crust, but also less carcinogens… life is just full of trade-offs, isn’t it)?

Comfort food, or family feud?
Traditional pasty fillings are sturdy, simple stuff, usually a mixture of meat and hearty but humble root vegetables, lightly seasoned with salt and black pepper, although you can put just about anything you like in there (as long as you don’t mind getting yelled at by a stickler for tradition).
Beef is probably the most common meat filling, but given how many hunting camps there are up north, this venison pasty recipe is also very traditional. And now most places will serve various vegetarian pasties, as well as chicken, turkey, and sometimes pork options.
Pasties are polarizing – feuds have started over the proper fillings and accompaniments, and some people will get pretty heated about what is “correct”. Should you:
- Use raw ground beef or braised chunks of roast or steak in the filling?
- Add diced rutabagas with the diced carrots and potatoes, or nah?
- Make the crust with butter, shortening, lard, or a combination?
- Dip them in ketchup or brown gravy, or eat them plain?
You will find vocal defenders of each of these versions, each insisting their way is the best. We’re solidly on Team Rutabaga in this household, and don’t (yet) have strong opinions on the form-factor of the meat or the sauce – they’re both delicious? I will say, I’m not usually a ketchup fan on anything other than french fries (and even then, prefer aioli), but it really does work well with these.

Our Favorite: This Venison Pasty Recipe
These homemade pasties have a sturdy hot water butter crust with a touch of spent grain leftover from homebrewing beer. “Spent grain” is the wet brewing malt, that I dried (in a dehydrator or oven) and then milled again into flour.
The spent grain flour is mostly malted barley, which is a traditional nod to the origins of the dish, though if you’re not a home-brewer, you can substitute whole wheat, rye, or regular barley flour, or just use an extra cup of all purpose flour.
The crust is generously filled with venison and roasted rutabaga, Yukon gold potatoes, carrots, and onions. This is hearty comfort food, perfect to warm you up on a chilly fall or winter day, but it’s also good year-round.
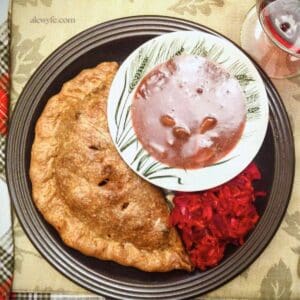
We ran out of ketchup last time we made them (even after raiding the stash of to-go packets we save for camping, whoops), so I made a burgundy mushroom gravy and served some sweet and spicy beet and carrot kraut on the side. So we’re not picking a side on the gravy vs. ketchup debate… Either way you garnish them, they’re so, so good!

Making the Hot Water Pastry with Spent Grain Flour
To make hot water pastry dough by hand:
- Combine the all purpose flour, whole grain flour, and salt in a large mixing bowl and stir or whisk to combine.
- Cut the cold butter or lard into 8-10 chunks and add these cubes to the bowl with the dry ingredients.
- Using a pastry cutter or your fingers, rub or cut in butter until the mixture is crumbly and no larger than pea-sized chunks remain.
- Add the almost boiling water and mix with a silicone spatula or wooden spoon.
- Stir and fold until the dough comes together into a ball.
- Once the dough is just cool enough to handle, knead it lightly in the bowl to combine, or turn it out onto a lightly floured surface and use a bench scraper and then your hands to lightly knead it until it comes together… not as thoroughly as a bread dough- you are not trying to develop the gluten (which has been coated by the fat) but you don’t have to be as delicate with it as a typical pie crust.
- If it’s very sticky, gently knead in more flour until it feels workable (dough will be soft while it’s hot).
To make dough with a mixer or food processor:
- Combine the dry ingredients in a stand mixer with paddle or food processor bowl with blade.
- Add the chunks of fat as above, and mix to cut in on medium-low speed or pulse food processor until the flour and fat are crumbly.
- Pour in the almost boiling water in a steady stream while the mixer is running (pulse food processor so you don’t overwork the dough).
- Turn the dough out onto lightly floured surface or shallow bowl and proceed as above, gently kneading to bring the dough together once it is cool enough to handle.

You can use the dough immediately (though it will be soft and harder to work with), or wrap the dough ball tightly with plastic wrap, or oil the surface of the dough and place in a tightly covered bowl. Let the hot water pastry dough rest in while you make the filling. You can refrigerate the dough if it is very warm in your kitchen, or set it aside in a covered bowl for an hour or so before assembling the pasties.
Venison and Roasted Root Vegetable Filling
Dice the veggies:
- If you are roasting the veggies, cut medium to large dice (1/2″-3/4″), and preheat the oven to 400° F. Otherwise, cut small dice (1/4″). Whichever you choose, it’s important to try to keep the pieces a uniform size so that they cook evenly.
- For roasted veggies, spread them out in a single layer on sheet pans and toss with vegetable oil (olive oil or your choice of neutral flavored oil). Season with salt and pepper and roast until they just start to turn tender and sweet (25-35 minutes, but this will vary based on your oven and size of dice).
Sear the meat:
- While the veggies are roasting, you will lightly sear the meat.
- Season the diced venison or beef first with salt and pepper to taste, and get a large heavy (preferably cast iron) pan hot over medium-high heat. You want a hot pan so you can get a good sear, but not quite smoking hot.
- Add a couple tablespoons of high heat oil (like peanut or grapeseed) or tallow or lard and then immediately add the cubes of meat- they should sizzle immediately but not burn.
- Leave them to sear a bit on each side before turning them. A good pair of tongs are helpful here.
- When the meat is browned, add the thyme and garlic, if you like, or otherwise season to taste.
- If you are working with a tender cut of meat, this is all they will need. If the roast you cubed is a tougher cut or from an older animal, you can braise them until just tender.
- Deglaze the pan with some wine or stock (or even hot water) and let them braise a bit at a low simmer until they are tender and the excess liquid evaporates (or drain and save this liquid for gravy).
Combine the filling:
- In a large bowl or roasting pan, combine the meat and roasted or plain diced veggies. Adjust seasoning to taste if necessary.
- Let the filling cool slightly while you start to roll out the dough.
- You can make and refrigerate this filling several days in advance, or freeze it for several months.
How to Assemble the Venison Pasties
- You can make large dinner plate sized pasties or smaller snack sized hand-pies- it’s up to you!
- For large entree-sized pasties, divide the dough into 8-9 pieces. For smaller snack sized ones, divide the dough into 12-16 portions.
- Portion the dough out into balls, and keep covered while you roll out individual circles on a lightly floured surface or Silpat.
- Use a bench scraper if the dough is sticking to the work surface.
- The quantity of filling will vary depending on the size of the pies- add a generous amount of filling to the center of the circle that will still allow you to close the pastry.
- Using a bench scraper or metal spatula, lift the top half of the dough circle and fold over to form a half moon. The dough should easily seal to itself, but if it is dry, you can brush it with water, milk, or egg wash.
- Fold the rounded edge of the dough over onto itself and crimp the dough closed using your forefingers or knuckles. You can also use a floured fork to crimp the edge sealed after you fold it over.
- Lift the pasty onto a baking sheet with your bench scraper or spatula, and repeat until you are out of dough or filling. Using the tip of a paring knife, cut 2-3 small steam vents in the tops by lightly poking and twisting the dough with the knife.
- If you want glossy pasties, brush lightly with egg wash, milk, or melted butter. Remaining dough can be refrigerated for a day or frozen for several weeks. Remaining filling freezes well for quick pasties, or can be added to a stew or casserole.
- Bake in a hot oven (425°F) for 10-15 minutes, then reduce oven temp to 350° F. Large pasties can take another 30-50 minutes, while smaller ones will cook faster.
- If you are uncertain (especially if you are using raw filling) use a calibrated thermometer to check the temperature of the center of the filling (it should be at least 145°F, which will carry over a bit… if you are using commercial ground meat, err on the side of caution and make sure the center reaches 165°F for food safety).

How to Freeze Pasties
- To freeze, let baked pasties cool, then wrap each in foil or plastic cling-film.
- Store the wrapped pasties in zip-seal bags or airtight freezer containers for up to six months.
- You can reheat pasties in a moderate oven or toaster oven still wrapped in the foil. No need to thaw them first.
- Remove foil or plastic wrap if using a microwave, though this will make the pastry soggy. An oven or toaster oven is best if you want crispy crust on your pasties.

Yooper Pasties with Venison and Roasted Root Vegetables and Spent Grain Hot Water Pastry
Equipment
- Rolling Pin
- large mixing bowl
- cutting board & sharp knife
Ingredients
Spent Grain Hot Water Butter Crust
- 3½ cups all purpose flour (plus extra for bench flour when working with the dough)
- ½ cup dried, milled, and sifted spent grain flour (can substitute rye, barley, or whole wheat pastry flour)
- 1 tbsp kosher salt (reduce slightly if not using kosher flakes)
- 8 oz butter or lard (2 sticks, room temperature or chilled)
- 1 cup HOT water (8 oz, boiled and very slightly cooled)
Venison and Root Vegetable Pasty Filling
- 3 lb venison roast or steak, cut into 1" cubes (can substitute ground venison, or use beef, mutton, lamb, or goat)
- 3-5 cloves garlic, peeled and minced (not traditional, but why wouldn't you?)
- 1 lb yukon gold or red potatoes, scrubbed and small-medium diced (peel the potatoes if you like or if skins are thick)
- 1 medium rutabaga, peeled and small-medium diced
- ½ lb carrots, peeled and small-medium diced
- 2 medium onions, peeled and small-medium diced
- 3-4 stalks celery, washed and small-medium diced (optional, but not traditional)
- 1 tbsp flaky kosher salt or to taste (use less regular salt if you substitute)
- 2 tsp fresh ground pepper or to taste
- 1-2 tsp dried thyme or marjoram (not traditional, but nice)
- 3-4 tbsp olive oil or neutral oil for roasting veggies & searing meat
Instructions
Spent Grain Hot Water Crust
- By Hand: Combine dry ingredients in a large mixing bowl. Cut butter or lard into 8-10 chunks and add to the dry ingredients. Using a pastry cutter or your fingers, rub or cut in butter until the mixture is crumbly and no larger than pea-sized chunks remain.By Machine: Combine dry ingredients in a stand mixer with paddle or food processor bowl with blade. Add the chunks of fat as above, and mix or pulse food processor until crumbly.
- By Hand: Add the almost boiling water and mix with a silicone spatula or wooden spoon. Once the dough is just cool enough to handle, knead it lightly in the bowl to combine, or turn it out onto a lightly floured surface and use a bench scraper and then your hands to lightly knead it until it comes together… not as thoroughly as a bread dough- you are not trying to develop the gluten (which has been coated by the fat) but you don't have to be as delicate with it as a typical pie crust. If it's very sticky, gently knead in more flour until it feels workable (dough will be soft while it's hot). By Machine: Pour in the almost boiling water in a steady stream while the mixer is running (pulse food processor so you don't overwork the dough). Turn dough out onto lightly floured surface or shallow bowl proceed as above.
- You can use the dough immediately (though it will be soft and harder to work with), or wrap the dough ball tightly with plastic wrap, or oil the surface of the dough and place in a tightly covered bowl. Let dough rest in fridge while you make the filling.
Venison and Roasted Root Vegetable Filling
- Dice the veggies- see note above about sizing. If you are roasting the veggies, cut medium to large dice (1/2"-3/4"), and preheat the oven to 400° F. Otherwise, cut small dice (1/4"). Whichever you choose, it's important to try to keep the pieces a uniform size so that they cook evenly.
- For roasted veggies, spread them out in a single layer on sheet pans and toss with vegetable oil (olive oil or your choice of neutral flavored oil). Season with salt and pepper and roast until they just start to turn tender and sweet (25-35 minutes, but this will vary based on your oven and size of dice).
- While the veggies are roasting, you will lightly sear the meat. Season first with salt and pepper to taste, and get a large heavy (preferably cast iron) pan hot over medium-high heat. You want a hot pan so you can get a good sear, but not quite smoking hot. Add a couple tablespoons of high heat oil (like peanut or grapeseed) or tallow or lard and then immediately add the cubes of meat- they should sizzle immediately but not burn. Leave them to sear a bit on each side before turning them. A good pair of tongs are helpful here.
- When the meat is browned, add the thyme and garlic, if using. If you are working with a tender cut of meat, this is all they will need. If the roast you cubed is tougher, you can deglaze the pan with some wine or stock (or even hot water) and let them braise a bit at a low simmer until they are tender and the excess liquid evaporates (or drain and save this liquid for gravy).
- In a large bowl or roasting pan, combine the meat and veggies and adjust seasoning if necessary. Let cool slightly while you roll out the dough.
Pasty Assembly
- You can make large dinner plate sized pasties or smaller snack sized hand-pies- it's up to you! Dough makes about 8-9 large pasties, or 12-18 smaller pasties.Portion the dough out into balls, and keep covered while you roll out individual circles on a lightly floured surface or Silpat. Use a bench scraper if the dough is sticking.
- The quantity of filling for each pie will vary depending on the size of the pies- add a generous scoop of filling to the center of the circle that will still allow you to close the pastry.
- Using a bench scraper or metal spatula, lift the top half of the dough circle and fold over to form a half moon. The dough should easily seal to itself, but if it is dry, you can brush it with water, milk, or egg wash.
- Fold the rounded edge of the dough over onto itself and crimp the dough closed using your forefingers or knuckles. You can also use a floured fork to crimp the edge sealed after you fold it over.
- Lift the pasty onto a baking sheet with your bench scraper or a spatula, and repeat until you are out of dough or filling. Using the tip of a paring knife, cut 2-3 small steam vents in the tops by lightly poking and twisting the dough with the knife.
- If you want glossy pasties, brush lightly with egg wash, milk, or melted butter. Remaining dough can be refrigerated for a day or frozen for several weeks. Remaining filling freezes well for quick pasties, or can be added to a stew or casserole.
Bake the Pasties
- Bake the pasties in a hot oven (425° F) for 10-15 minutes, then reduce oven temp to 350° F. Large pasties can take another 30-50 minutes, while smaller ones will cook faster. The pastry will be fully set, and lightly golden brown, especially if you glazed the pastry, and the filling will be hot and cooked through.
- If you are uncertain (especially if you used a raw filling) use a calibrated thermometer to check the temperature of the center of the filling. It should be at least 145℉, which will carry over a bit. If you are using commercial ground meat, err on the side of caution and make sure the center reaches 165℉ for food safety.
Notes
Nutrition
Liked this? Try these related recipes!
- Venison Leberknödel – How to Make German Liver Dumplings
- Five-Alarm Venison (or Beef) Chili (pressure-canning or freezer-meal prep)
- Venison Burgers with Bacon, White Cheddar, & Caramelized Sweet Onion
- Wild Game Charcuterie- How to Make Homemade Venison Wiejeska (Fresh Kielbasa with marjoram)
- Perfect All-Butter Flaky Pastry Crust
- How to Make Classic Yorkshire Pudding