
CANNING: Homemade Grape Jelly
- Homemade Grape Jelly Ingredients
- Kitchen Equipment Needed to Can Grape Jelly
- How to Can Homemade Grape Jelly
- Storage & Serving Ideas
- Homemade Grape Jelly
Making and canning homemade grape jelly is one of the easiest beginner preserving projects, but is quite satisfying. You can customize your homemade grape jelly by varying the type of grape you use and how thick or soft you prefer your jelly to be.
The hardest part of making grape jelly is making the juice, which we cover in depth in another post (check the ingredient section for more). But if you don’t have any grape vines or fresh grapes, or just ain’t got time for all that, you can use store bought juice. It’s a really simple recipe though, so focus on quality ingredients!
Move over, Welch’s, the platonic ideal of a PB & J could soon be yours! Great in thumbprint cookies or sandwiches, on buttered toast, or as the filling for homemade doughnuts. Yum, man.
Homemade Grape Jelly Ingredients

Sugar:
Use regular granulated white sugar, which is necessary for the pectin to set. It sounds like a lot, and it is, but if you reduce the sugar or try to substitute artificial sweeteners, your jelly will not set properly. If you need a low-sugar recipe, you’ll need to use a different kind of pectin (and a different recipe).
Grape Juice:
This is where all of your flavor, color, and goodness come from, so use a good quality grape juice! You can make your own homemade grape juice by heating fresh fruit, straining, chilling, and straining again. Or you can use store bought juice- but use a good quality product to get a flavorful jelly!
You can use white or red grape juice, or a blend. Red is a bit more nutritious, as those colorful anthocyanin pigments are antioxidants, but it’s really your choice and doesn’t make that much of a difference. The jelly in these photos was made with a blend of our homegrown green grapes, and some wild grapes that I picked on a hike last fall and stashed in the freezer.

To get the clearest, most sparkling juice for jelly, do not press or squeeze the fruit pulp in the jelly bag or strainer. Just set it aside and let gravity do the work!
If you want to get all the goodness out of your fruit, set aside the first run of clear juice and use this for jelly, and the rest for drinking or other preserves where the clarity is not as important. This is just a matter of aesthetics, though, so don’t fret if your juice is hazy.
The freezer is your friend when making jelly- you can save up your pickings until you have enough for a batch. But more importantly, you get a higher juice yield from previously frozen fruit. When you freeze the fruit, the ice crystals that form puncture the cell walls and make it easier to extract all the good stuff from the fruit.
You can also make and freeze juice and thaw them later to make jelly when you have time. Super handy for the busy preserver!
Pectin:
There are various types of pectin, a thickening substance naturally present in many fruits. These are the most common ones used by home jelly and jam makers:
- standard powdered pectin
- liquid pectin packets
- standard low-sugar pectin
- Pomona’s Universal pectin (uses a calcium solution to set even in low-sugar mixes)
- homemade pectin from crabapples, apples, or other pectin rich fruits
There are about 4 tablespoons of pectin in a standard packet of Ball pectin (1.75 oz by weight). I used 2 tablespoons, which results in a fairly soft jelly. If you’d like a firmer set, use 3-4 tbsp of dry pectin.
Lemon:
This is completely optional, and not necessary for food safety or proper jelly setting, but you may want to add a bit of acidity to balance the sweetness of this jelly.
This will depend a lot on the flavor and quality of your juice and may vary from batch to batch, especially if you aren’t using standardized commercial grape juice.
I added about a tablespoon of lemon juice to this batch, just to balance the flavor. You could also use a teaspoon or so of citric acid. Feel free to leave this out if you don’t think it needs it, or adjust to taste if you think it does!
Kitchen Equipment Needed to Can Grape Jelly
Enameled water-bath canner or large stockpot:
You need a large pot with a lid that will hold all of your jars with room for at least an inch of rapidly boiling water to cover the jars. You can stack the jars, but it’s best to use a jar rack or a perforated steamer insert separating between the layers so that the jars don’t jostle and break.
Large heavy-bottomed pot or jelly pan:
You’ll need a large heavy bottomed pot that holds at least one gallon to boil your jelly mixture before canning it. Make sure the pot has plenty of room above the juice, as it will foam up quite vigorously while boiling.
Canning jars and lids:
You’ll want pint, half pint, or 4 oz jars to can your grape jelly. Wash your jars with hot, soapy water and rinse well. Check each jar for cracks or damage, and especially for chips in the rim that will prevent them from sealing.
Use new canning jar lids and clean, undented canning rings. If you are comfortable with reusable two-piece lids (Tattler or Harvest Guard, or Weck jars and rubber rings) inspect each lid and rubber seal to make sure they are extremely clean and not damaged.
Do not boil standard metal lids, as the modern sealant gasket formulas don’t need it (and can be damaged by boiling them prior to placing them on the jars). Most reusable lids recommend this (especially if they’ve been used before, to sanitize them). Follow the manufacturer directions for the lids that you are using.
Basic canning accessories:
While not required, a few simple tools like a canning funnel and jar tongs will make filling and handling your jelly jars easier and safer!
If you are new to canning or would like a refresher, check out our guide to canning equipment for tips and recommendations!
How to Can Homemade Grape Jelly
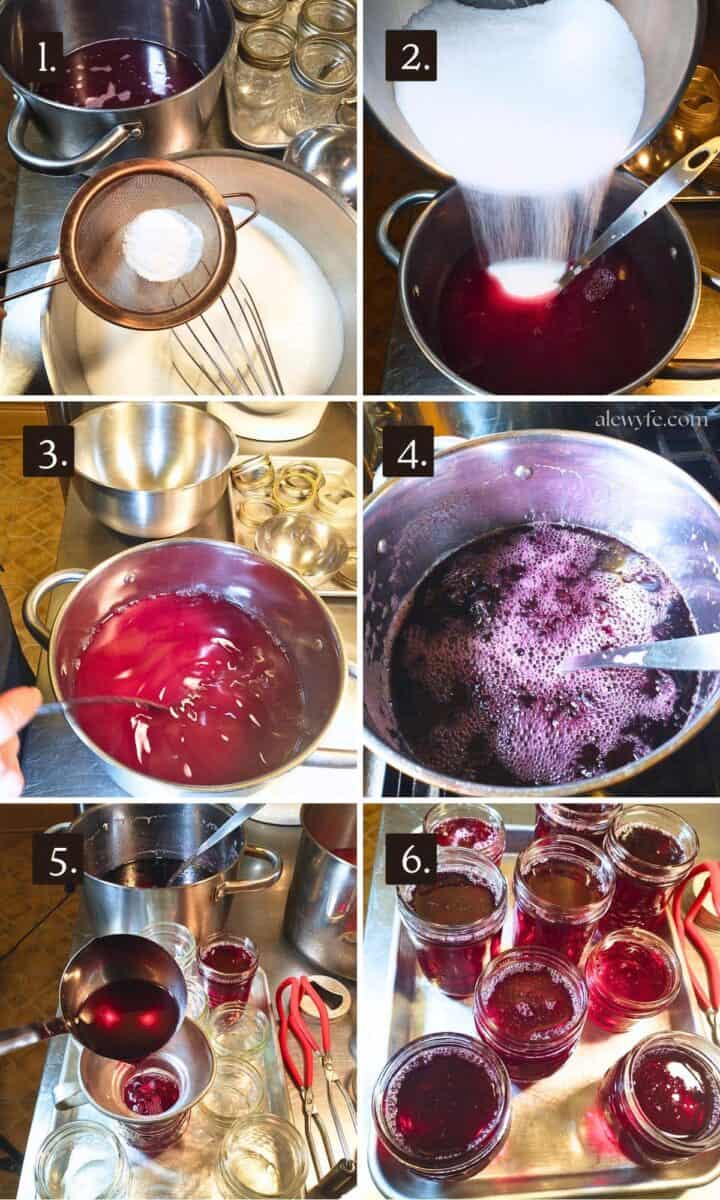
prep ingredients:
- Fill your canning pot with enough water to cover the jars you are using, and begin to bring it up to a boil.
- Wash your jelly jars with hot soapy water, rinse well, and place them in the pre-heating canner to warm and sanitize the jars (this isn’t necessary, but you do need to preheat the jars and I find this is the easiest way).
- Sift the powdered pectin into the granulated sugar to remove any lumps.
- Whisk the dry ingredients together until well-combined.
- Pour the juice, and any additional acid that you may be adding, into your jelly pot.
boil juice:
- Heat the juice to a rolling boil over medium heat, stirring and watching so that it doesn’t boil over.
- Remove juice from the heat, and pour in the sugar and pectin mixture.
dissolve sugar & pectin:
- Stir until the sugar is dissolved and all is well mixed.
- If you are using the plate test method to check your jelly, put a few small heat-resistant saucers or ramekins into the freezer to chill.
bring back to a boil:
- Return the pot to the heat, and bring back up to a boil.
- Boil the mixture hard, watching it carefully so and stirring so that it does not scorch or boil over. It will foam up quite a bit, which is why you want a larger pot!
- Cook your jelly until it reaches 220℉, or do a plate test to check for gelling.
- Plate test: take a cold saucer out of the freezer. Drop a half teaspoon or so of hot jelly onto the cold plate. Let it sit for a few seconds, then run your finger through the center of the blob.
- If the jelly has set, a clear line will remain down the center. If it quickly runs back together, you need to boil it a bit longer. Let it simmer for a few more minutes and check it again. Repeat until you get a good set. Remember that the jelly will be runny until it cools and sets!
fill jars with finished grape jelly:
- When your jelly is ready, carefully ladle it into the hot, prepared jars. A canning jar funnel makes this much easier.
- Wipe the rims of the jars with a clean, lint free cloth dipped in hot water or distilled vinegar. Make sure the rims are clean before placing your lids and rings so that you get a good seal. Clean jar rims mean safe seals!
- Place your canning lids on the jars and secure with rings. Do not overtighten the bands on the jars. They should be lightly snug, or “finger-tight”. You want to keep the liquid in while processing, but allow air to escape.
water bath process the jelly:
- Using a jar rack or jar tongs, carefully place the jelly jars into your boiling water bath. Make sure there are 1-2″ of water to cover and room for a vigorous boil. If you stack jars, use a metal divider to protect the jars from breakage.
- Cover the pot and bring back up to a rolling boil. Once the pot is boiling, set your processing timer.
- Process jars for 10 minutes at a rolling boil. Once the processing time is up, turn off the heat and set another timer for 5 minutes.
- Important: Use the altitude adjustment chart in the recipe card to increase the processing time if you live above 1001 sf of elevation!
- Carefully remove the jars from the canner and set them aside to cool. Do not place hot jars on a cold metal or stone surface or they may crack. Let them cool on wire racks or thick kitchen towels.
- Leave undisturbed for about 12-24 hours. Do not adjust the tension on the bands before the jars are completely cool (unless you are using reusable lids- then follow manufacturer directions to tighten bands immediately after processing while jars are hot).

Storage & Serving Ideas
After jars have cooled completely (12-24 hours) remove the bands and check for seals. Refrigerate any jars that did not seal and use promptly. You can also reprocess the unsealed jars with new lids if you do it within the first 24 hours after canning.
Gently wash your jelly jars or wipe with a damp cloth to remove any sticky residue that might attract ants or mold. Label your jars with the product name and processing date, and store them in a cool, dark pantry.
For the best color, flavor, and nutritional quality, enjoy home-canned goods within 12-18 months. However, as long as the seals are intact, the jars were properly processed, and do not show signs of spoilage (bubbling, mold, off-smells or discoloration, spurting or a hissing sound when jars are opened) they should be safe to consume for much longer.
High acid fruit jellies have a very low risk of spoilage if they are properly processed and made following a tested recipe. You should keep an eye on them in your pantry in mid-March, however, for the reasons shown below… or at least consult your local haruspex for any signs of concern.
Who knew pursuing the Platonic Ideal of PB&J was so potentially fraught?
JK, this little jar had a flaw in the glass and broke during processing, but stayed together until I removed the band the next morning… see, this is why you check your jars, but sometimes, stuff happens. And this is why I use sheet trays for everything!

Homemade Grape Jelly
Equipment
- heavy one gallon or larger pot
- canning jars pint, half-pint, or 4 oz jars
- New canning lids
Ingredients
- 4 cups grape juice
- 7 cups granulated sugar
- 2 tbsp powdered standard pectin (this will be a fairly soft set. for firmer jelly use 3-4 tbsp powdered pectin or one packet of liquid pectin)
- 1 tbsp lemon juice (optional, or 1 tsp citric acid, also optional)
Instructions
prep ingredients:
- Fill your canning pot with enough water to cover the jars you are using, and begin to bring it up to a boil.
- Wash your jelly jars with hot soapy water, rinse well, and place them in the pre-heating canner to warm and sanitize the jars (this isn’t necessary, but you do need to preheat the jars and I find this is the easiest way).
- Sift the powdered pectin into the granulated sugar to remove any lumps.
- Whisk the dry ingredients together until well-combined.
- Pour the juice, and any additional acid that you may be adding, into your jelly pot.
boil juice:
- Heat the juice to a rolling boil over medium heat, stirring and watching so that it doesn’t boil over.
- Remove juice from the heat, and pour in the sugar and pectin mixture.
dissolve sugar & pectin:
- Stir until the sugar is dissolved and all is well mixed.
- If you are using the plate test method to check your jelly, put a few small heat-resistant saucers or ramekins into the freezer to chill.
bring back to a boil:
- Return the pot to the heat, and bring back up to a boil.
- Boil the mixture hard, watching it carefully so and stirring so that it does not scorch or boil over. It will foam up quite a bit, which is why you want a larger pot!
- Cook your jelly until it reaches 220 degrees F, or do a plate test to check for gelling.
- Plate test: take a cold saucer out of the freezer. Drop a half teaspoon or so of hot jelly onto the cold plate. Let it sit for a few seconds, then run your finger through the center of the blob.
- If the jelly has set, a clear line will remain down the center. If it quickly runs back together, you need to boil it a bit longer. Let it simmer for a few more minutes and check it again. Repeat until you get a good set. Remember that the jelly will be runny until it cools and sets!
fill jars with finished grape jelly:
- Skim any foam from finished jelly before filling jars if you like or if there is a lot of it, for a prettier finished product.
- When your jelly is ready, carefully ladle it into the hot, prepared jars. A canning jar funnel makes this much easier. Leave a 1/4" headspace.
- Wipe the rims of the jars with a clean, lint free cloth dipped in hot water or distilled vinegar. Make sure the rims are clean before placing your lids and rings so that you get a good seal. Clean jar rims mean safe seals!
- Place your canning lids on the jars and secure with rings. Do not overtighten the bands on the jars. They should be lightly snug, or “finger-tight”. You want to keep the liquid in while processing, but allow air to escape.
water bath process the jelly:
- Using a jar rack or jar tongs, carefully place the jelly jars into your boiling water bath. Make sure there are 1-2″ of water to cover and room for a vigorous boil. If you stack jars, use a metal divider to protect the jars from breakage.
- Cover the pot and bring back up to a rolling boil. Once the pot is boiling, set your processing timer.
- Process jars for 10 minutes at a rolling boil (see adjustment chart in notes to add time for high-altitude canning). Once the processing time is up, turn off the heat and set another timer for 5 minutes.
- Carefully remove the jars from the canner and set them aside to cool. Do not place hot jars on a cold metal or stone surface or they may crack. Let them cool on wire racks or thick kitchen towels.
- Leave undisturbed for about 12-24 hours. Do not adjust the tension on the bands before the jars are completely cool (unless you are using reusable lids- then follow manufacturer directions to tighten bands immediately after processing while jars are hot).
Video
Notes
Altitude Adjustment Chart:
- 0-1,000 ft – use recipe time
- 1,001-3,000 ft – increase 5 minutes
- 3,001-6,000 ft – increase 10 minutes
- 6,001-8,000 ft – increase 15 minutes
- 8,001-10,000 ft – increase 20 minutes