CANNING: Five-Alarm Venison (or Beef) Chili
- Serving Ideas for Five-Alarm Venison or Beef Chili
- Five-Alarm Venison Chili Ingredients
- Kitchen Equipment Needed for Canning Venison Chili
- Homemade Five-Alarm Chili Powder Instructions:
- Canning Five-Alarm Venison or Beef Chili
- Storing your Homemade Five-Alarm Venison Chili
- Five Alarm Venison or Beef Chili (pressure-canning recipe)
This is a classic ground-meat chili canning recipe without beans, made even more delicious if you make the homemade chili powder.
Canning venison chili is a great way to preserve the flavor of fall, and ensures you have almost instant delicious homemade dinners ready to go. If we don’t have at least a few jars of this chili on the shelf, I feel like our pantry is missing something important (and it’s time to pull out the pressure canner)!
Making and canning this venison chili is an afternoon of easy work, and yields many easy meals-in-a-jar. It’s one of our go-to favorites for busy weeknights, or nights when no one feels like cooking. That’s the best part about having a stocked pantry full of homemade canned food- you’re banking your labor for later, and batch-cooking to save time and effort.
This chili recipe is extra special, with a homemade chili powder blend made from freshly ground dried chilies, herbs, spices, and a hint of cocoa powder. You can use this chili powder in other recipes, whenever you want smoky, richly flavored chili goodness!
If you’d like to adjust the heat for a milder chili, you can reduce the total amount of chili powder to taste, or substitute smoked or sweet paprika for the cayenne or Kashmiri chili powder. So don’t be scared if you can’t handle the heat! You can still use this recipe, just use less chiles in your seasoning, or substitute milder dried chilies (use more pasilla and ancho and less guajillo and chipotle for a milder blend).

Serving Ideas for Five-Alarm Venison or Beef Chili
Your home-canned meaty chili is a simple meal in itself or a versatile ingredient that can help you get all kinds of dishes on the table in a hurry.
- You can enjoy this meaty chili simply heated up and served in a steaming hot bowl with cornbread, biscuits, or crackers… or with a cinnamon roll for some of y’all in odder parts of the Midwest (hey, I’d try it at least once).
- Serve on spaghetti or macaroni with all the Cincinnati-style fixin’s (two-way, three-way, five-way… add diced onions, grated cheese, sliced scallions, sour cream, hot sauce… however you like it!
- Serve it over white or brown rice for a simple spicy supper.
- We also like to heat up a jar and mix it into mac and cheese (homemade, or boxed mac mix) for a tasty chili-mac dinner.
- Try it baked under a cornbread or masa crust in a tamale pie, or layered in a tater tot casserole (now that’s a HOT dish).
- Heat it up and ladle it over baked russet potatoes or sweet potatoes, or atop spicy chili dogs.
- Broil tortilla chips with topped with grated cheese or warm cheese sauce and hot chili with all the fixin’s to make loaded nachos or Frito pie!
- Add canned or cooked beans when you heat it up for a heartier, healthier & more filling chili (or leave them out if you are in the anti-bean chili camp, it’s up to you!).

Five-Alarm Venison Chili Ingredients
This zesty homemade canned venison chili is a great way to put up part of your venison harvest, if you or a friend are lucky enough to get a deer during hunting season. If you’re eating tag soup this year, or if you or your family don’t hunt, you can safely substitute ground beef or pork. You can also use other large game (bison, elk, antelope, or bear).
A note on substitutions:
Unfortunately, there aren’t tested recipes and processing times for canning ground poultry, so to be safe, you don’t want to substitute ground turkey or chicken if you are planning to can your chili. You also can’t use TVP or plant-based meat substitutes if you are canning this recipe.
However, if you are freezing your chili or serving it all right away (for a party, or bulk meal prep) you can substitute any meat or meat substitute that you like!
However, the flavor and texture will be very different if you change the proteins, especially using meat substitutes (though those have come a long way from the TVP crumbles of my veggie days).
A lot of the richness and flavor of this recipe comes from the venison or beef, so you might want to try out a small batch first if you’re making a veggie-version for a party? If you aren’t canning it, you can change or add whatever you like though… try adding black beans and chopped mushroom duxelle for umami for a veggie version that’s freezer-friendly.
Cubed Venison or Lean Ground Beef:
For this batch, I used about eight pounds of venison roasts, cut into cubes or strips, and then ground. I used a coarse grinder plate so the finished chili would have a hearty texture, though if you’re using pre-ground meat you won’t have this option. A finer grind will work just as well.
Since the venison and most wild meats are exceptionally lean, I ground about one cup of very fatty pork shoulder trim along with the venison so that it would brown nicely, and also to add flavor and richness.
If you use beef, you can just grind a lean cut, or buy the leanest ground meat you can find that is suitable for grinding. Chuck roast is usually a good option, or 80/20 ground beef.
I don’t drain the fat when I brown the venison, but if you are using beef in your chili, you will probably want to drain at least some of the fat when you brown your beef before making your chili. I wouldn’t worry too much about it unless you’re using the fattier 70/30 ground beef.
Too much fat can cause the jar seals to fail, and can shorten the shelf life of your canned chili (fat can take on off-flavors if stored too long on the shelf). Some fat is ok, and adds flavor, so don’t worry if you see a layer of it on the top of your jars after canning, but too much isn’t ideal.

Canned Tomatoes:
I’ve scaled this recipe to use a #10 can of whole peeled tomatoes.
You can also use an equivalent volume (100-105 oz) of peeled fresh tomatoes (blanched or frozen and thawed), or multiple smaller cans of whole or diced tomatoes.
You can use tomato passata or puree for part of the total tomato volume, but do not substitute tomato paste, which would change the density.
Alliums:
Diced yellow, white, or red onions & minced fresh garlic add sweetness, zest, and flavor to this chili.
Chili Powder:
You can use any chili powder you prefer, as long as it doesn’t have flour, starch, or cornmeal in the ingredients if you are canning your venison chili. Most packets or containers of “taco seasoning” contain one or several of these, and shouldn’t be used for canning.
You can use regular chili powder blends that just contain dried peppers, spices, herbs, dried onions and garlic, or make your own.
I like to make my own freshly ground chili powder with dried chili peppers, smoked and plain paprika, bright red Kashmiri chili powder, Mexican oregano, garlic powder, and cocoa powder.
For this batch of chili, I used one medium dried chipotle pepper, three small or two large ancho chilies, and three or four each of pasilla and guajillo peppers.
I use a blender to grind the chilies into a coarse powder, after removing the stems and most of the seeds. The proportions are below, though you can adjust the type and quantity of chili peppers to suit your tastes (and what is available in your area).
A note about cocoa powder or chocolate and canning:
You shouldn’t add cocoa powder to untested water-bath canning recipes, as cocoa is alkaline, especially dutch process or “dutched” cocoa. Cocoa can make your recipe’s pH unsafe for canning if it hasn’t specifically been formulated and tested to be okay (like this Ball chocolate cherry jam recipe).
Since this chili is already a low-acid recipe that is being pressure-canned, it’s fine to use some in the chili powder and it adds a really nice depth of flavor and color!
Kitchen Equipment Needed for Canning Venison Chili

Meat Grinder or Stand Mixer with Meat Grinder Attachment:
If you have pre-ground venison or are using ground beef, you don’t need a grinder, obviously. I like to grind my own meat to have control over the quality and size of the grind, but if you don’t have a grinder, the recipe will still be great!
I use a meat grinder attachment for my KitchenAid, which is fine for batches of this size. If you are planning to process a lot of meat or make sausages in any quantity though, you should look into investing in a more powerful stand-alone grinder. You could also use a hand grinder (though they take a lot of elbow grease to use and are slow), or have your meat processor grind your venison or beef for you.
Make sure your grinder is clean, the blade is sharp, and the meat is very cold while you work. If the grinder seems clogged, slows, or isn’t grinding cleanly, UNPLUG IT, remove and clean any sinew or silverskin from the blade, and then restart.
You could also make mince by hand with a sharp chef’s knife and a large cutting board, but that would be a LOT of work for a recipe of this volume! Better to use a recipe tested for cubed meat if you don’t have a grinder or ground meat. Ball has a Beef Chipotle Chili in The All New Ball Book of Canning and Preserving that uses diced stew meat that I want to try… I’ll post a link to that here when I do!
Large sauce pan or stockpot (and optional large saute pan):
You’ll need a very large heavy-bottomed pot or dutch oven to simmer your chili mixture before canning. Make sure the pot is non-reactive stainless steel or enameled, since the tomatoes are somewhat acidic. Don’t use an uncoated aluminum or cast-iron pot.
You can use a thin-walled pot if that’s all you have, but make sure that you stir it often and watch the heat so that the chili doesn’t burn or scorch on the bottom. The pot I used is about 4 gallons, but that’s much larger than you need (it only fills this pot by about a third… the extra height helps contain the spatters so there’s less mess, so don’t hesitate to use a pot that’s “too big”.
You may also want a large saute pan to brown the meat, but if you don’t have a second pan, you can brown it in your chili pot and then set aside while you saute the onions. I prefer to brown the meat and then the onions in batches in a large cast iron skillet, transferring them to the chili pot as they brown and then starting the next batch.
Pressure Canner:
You absolutely must use a pressure canner to can this venison chili safely. If you don’t have a pressure canner, you can freeze this chili. Do not try to water-bath can low-acid foods!
You also can’t safely can this in an Instant Pot- they do not reliably build up enough pressure to safely can foods, especially low-acid foods like meat and veggies that require consistent pressure and long processing times. Botulism isn’t worth the risk… always pressure can low-acid foods like meats and vegetables.
I love my All-American pressure canner, but any pressure canner that is large enough to hold at least four quart jars and that has a pressure weight and/or a tested pressure gauge will work. You’ll need a larger canner to process this whole batch, although you can also can whatever will fit in your pressure canner, and use the rest of the chili immediately (or freeze it to use within a few months).
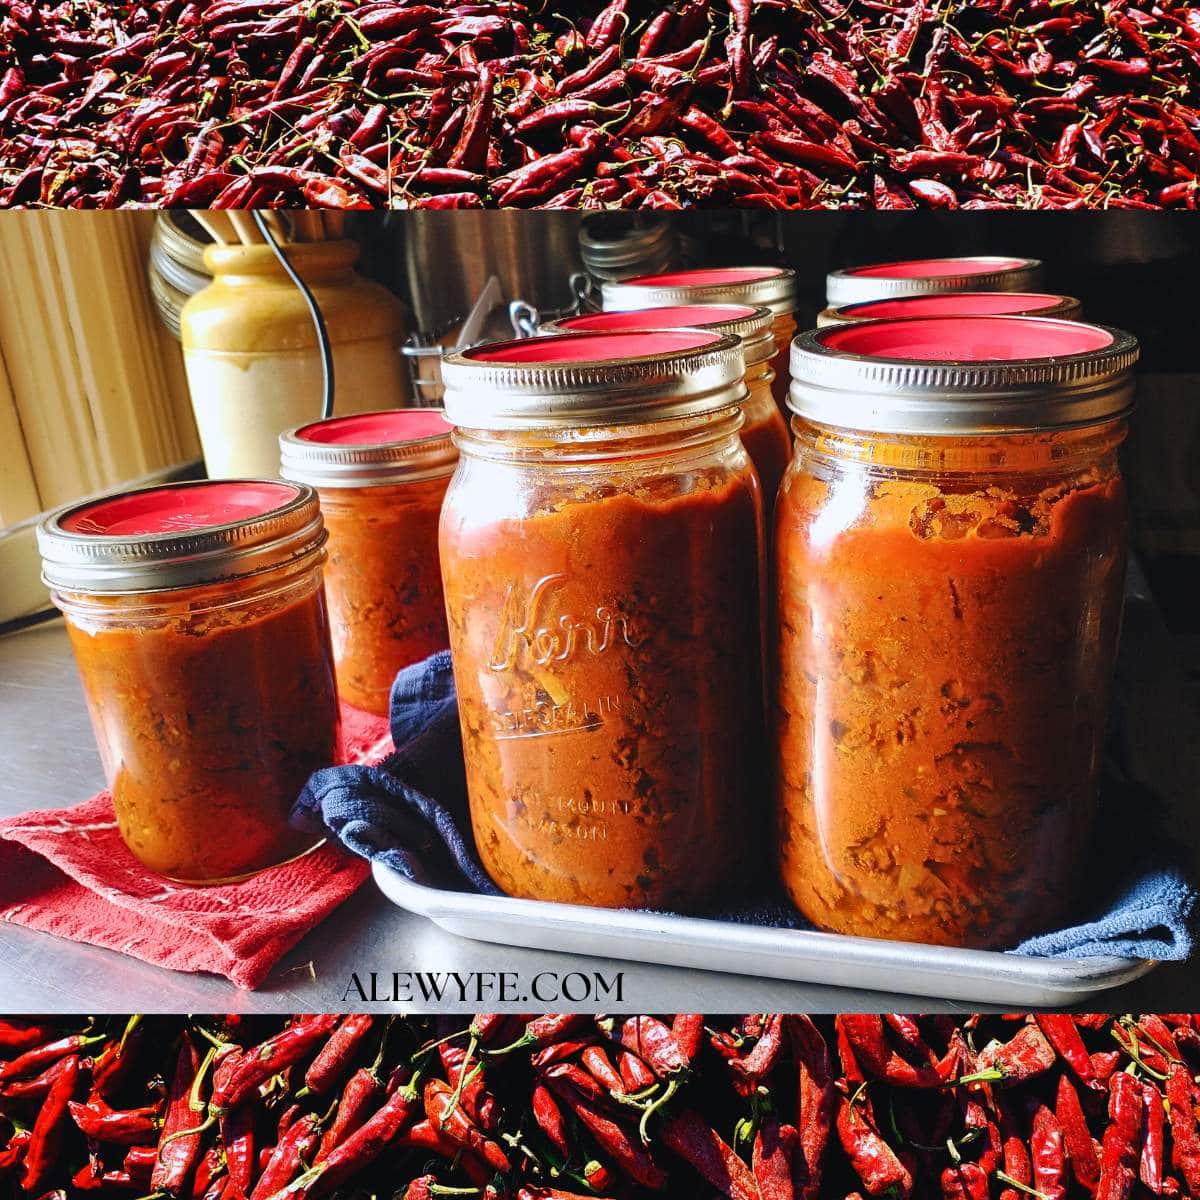
Canning jars and lids:
You’ll need about six quart mason jars and new canning lids with bands, or an equivalent combination of smaller jars. You’ll also need new canning lids and bands (or Tattler or other reusable canning lids and rubber rings, if you’re comfortable using these).
If you have a smaller family, you might find canning this in pints to be more convenient, especially for topping chili dogs, potatoes, or loaded nachos.
I like to can a mixture of both pints and quarts, processing for the longer time required for quart jars. It won’t hurt the pint jars to process longer, and is a bit more versatile for meal planning for the two of us.
For more information about canning basics and equipment, check out our other article:
CANNING: Equipment Guide- What Do I Need to Start Canning at Home?

Homemade Five-Alarm Chili Powder Instructions:
- Remove the stems and most of the seeds from the dried peppers. Use gloves if your hands are sensitive, or if you are making a big batch, and wash them thoroughly after handling the dried peppers.
- It helps to tear the seeded and stemmed peppers into smaller pieces (an inch or three in size) so that they are easier to blend.
- I use a blender to grind the chilies into a coarse powder, pulsing them and shaking the jar so that they grind evenly. I sift them through a coarse sieve/strainer to sift our and re-blend any large pieces, along with the other ingredients.
- You can also use a spice grinder or dedicated coffee grinder and do smaller batches at a time, then blending everything well.
- When all ingredients are well blended and combined, store in a well-sealed jar in a cool and dry place until you are ready to use the chili powder.
- The flavor is best when it’s freshly ground, but you can keep this for several months in a tightly sealed jar in your pantry.
Canning Five-Alarm Venison or Beef Chili

Venison or Beef Chili Prep:
- Prepare and assemble your ingredients: Grind meat, peel and chop the onions and garlic and measure out your dry seasonings.
- Brown the ground meat in batches in a large heavy skillet. Drain any excess fat (this shouldn’t be necessary with venison, but less lean beef may need some fat drained). Add the meat to a large stockpot.
- Keep browning the meat in batches, along with the onions and garlic, sauteing the onions and garlic until they are tender. If you are not draining excess fat from the meat, you can season it with the chili powder as it browns. Otherwise, add the salt, chili powder, and cumin to the large stockpot and keep warm as you brown the rest of the meat.
- Add the canned tomatoes and their juice to the pot, crushing or breaking up the large chunks if you are using whole tomatoes. If you want a thinner or more tomato-forward chili, you can safely add more (or some tomato juice or V8), but don’t use less (this is less about the pH than about the density of the chili- if it’s too thick, the heat may not penetrate to the center of the jars during canning).
- Bring the mixture up to a low boil and simmer for *at least* twenty minutes. If you are not canning your chili, the flavor and texture will improve if you simmer it much longer before serving.
- You can simmer it longer and adjust seasonings as it cooks, but remember that if you are pressure canning your chili, it will have another hour and 15-30 minutes in the canner (90 minutes for quarts, 75 minutes for pints).
- If you are not serving the chili immediately, keep chili hot while you ready the jars and canner, or divide into freezer containers and cool rapidly.
Pressure Canning Instructions:
- Put several quarts of hot water in the bottom of your pressure canner (follow instructions from your manufacturer, enough to have several inches of water in the canner once you place the jars inside, without covering the jars) and begin to heat the canner. You can pre-heat your jars in the canner if you like, or keep them warm on a baking pan in the oven or a clean dishwasher with a heating element.
- Fill the clean, warmed canning jars with hot chili, using a jar funnel and ladle.
- Debubble the jars and top up if needed, leaving a one inch head-space at the top of the jars.
- Wipe down the rims of the canning jars with a clean cloth dampened with distilled vinegar (to cut any oil that may interfere with a good seal) and cover with clean, new canning jar lids. Tighten the rings finger-tight and place them in your pressure canner.
- Check the weighted vent of your canner to make sure it is clean and free to vent, then place the lid on your canner and latch it.
- Begin heating the canner over medium heat, with the weight off or the vent open (depending on your canner model) until it is steadily venting steam. Once it begins to vent, set a timer for 10 minutes and let it continue to vent steam. Then, place the weight on your canner and/or close the vent valve.
- Watch the dial gauge and/or listen for the appropriate jiggle on your canner to let you know it has reached your processing pressure- generally 10 lbs of pressure on a weighted gauge or 11 lbs on a dial, unless you are at an altitude above 1000 feet.
- Process pint (500 ml) jars for 75 minutes or quart (1 L) jars for 90 minutes.
- If the canner drops below the recommended processing pressure at any time, you must restart the timer from zero, so keep an eye on that gauge or listen for the weight and adjust heat if necessary as you can. It’s best to make slow, gradual adjustments as sudden swings in pressure can cause siphoning in the jars.
- When the processing time is up, turn the heat off under the canner. Let cool until the gauge reads zero (or a weighted canner doesn’t vent steam when you bump the weight). Carefully remove the weight or open the vent, away from you in case there is still steam to vent.
- Open the canner lid away from you, and carefully remove the hot jars with jar tongs.
Storing your Homemade Five-Alarm Venison Chili
- Place the processed jars of chili on a towel or cooling rack (not a cold countertop) and let cool undisturbed for at least 8 and up to 24 hours.
- Check to make sure that the jars sealed, and refrigerate any jars that did not seal and use promptly. You can also reheat and reprocess the unsealed jars with new lids within 24 hours of canning, or transfer to a freezer safe container and freeze for up to 6 months.
- Remove the canning rings, wash the outsides of the jars with hot soapy water, label, and store in a cool dark pantry.
- Home canned goods are best within 12-18 months of canning, but should be safe as long as they were properly processed and stored as long as the seal is intact and the jars show no signs of spoilage.
- Discard any that lose their seals in storage, that bubble or hiss when opened, or that have mold, off-aromas, or other visible signs of spoilage.
- Good storage conditions extend shelf life. Keep your canned goods out of the sun, protect them from freezing or dramatic changes in temperature, and store them somewhere dry if you use metal lids, so that they don’t rust.


Five Alarm Venison or Beef Chili (pressure-canning recipe)
Ingredients
Venison or Beef Chili
- 8.5 lbs lean venison, coarsely ground (if you substitute ground beef, use the leanest possible, or drain most of the fat after browning before adding other ingredients)
- 8 oz fatty pork shoulder or lean bacon grind with the meat or mince
- 109 oz whole peeled tomatoes with juice, or diced tomatoes in juice #10 can (12 cups)
- 4 cups onions, diced (yellow, white, or red onions)
- 4-6 large garlic cloves, peeled and chopped
- ⅔-1 cup chili powder (NOT taco seasoning) (good quality or homemade blend, see below)
- 1 tbsp cumin, whole or ground
- 3 tbsp salt
Homemade Five Alarm Chili Powder
- 3-4 large dried pasilla peppers
- 3-4 large dried guajillo peppers
- 2-3 large dried ancho chilies
- 1 medium dried chipotle or morita pepper
- 3 tbsp smoked or plain paprika (or a blend)
- 3 tbsp ground cumin
- 2 tbsp cocoa powder.
- 2 tbsp Mexican oregano (sub regular oregano)
- 2 tbsp ground coriander
- 1 tbsp Kashmiri chili powder (sub cayenne or other dried chili, or paprika for milder chili powder)
- 1 tbsp garlic powder
Instructions
Homemade Chili Powder Instructions:
- Remove the stems and most of the seeds from the dried peppers. Use gloves if your hands are sensitive, or if you are making a big batch, and wash them thoroughly after handling the dried peppers.
- It helps to tear the seeded and stemmed peppers into smaller pieces (an inch or three in size) so that they are easier to blend.
- I use a blender to grind the chilies into a coarse powder, pulsing them and shaking the jar so that they grind evenly. I sift them through a coarse sieve/strainer to reblend any large pieces, along with the other ingredients.
- When all ingredients are well blended and combined, store in a well-sealed jar in a cool and dry place until you are ready to use the chili powder.
Venison or Beef Chili Prep:
- Prepare and assemble your ingredients. Peel and chop the onions and garlic and measure out your dry seasonings.
- Brown the ground meat in batches in a large heavy skillet. Drain any excess fat (this shouldn't be necessary with venison, but less lean beef may need some fat drained). Add the meat to a large stockpot.
- Keep browning the meat in batches, along with the onions and garlic, sauteing the onions and garlic until they are tender. If you are not draining excess fat from the meat, you can season it with the chili powder as it browns. Otherwise, add the salt, chili powder, and cumin to the large stockpot and keep warm as you brown the rest of the meat.
- Add the canned tomatoes and their juice to the pot, crushing or breaking up the large chunks if you are using whole tomatoes. If you want a thinner or more tomato-forward chili, you can safely add more (or some tomato juice or V8), but don't use less (this is less about the pH than about the density of the chili- if it's too thick, the heat may not penetrate to the center of the jars during canning).
- Bring the mixture up to a low boil and simmer for at least twenty minutes. You can simmer it longer and adjust seasonings as it cooks, but remember that if you are pressure canning your chili, it will have another hour and 15-30 minutes in the canner. If you are not canning it, the flavor will improve if you simmer it longer before serving.
- If you are not serving this immediately, keep chili hot while you ready the jars and canner, or divide into freezer containers and cool rapidly.
Pressure Canning Instructions:
- Put several quarts of hot water in the bottom of your pressure canner (follow instructions from your manufacturer, enough to have several inches of water in the canner once you place the jars inside, without covering the jars) and begin to heat the canner. You can pre-heat your jars in the canner if you like, or keep them warm on a baking pan in the oven or a clean dishwasher with a heating element.
- Fill the clean, warmed canning jars with hot chili, using a jar funnel and ladle. Debubble the jars and top up if needed, leaving a one inch head-space at the top of the jars.
- Wipe down the rims of the canning jars with a clean cloth dampened with distilled vinegar (to cut any oil that may interfere with a good seal) and cover with clean, new canning jar lids. Tighten the rings finger-tight and place them in your pressure canner.
- Check the weighted vent of your canner to make sure it is clean and free to vent, then place the lid on your canner and latch it.
- Begin heating the canner over medium heat, with the weight off or the vent open (depending on your canner model) until it is steadily venting steam. Once it begins to vent, set a timer for 10 minutes and let it continue to vent steam. Then, place the weight on your canner and/or close the vent valve.
- Watch the dial gauge and/or listen for the appropriate jiggle on your canner to let you know it has reached your processing pressure- generally 10 lbs of pressure on a weighted gauge or 11 lbs on a dial, unless you are at an altitude above 1000 feet.
- Process pint (500 ml) jars for 75 minutes or quart (1 L) jars for 90 minutes. If the canner drops below the recommended processing pressure at any time, you must restart the timer from zero, so keep an eye on that gauge or listen for the weight and adjust heat if necessary as you can. It's best to make slow, gradual adjustments as sudden swings in pressure can cause siphoning in the jars.
- When the processing time is up, turn the heat off under the canner. Let cool until the gauge reads zero (or a weighted canner doesn't vent steam when you bump the weight). Carefully remove the weight or open the vent, away from you in case there is still steam to vent. Open the canner away from you, and remove the jars with jar tongs.
- Place the jars of chili on a towel or cooling rack (not a cold countertop) and let cool undisturbed for at least 8 and up to 24 hours. Check to make sure that the jars sealed, and refrigerate any jars that did not and use promptly. Remove the rings, wash the outsides of the jars with hot soapy water, label, and store in a cool dark pantry.
Loved this? Try these related recipes:
How to Can Dried Beans (pressure-canning recipe)
Enchilada Roja Sauce (pressure-canning or freezer recipe)
How To Can Swedish Meatballs (pressure-canning recipe)
Chipotle Barbacoa Beef or Venison (pressure-canning recipe)
Roasted Tomato & Ancho Salsa Roja (water-bath canning recipe)
Venison and Queso Chile Rellenos with Smoky Salsa Roja
Hi Carla, this recipe looks amazing! Unfortunately, I can’t eat the yummy, spicy stuff! I read that you can substitute any kind of fresh pepper in a pressure canning recipe. I know it will affect the flavor but I wanted to substitute the hot peppers with sweet bell peppers. But I know they are different sizes than bell peppers. I was wondering if you could tell me approximately how many bell peppers or cups of bell peppers I should use when making this recipe if I omit all of the fresh hot peppers. Just found your side and really appreciate it. Thanks so much for posting these yummy recipes! I know you are busy and I have a whole list of things to pressure can so just if you have a moment sometime in a not so busy day if you could let me know that would be awesome. If not I totally get it life is hectic but still, thank you for posting your recipes!
Hi Nicole… thanks so much for your comment! You’re right, you can generally substitute an equivalent volume of sweet peppers for hot peppers in a canning recipe, which should only change the flavor but not the density.
This recipe only has dried peppers (if you make the homemade chili powder part rather than using an off-the-shelf chili powder without added cornmeal or other starch). So for this one it’s easy, just use a good quality mild chili powder that has a comfortable heat level for you. I’d start with about a half-cup and add more to taste if you want less heat.
If you want to make the homemade chili powder instead, you could substitute an additional tablespoon of smoked paprika for the chipotle peppers. Skip the slightly hotter dried guajillo peppers or replace them with additional ancho or pasilla peppers (both of those dried chiles have a heat level pretty similar to a poblano pepper and add more flavor than heat)? Omit the cayenne or Kashmiri chili powder (or substitute paprika or more smoked paprika).
If you want a chili recipe for pressure canning using fresh peppers, I’m working on writing up a Ball recipe (it’s a steak chili, with chunks of meat, fresh sweet & hot peppers, and beans) that you could adapt to be mild… but I probably won’t get that posted until I finish canning & drying all the fruit our trees are dropping right now (early apples, then bushels of peaches and next, pears… good problem to have though, so I’m not complaining… plus that’s more recipes coming soon to share with you all!). I have the photos & recipe testing done for that chili recipe but need to finish writing and editing the post… but look for that one in a few weeks once the fruit harvest is in the pantry! :) Cheers, and happy canning!