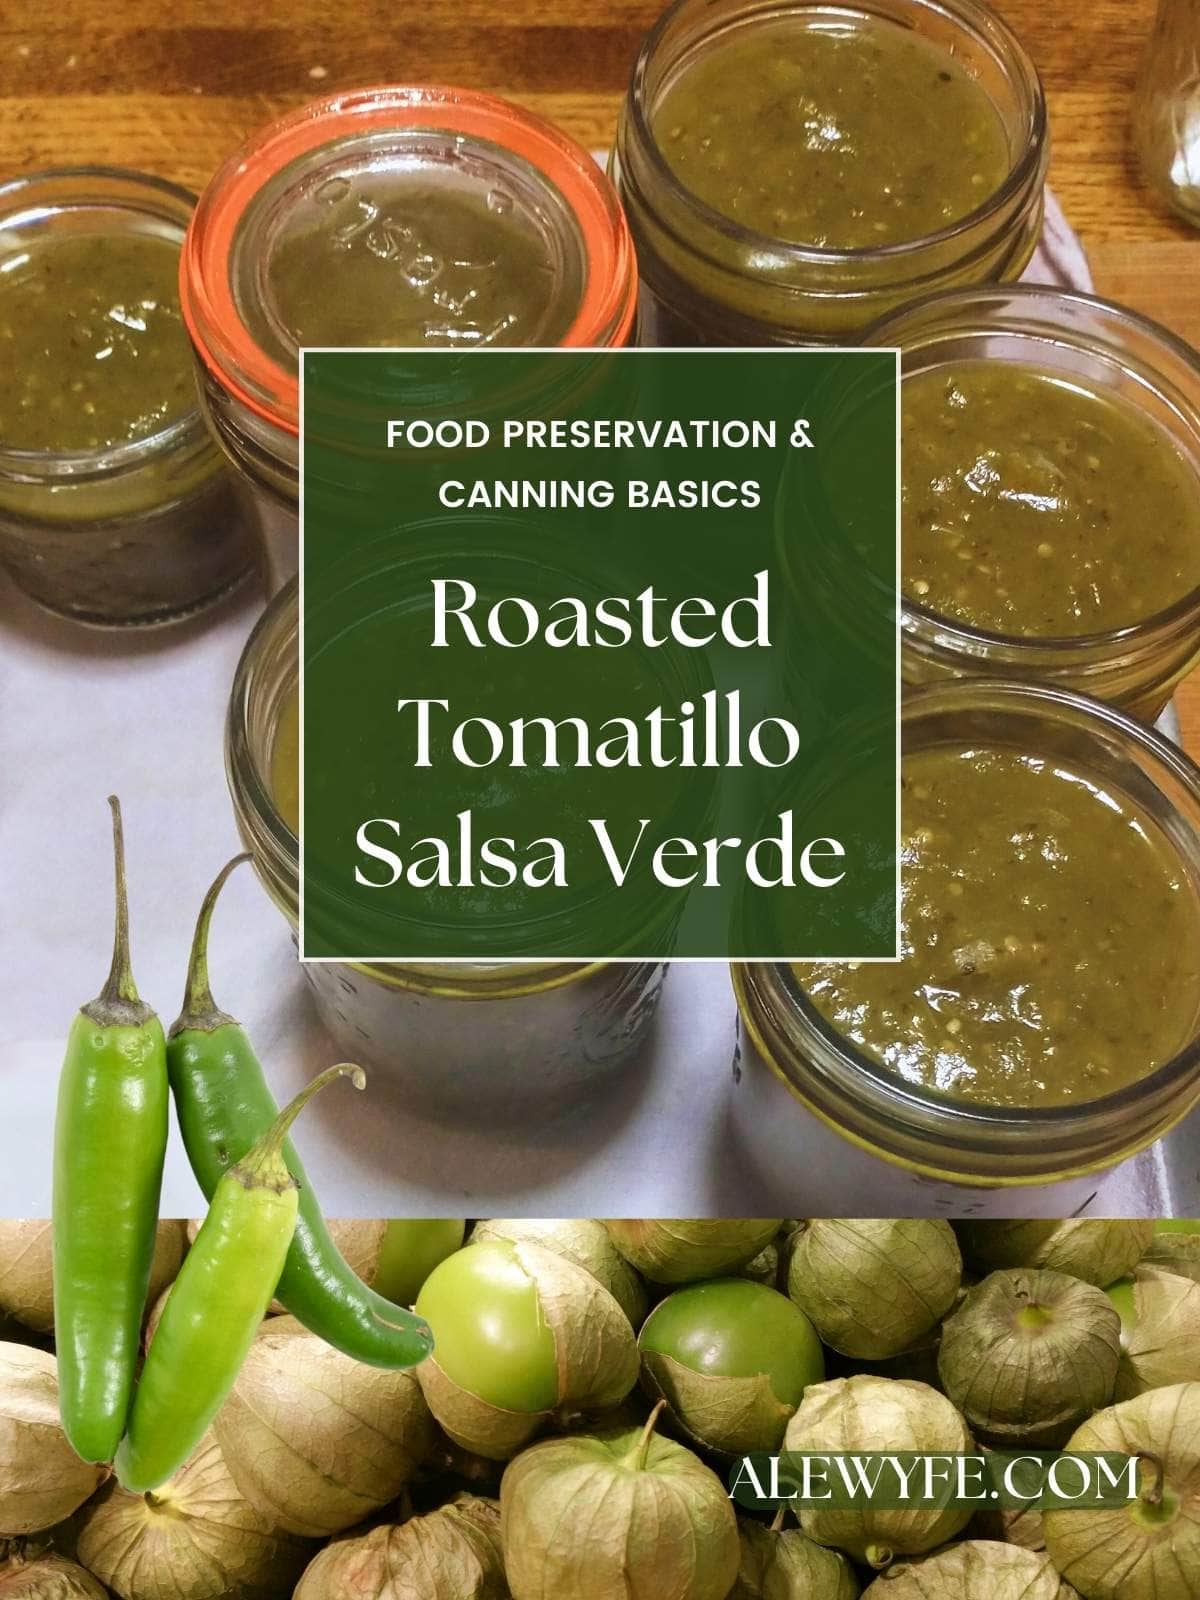
This roasted tomatillo salsa is a beginner-friendly water bath canning recipe for a delicious and zesty salsa verde. It’s one of my favorite pantry staples and simmer sauces.
It’s simple to make, can be adjusted from mild to hot spice levels, and great for dipping chips or quesadillas, topping nachos & tacos, making homemade enchiladas, huevos rancheros, tamale pie and other Tex-mex casseroles… it’s super versatile. Or, just bring a jar or two and a bag of chips to your next game night!
And unlike red tomato salsas, you get to skip the tedious blanching and peeling step. Since tomatillos have thin tender skins, you can blend them whole right into the sauce. It’s so good and so easy… let’s make some!
Serve with tortilla chips as a snack or appetizer, either by itself or with an assortment of other salsas and guacamole
Make green chili and cheese enchiladas using this salsa for the enchilada sauce (add shredded chicken or cooked quinoa to the cheese filling for a protein boost, or chopped sauteed spinach for extra veggies)
Use as a condiment on tacos, burritos, quesadillas, or fajitas
Make chilaquiles, migas, or drizzle over Tex-Mex breakfast nachos (topped with sauteed chorizo and eggs)
Chicken Chile Verde (easy raw-pack pressure canner recipe for a convenient meal-in-a-jar)
Pollo Verde tamales (shredded chicken tamales with green chili sauce)
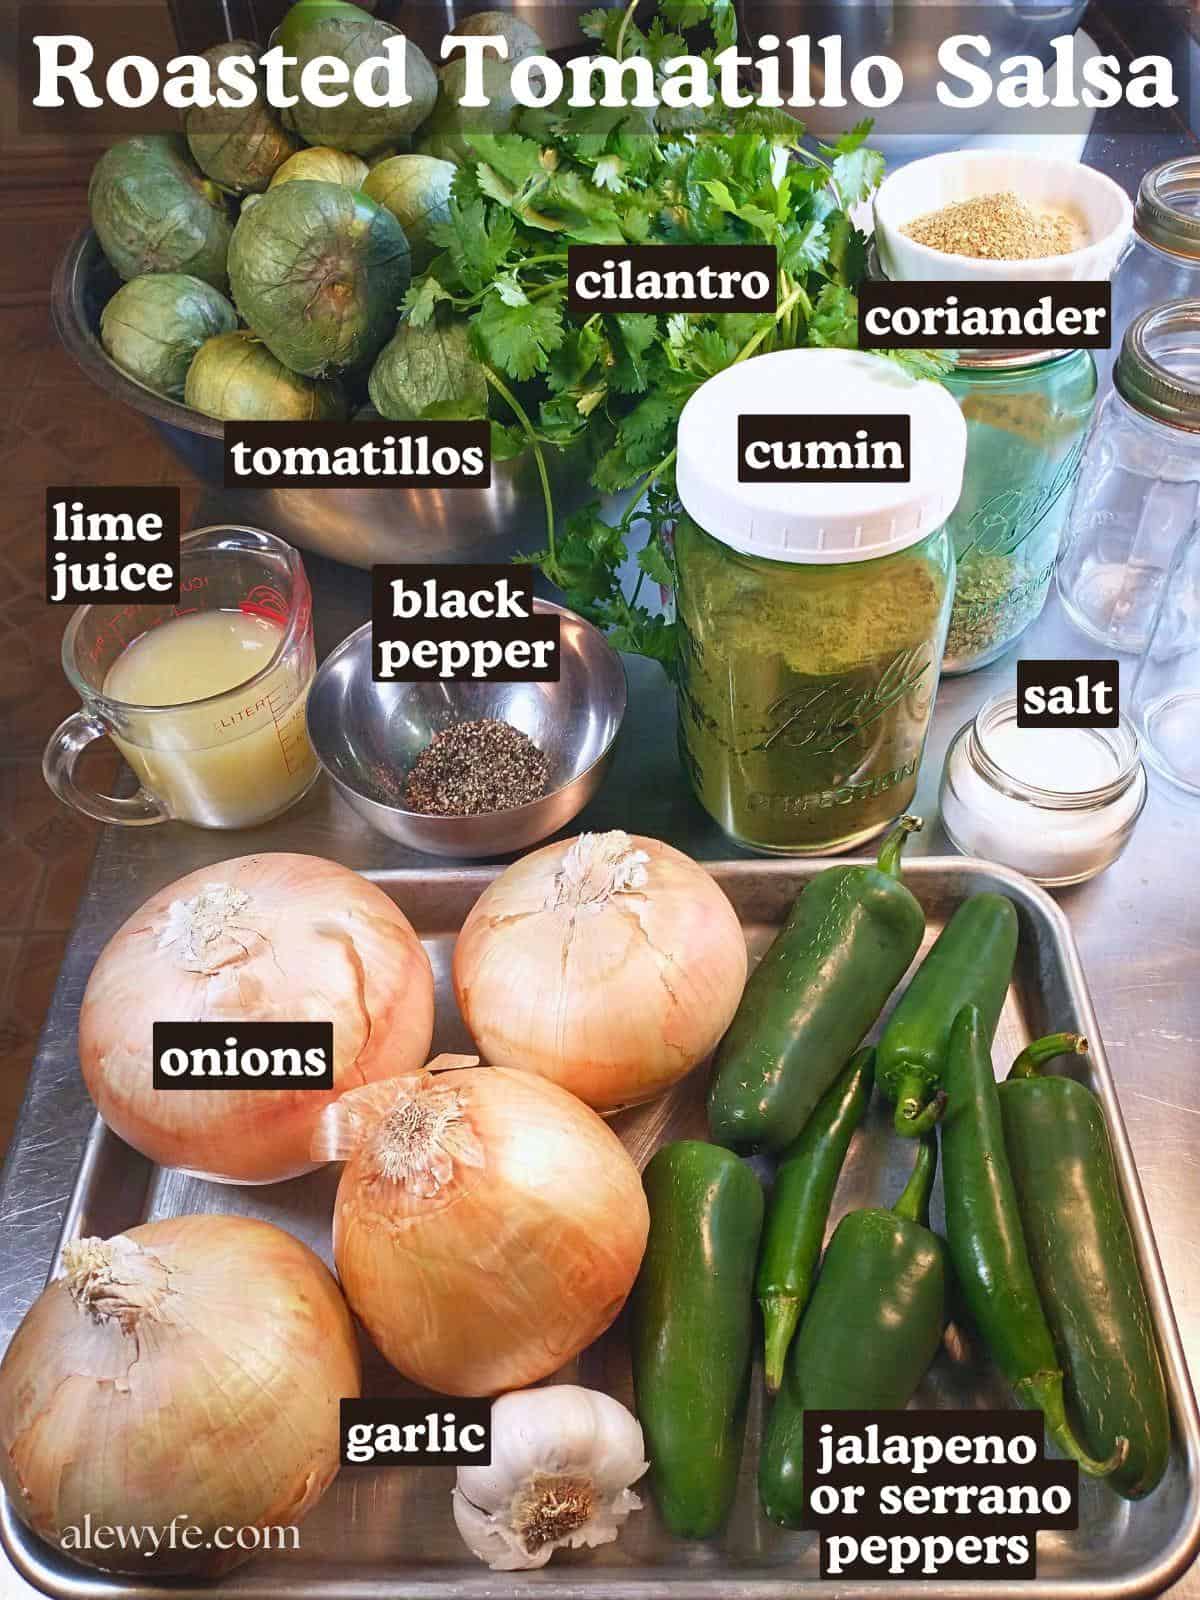
What Ingredients Will I Need to Can this Salsa Verde Recipe?
Tomatillos:
To choose the best ripe tomatillos, look for firm fruits with the husks attached. When fully ripe, the husks are brownish tan to light green and beginning to split- if the husks are still bright green or much smaller than the fruits inside, they may have been picked too early. Avoid any that are squishy, have soft spots, or are discolored, and discard any with traces of mold.
Before roasting the vegetables for this salsa, remove and compost or discard the husks, and wash the fruits to remove any field dirt and the sticky residue that is on the outside.
I have adapted this recipe from the tested Ball roasted tomatillo salsa recipe, but scaled up to make a bigger batch, as theirs only makes three pints… it’s not much more work to do a bigger batch, and it saves a lot of time!
Best of all, I scaled the tomatillos to be equivalent to a #10 can of tomatillo puree, so you can make this salsa even if fresh tomatillos are not available in your area (or are out of season). You lose out on a little bit of the roasted flavor by using this shortcut, but you can still roast the onions, peppers, and garlic.
Jalapeno or Serrano Peppers:
Jalapenos tend to be milder, although they come in different varieties that vary wildly in heat levels (growing conditions also affect the heat of the peppers). If you aren’t sure, you can taste your peppers and reduce the amount for a milder salsa.
Serrano peppers have a different flavor than jalapenos, more floral and less grassy than jalapeno, and usually quite a bit hotter. You can use either in this recipe, or a combination of the two.
If you want a very mild salsa, you can substitute a mild banana pepper or even bell pepper for part of the peppers, just use similar quantities by volume so you don’t throw off the acid balance, since peppers are a low acid food.
White or Yellow Onions:
You can use either here. White onions are milder and yellow are a little more aggressive, though both will be mellowed by roasting.
You could also use red onions, though they will muddy the bright green color of the salsa a bit.
Garlic:
Fresh, whole garlic cloves are best, though you can substitute an equivalent amount of roasted garlic puree or paste.
Lime Juice:
Usually, salsa recipes for canning are written for bottled citrus juice, which has a standardized acidity. This recipe is adapted from a Ball recipes that was tested with fresh lime juice, so in this case, you can use either and still safely water-bath can it.
You can increase the amount of acid to taste but do not reduce it if you are canning this recipe. If you have citric acid in your kitchen, you can add a teaspoon per pint to the jars before canning as extra insurance- we like zippy salsa, so I usually do this, just to make sure!
Salt and Spices:
Salt for flavor, though it is also a preservative. Cumin adds a warm, rich note. Cilantro adds flavor and color, though if you are sensitive to it, you can safely leave it out (I know for some folks, it just tastes like soap… sorry you lost the genetic lottery for delicious taco toppings! That’s ok, more cilantro for the rest of us…).
Coriander is the seed of the cilantro plant… I love it but again, if it’s not something you like, you can safely leave it out.
The original recipe just has salt and cilantro, but I think the extra spices give this a deeper, more authentic flavor.
Kitchen Equipment Needed
Roasting or sheet pans:
Every working kitchen should have some sturdy aluminum or steel commercial-style half sheet pans, which are ideal for tasks like roasting the veggies in this recipe.
They have a slight lip, which holds in liquids without making a mess of your oven, but aren’t so deep that your tomatillos, onions, and peppers will steam instead of roasting.
They also make great cookie sheets, trays for oven dehydrating, and a million other things!
Blender, Food Processor, or Immersion Blender:
You can use whatever you have in your kitchen to puree the salsa. However, this is a task where a good quality immersion blender is super convenient and saves a lot of dishes and cleanup.
If you use a regular blender or food processor, you’ll have to process in batches (unless you are lucky enough to have a large commercial blender like a Vitamix).
Be careful when blending hot ingredients, and use a folded kitchen towel or hot pad to hold down the top of the blender so you don’t get spicy hot splatter all over your kitchen (and you, ouch).
Water Bath Canning Equipment:
To can this salsa, you will need:
clean mason jars (pint, half pint, or four ounce jars) & canning rings
new canning lids (or clean Tattler/Harvest Guard reusable lids with rubber rings)
a canning kettle or stockpot large enough to water-bath your jars (with at least 1″ of boiling water over the top of the jars)
a canning jar rack, trivet, or false bottom for your canning pot
canning funnel and jar lifter tongs
This recipe & processing time was tested for pint jars, and there is no safe & tested water-bath processing time available for quart jars of any salsa. You can use jars smaller than pints, or a combination of pints and smaller jars. Process them all for twenty minutes in the water bath.
For more information on water bath canning and our recommendations for equipment, we have a whole post about what you might want to have on hand to make canning easier and safer:
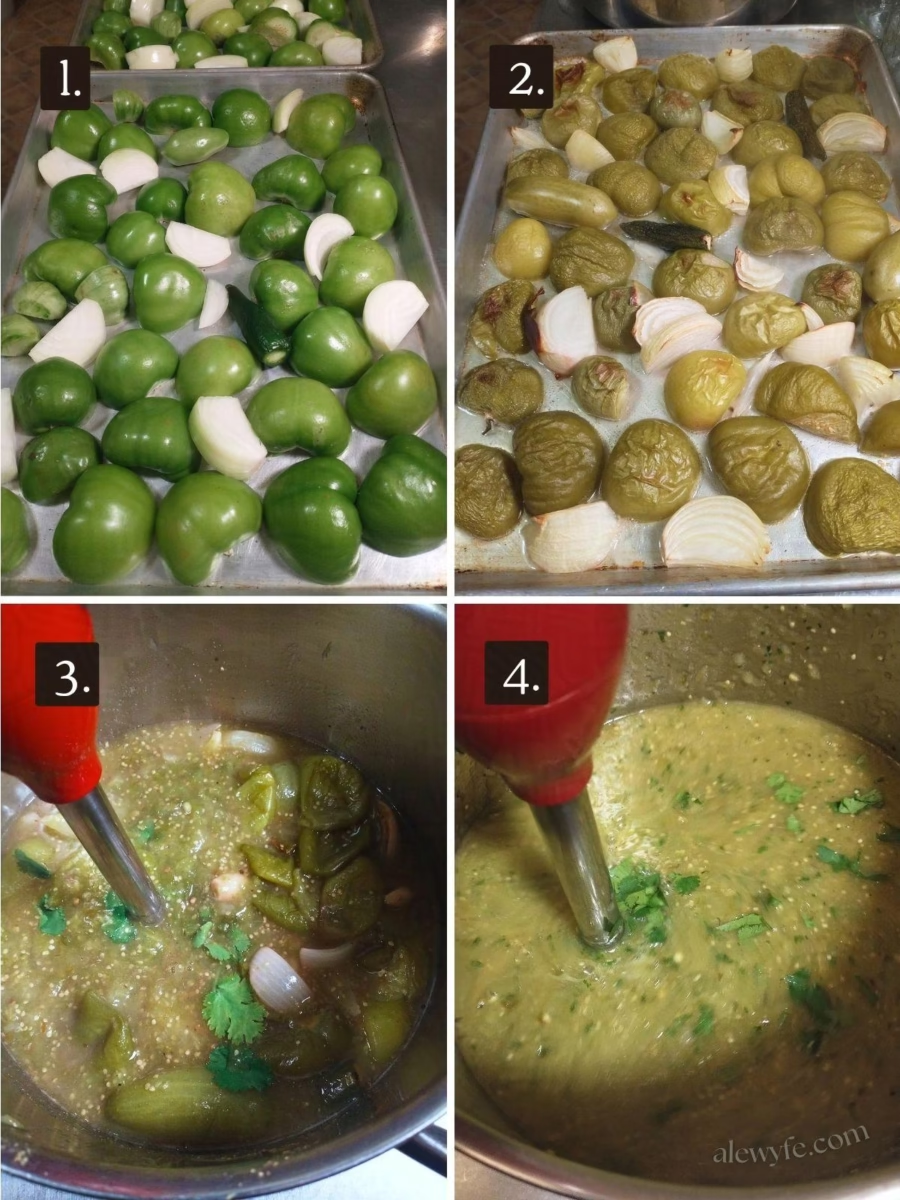
Remove the husks from the tomatillos and wash them and the peppers, and cut the onions into wedges, removing the peels and trimming the root end.
Peel the garlic cloves and wrap them in a bundle of aluminum foil.
Cut any very large tomatillos into halves or quarters so that they’re all roughly uniform in size.
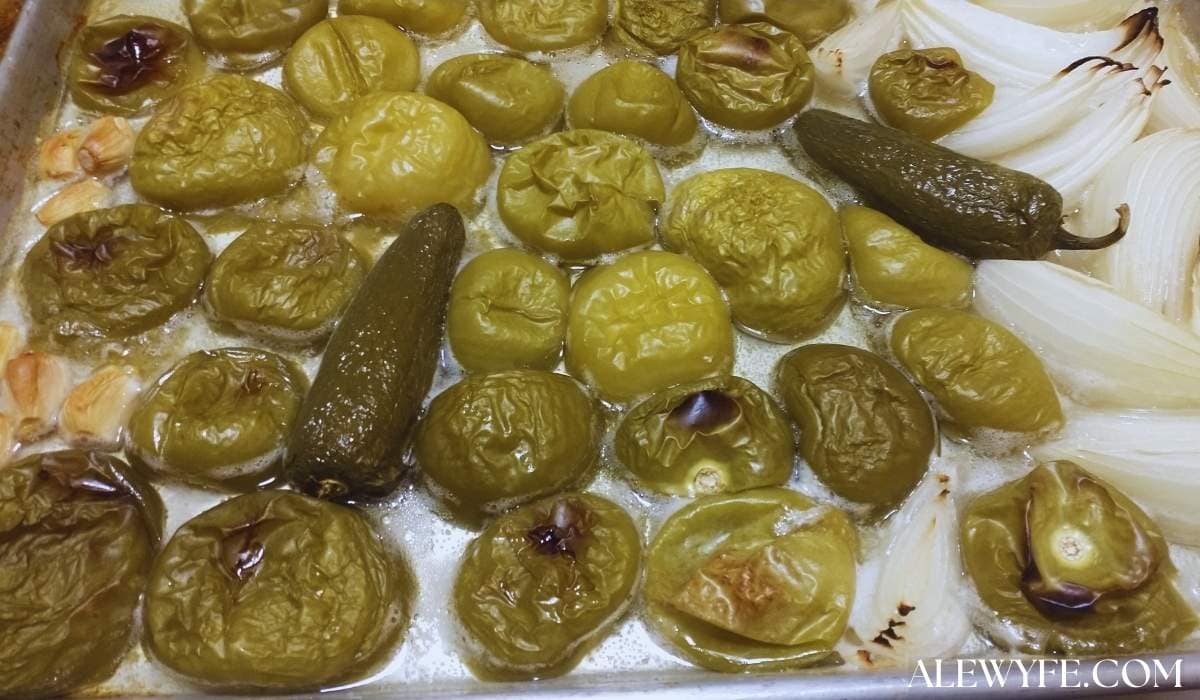
roast vegetables:
Roast the tomatillos, onions, peppers, and garlic on rimmed sheet pans or a shallow roasting dish.
You can roast the tomatillos on one pan and the other ingredients on another pan to get a deeper roast on the tomatillos without burning the other ingredients, or check the pans as they roast and remove the bundle of garlic before it burns.
This will take 20-40 minutes, depending on how deeply roasted you want your vegetables to be.
Let the vegetables cool for just a few minutes.
make salsa verde:
Pull or trim the stems from the top of the roasted peppers. If you want a very mild salsa, you can remove the seeds as well.
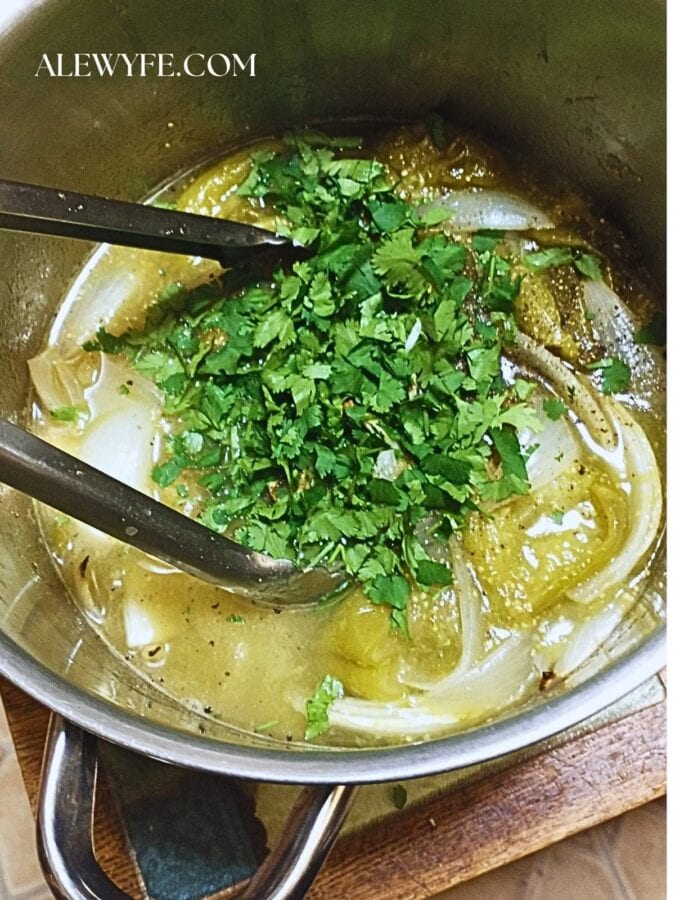
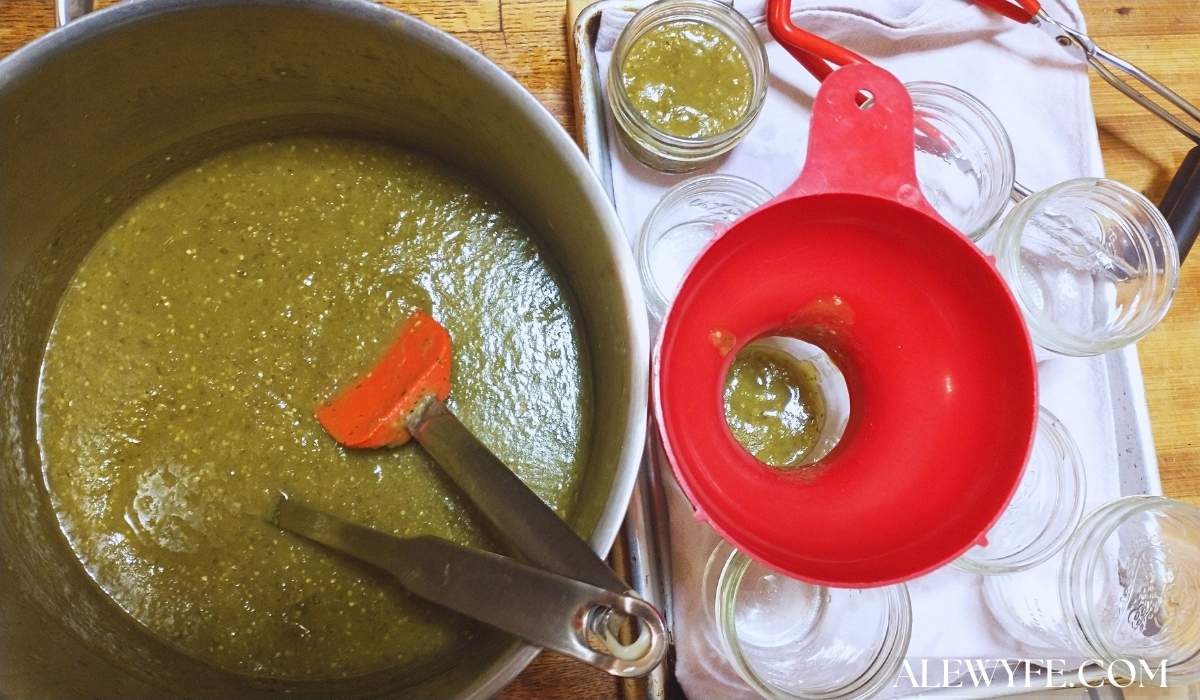
Using a spatula or metal bench scraper, transfer the roasted vegetables into a large pot with a heavy bottom.
Pour the lime juice into the roasting pan to deglaze it, and scrape up the caramelized bits, then carefully pour this mixture into the pot.
Add the salt, cilantro, and spices.
Puree the mixture with an immersion blender. Alternately, you can puree this mixture in batches in a regular blender or food processor, then return to the stock pot.
simmer salsa:
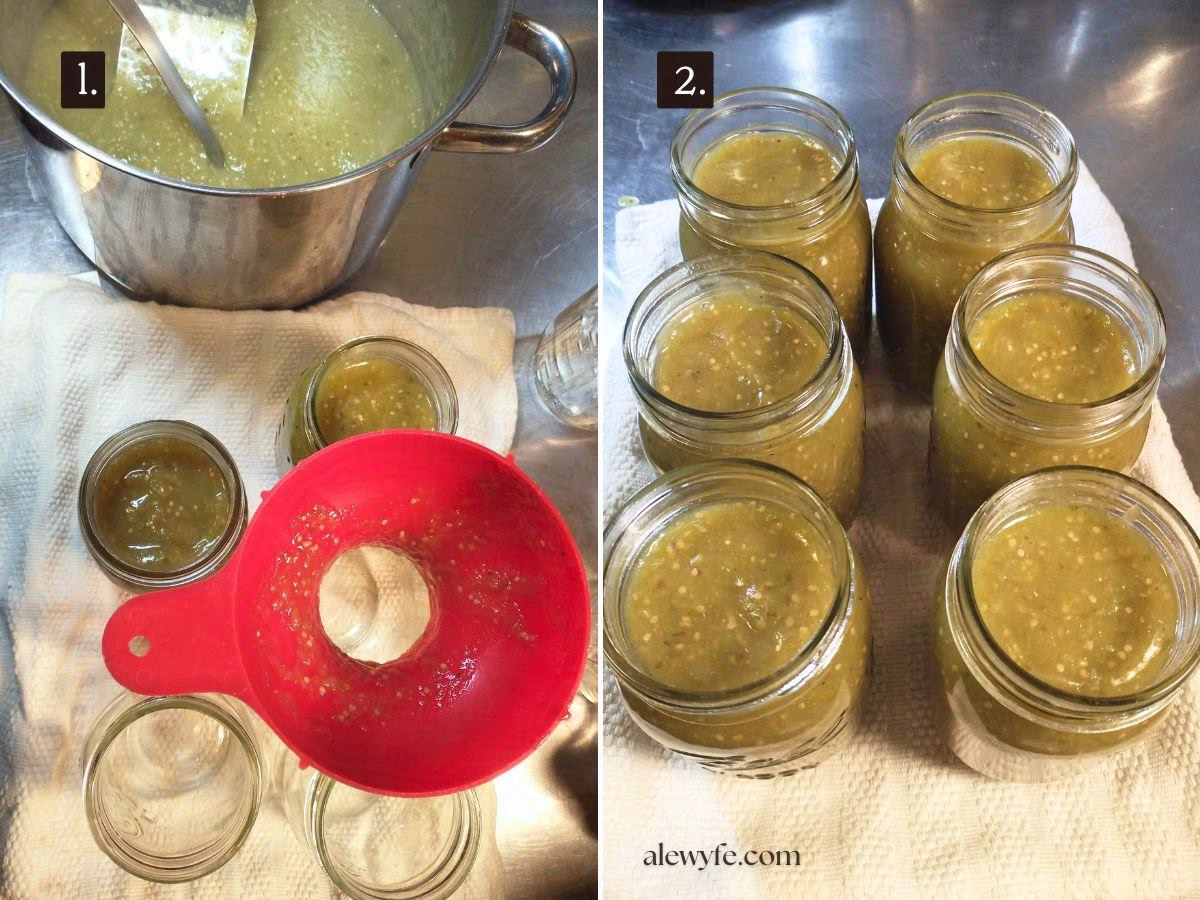
Place the stockpot on medium heat, and bring the salsa up to a simmer, stirring regularly. Simmer for a few minutes before filling your jars.
If you are not canning this salsa, let cool slightly and transfer into freezer containers, or store in the fridge for up to a week.
Canning the Tomatillo Salsa
prep water-bath canner & jars:
Fill your canner with enough water to cover the tops of the jars by at least one inch, cover the pot, and bring up to a boil.
Wash and sanitize your pint or smaller jars, and wash your lids.
Do not boil the canning jar lids (unless you are using reusable lids – follow manufacturer instructions for those).
fill canning jars:
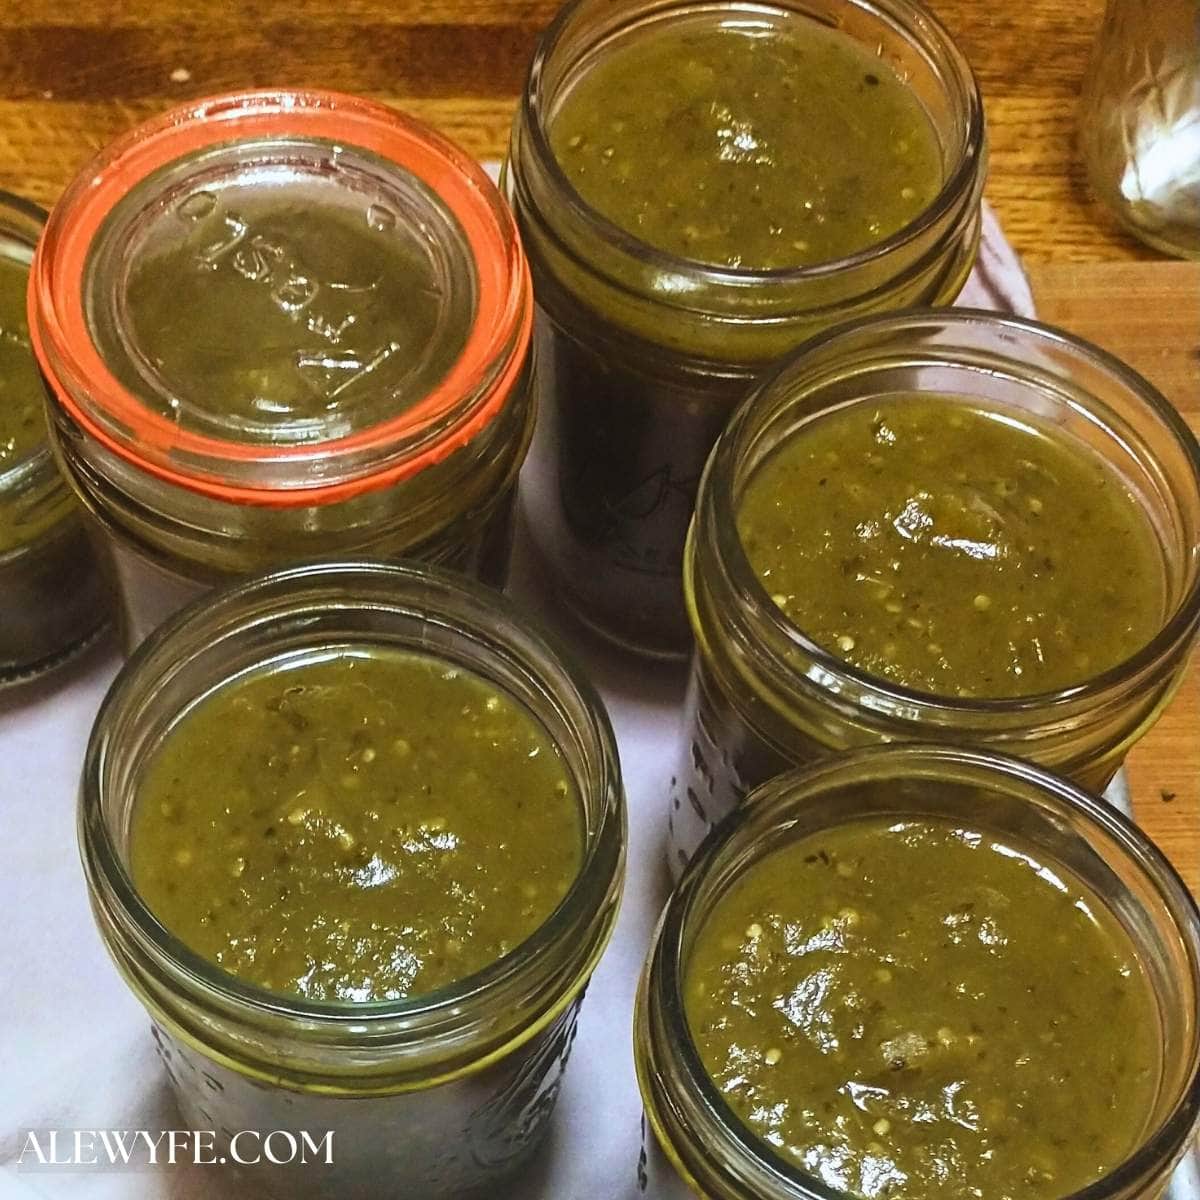
Using a canning funnel (if possible) fill the jars with the hot salsa mixture, leaving ½” headspace. Work quickly and keep mixture hot while filling jars.
Using a thin non-metallic spatula, thin wooden spoon, or jar tool, remove air bubbles from the jars and adjust headspace as needed.
Wipe jar rims. I use a paper towel or clean lint-free towel dipped in hot water, followed with a clean towel dampened with distilled vinegar. Clean jar rims mean safe seals!
Place your prepared lids on the jars and secure with rings (check rings for dents and discard any damaged rings).
process salsa in canner:
Using jar tongs, transfer the hot jars of salsa verde into the boiling water canner (or stockpot) and make sure there is at least an inch of water over the jars (top up from a hot kettle of water if needed).
Process in your boiling water bath for 20 minutes (increase as needed for elevations above 1000 ft). Make sure the water is boiling hard the whole time- do not start the timer until the pot is boiling.
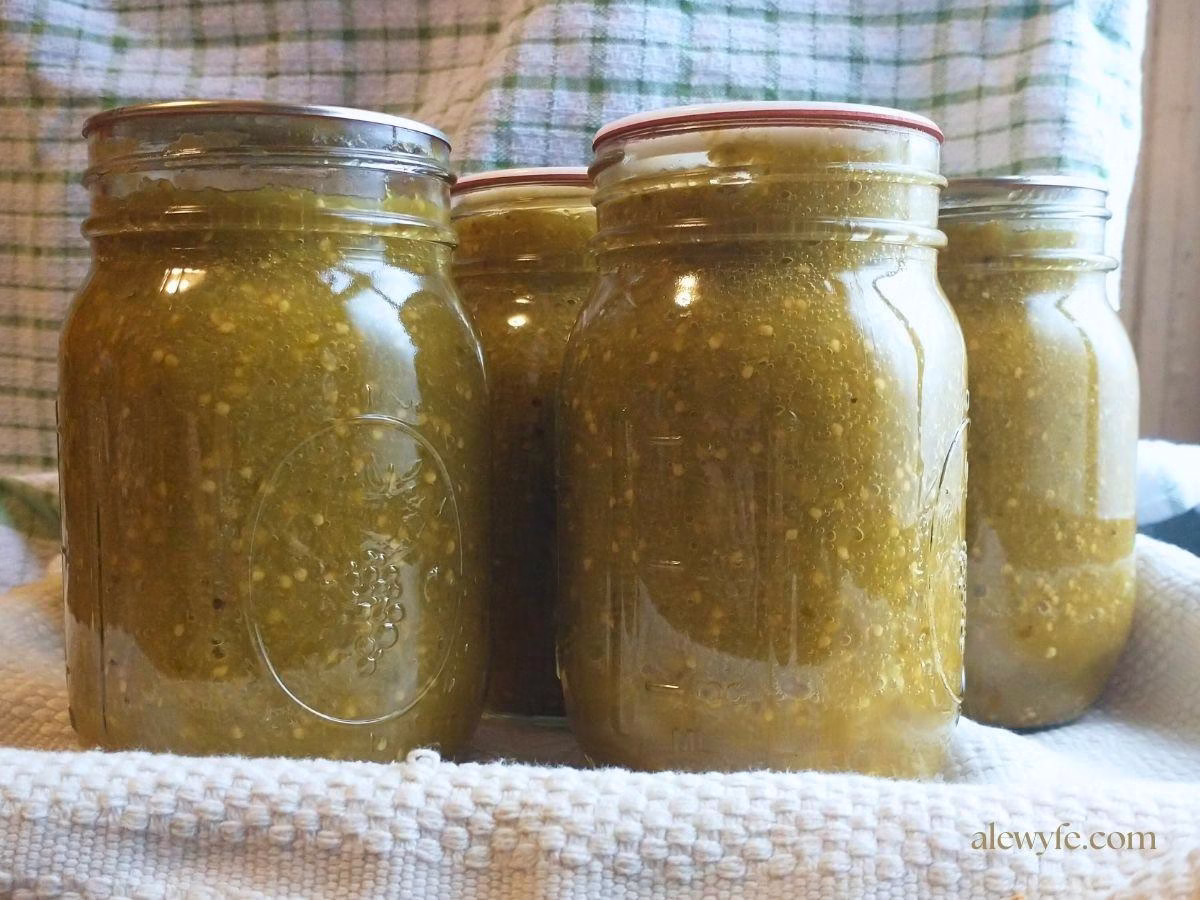
When the time is up, turn off the burner under the pot, wait 5 minutes, and then carefully remove the jars with jar tongs (or remove the jar rack, if you used one).
cool and store jars:
Place them on a towel-covered or wooden surface and leave undisturbed until completely cool (if it’s cold or drafty, you may want to cover the jars with a towel so they cool evenly). Do not tighten the bands (unless you are using reusable lids- follow manufacturer instructions if so).
After jars have cooled completely (12-24 hours) remove the bands and check for seals.
Refrigerate any jars that did not seal and use promptly. Gently wash jars or wipe with a damp cloth, label, and store in a cool, dark pantry.
For best quality, enjoy home-canned goods within 12-18 months.
This is a beginner-friendly water bath canning recipe for a delicious and zesty green salsa. Adapted from the Ball Canning roasted salsa verde recipe so that a #10 can of tomatillo puree can be substituted for the roasted tomatillo if you are making this out of season or don't have access to fresh tomatillos. If you are canning this recipe, you can increase the amount of lime juice or tomatillo but do not increase the other ingredients (any low-acid ingredients can be reduced to taste and spices omitted, but not the lime and tomatillo). If you are freezing the salsa or using it fresh, feel free to modify or adjust any ingredients to taste.
6.7lbstomatillos (6 lbs 10 oz)(or substitute #10 can of tomatillo puree)
3 mediumonions (white or yellow)(cut into wedges)
3largejalapeno or serrano peppers(or equivalent volume of other green peppers)
8garlic cloves
7ozlime juicebottled or fresh squeezed
4 tspsalt
⅓cupcilantrowashed, chopped, and gently packed
2tspground cumin
1tspground coriander
1tspground black pepper
Instructions
prep ingredients:
Preheat the oven to 425 ℉. Remove the husks from the tomatillos and wash them and the peppers, and cut the onions into wedges, removing the peels and trimming the root end. Peel the garlic. Cut any very large tomatillos in half or quarters so that they're all roughly uniform in size.
roast vegetables:
Roast the tomatillos, onions, peppers, and garlic on rimmed sheet pans or a shallow roasting dish. You can roast the tomatillos on one pan and the other ingredients on another pan to get a deeper roast on the tomatillos without burning the other ingredients, or check the pans as they roast and remove the garlic before it burns. This will take 20-40 minutes, depending on how deeply roasted you want your vegetables to be.
make salsa verde:
Pull or trim the stems from the top of the roasted peppers. If you want a very mild salsa, you can remove the seeds as well. Using a spatula or metal bench scraper, transfer the roasted vegetables into a large pot with a heavy bottom. Pour the lime juice into the roasting pan to deglaze it, and scrape up the caramelized bits, then carefully pour this mixture into the pot. Add the salt, cilantro, and spices.
Puree the mixture with an immersion blender. Alternately, you can puree this mixture in batches in a regular blender or food processor, then return to the stock pot.
simmer salsa:
Place the stockpot on medium heat, and bring the salsa up to a simmer, stirring regularly. Simmer for a few minutes before filling your jars.
If you are not canning this salsa, let cool slightly and transfer into freezer containers, or store in the fridge for up to a week.
Water-Bath Canning Instructions
Fill your canner with enough water to cover the tops of the jars by at least one inch, cover the pot, and bring up to a boil. Wash and sanitize your pint or smaller jars, and prepare your lids. Do not boil the lids (unless you are using reusable lids- follow manufacturer instructions for those).
Using a canning funnel (if possible) fill the jars with the hot salsa mixture, leaving ½" headspace. Work quickly and keep mixture hot while filling jars.
Using a thin non-metallic spatula, thin wooden spoon, or jar tool, remove air bubbles from the jars and adjust headspace as needed.
Wipe jar rims. I use a paper towel or clean lint-free towel dipped in hot water, followed with a clean towel dampened with distilled vinegar. Clean jar rims mean safe seals! Place your prepared lids on the jars and secure with rings (check rings for dents and discard any damaged rings).
Using jar tongs, transfer the hot jars into the boiling water canner (or stockpot) and make sure there is at least an inch of water over the jars (top up from a hot kettle of water if needed).
Process in your boiling water bath for 20 minutes (increase as needed for elevations above 1000 ft). Make sure the water is boiling hard the whole time- do not start the timer until the pot is boiling.
When the time is up, turn off the burner under the pot, wait 5 minutes, and then carefully remove the jars with jar tongs (or remove the jar rack, if you used one). Place them on a towel-covered or wooden surface and leave undisturbed until completely cool (if it's cold or drafty, you may want to cover the jars with a towel so they cool evenly). Do not tighten the bands (unless you are using reusable lids- follow manufacturer instructions if so).
After jars have cooled completely (12-24 hours) remove the bands and check for seals. Refrigerate any jars that did not seal and use promptly. Gently wash jars or wipe with a damp cloth, label, and store in a cool, dark pantry. For best quality, enjoy home-canned goods within 12-18 months.
Notes
Altitude Adjustment Chart:
0-1,000 ft – use recipe time
1,001-3,000 ft – increase 5 minutes
3,001-6,000 ft – increase 10 minutes
6,001-8,000 ft – increase 15 minutes
8,001-10,000 ft – increase 20 minutes
Nutritional Information Notes:
Nutritional values provided are for a pint jar, and are only an estimate. Divide by number of servings used per jar for individual serving information.