
CANNING: How to Can Chicken
- Why should you can chicken at home?
- Raw-Pack vs Hot-Pack Methods
- Serving Ideas for Canned Chicken
- Ingredients in Hot-Pack Canned Chicken
- Equipment Needed to Can Chicken
- How to Can Chicken: (Raw or Hot-Pack Method)
- Storing your Canned Chicken
- How to Can Chicken (Raw-Pack or Hot-Pack Methods)
Pressure canning chicken is not only easy to learn, it’s a great way to add shelf-stable, ready-to eat, high-quality protein to your pantry on a budget. You can use light or dark meat, bone-in or boneless pieces.
If you cut up and can whole chickens, you’ll end up with a bunch of jars of fully cooked tender breast meat (either diced or in large chunks that you can heat and slice), some of dark meat for soups and casseroles, and even more jars of delicious homemade bone broth. Or, start with boneless portions for even less prep!
Depending on your preferences (and how much time you want to spend) you can do the quick and easy raw-packed recipe, or partially cook the chicken and hot-pack it (the latter is my preference… I’ll explain why in a minute, but will give you processing times for both).
Why should you can chicken at home?
While you can certainly buy cans of diced chicken breast at the grocery store, it’s a lot more cost effective to can it yourself if you already have a pressure-canner. And if you want larger pieces of chicken or bone-in pieces, you’ll need to can your own!
This is a great way to take advantage of a good sale on fresh or frozen chicken. Canning chicken also frees up valuable freezer space, is shelf-stable, ready-to-eat, and especially reliable if you live somewhere with frequent power outages or bad weather.
These jars of fully-cooked chicken are super convenient for making quick and easy home-cooked meals from your pantry.
You can put up large pieces that you can slice or shred later for BBQ chicken sandwiches or tacos, or bite-sized chunks and pieces ready to use in your favorite soup and casserole recipes, or a mix of the two.
Raw-Pack vs Hot-Pack Methods
While you can raw-pack poultry, you’ll get a much better product if you hot-pack it before pressure-canning. If you’re in a big hurry, you can raw-pack, but if you have a bit more time and care about quality, hot-pack is the way. Want to know more? Read on!
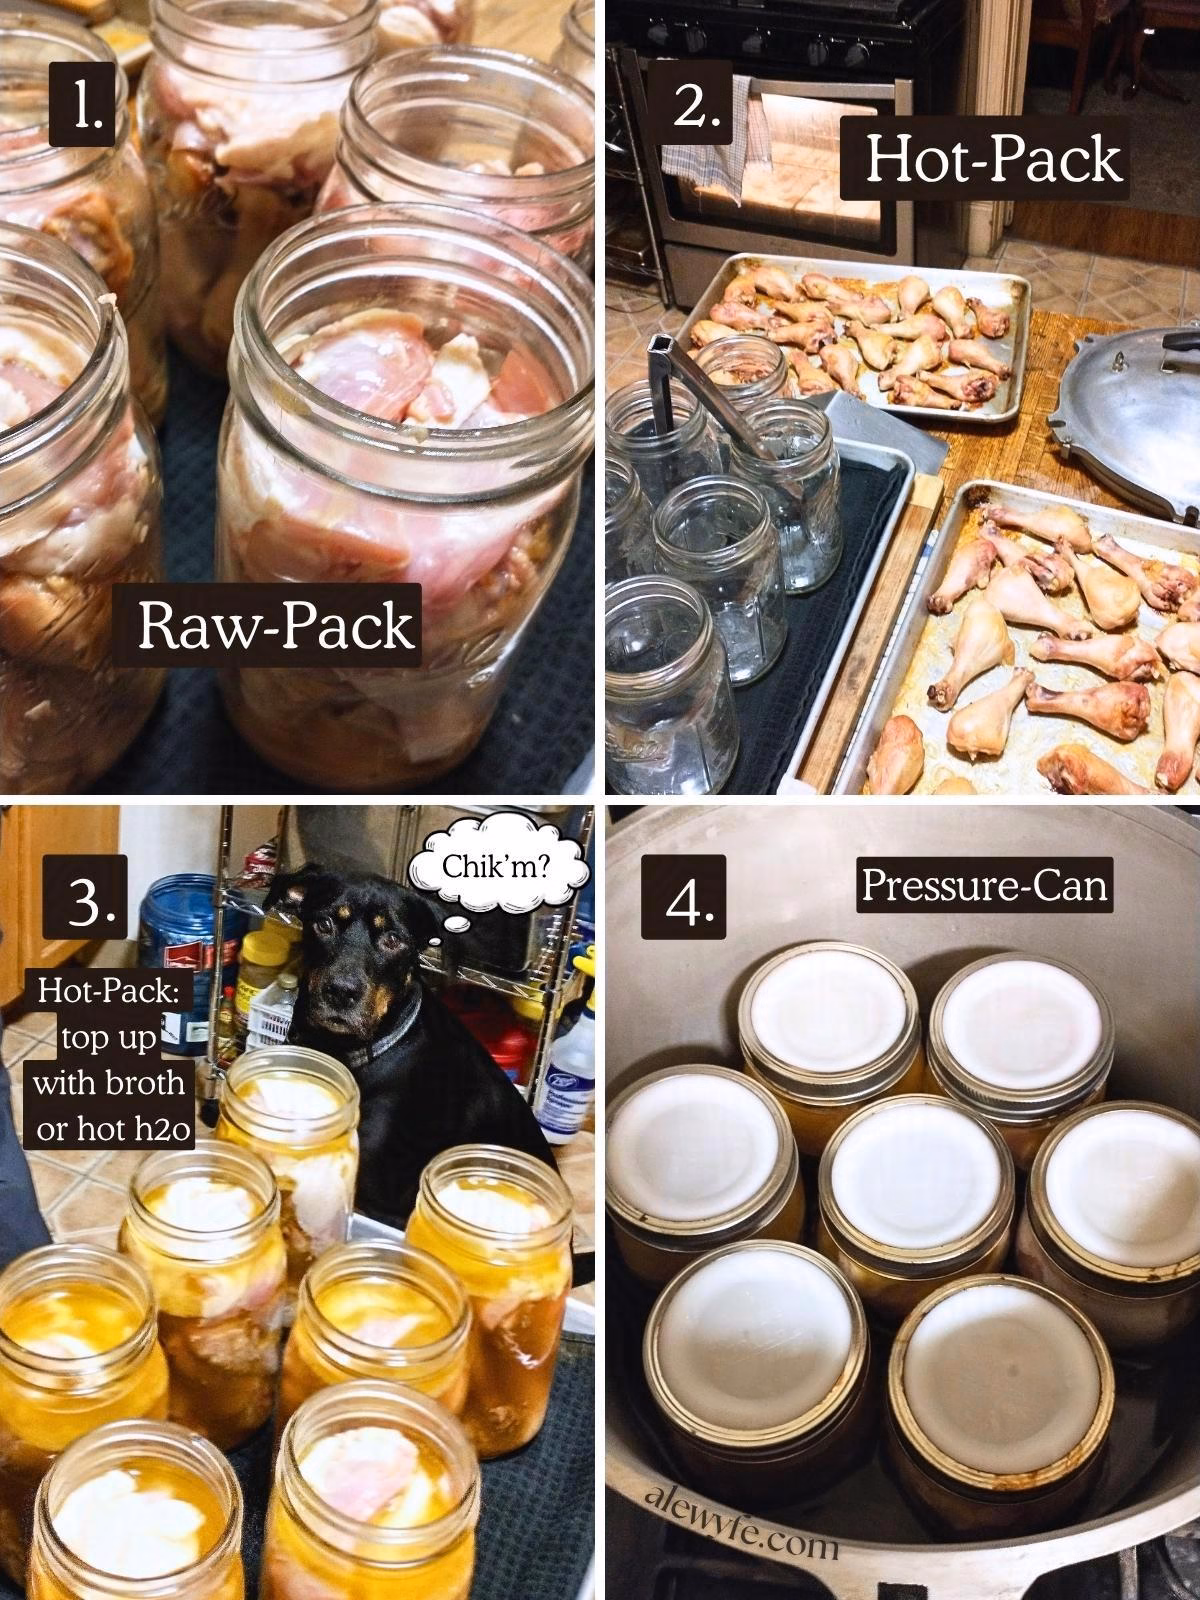
Raw-Packing Poultry
Raw-packing chicken is exactly what it sounds like. You fill your jars with just raw chicken (boneless chunks or small bone-in pieces like legs, thighs, or cut-up breasts) and perhaps a bit of salt.
You then process the jars in your pressure canner as-is. They will cook in the jar in just their own liquid. You can get the jars in the canner faster this way, and the bone-in jars actually process for less time than boneless chicken, as the bones are less dense than just the meat, and conduct heat to the center of the jar.
While raw-packing the jars saves quite a bit of time on the front end, the finished product isn’t quite as nice. It can be harder to use (especially if you are canning bone-in pieces, which either need to be reheated carefully or deboned before serving).
Raw-packing meat, fish, & poultry leaves a protein film on the jars that is a real pain to scrub off (especially if you aren’t using wide mouth jars or don’t have little hands). The raw meat, packed without broth, sears itself to the glass and you lose some of the time you save with raw-packing trying to clean it off your canning jars afterwards.
The meat in jars of raw-packed meat and poultry doesn’t always make enough liquid to fully cover the meat after processing, and the product above the liquid tends to dry out or discolor. It’s still safe to eat, but not ideal for longer storage. It’s a bit “blech”, and they definitely look unappetizing on the shelf!
Hot-Packing Poultry
I prefer to hot-pack most of my meat, which is what I’m going to demonstrate below (though I’ll also list the processing times for bone-in chicken).
For the best flavor, bone out the chickens into portions (or start with already portioned whole chicken), make homemade broth with the bones, and then partially roast the meat before canning it in either chunks or ready to use diced or shredded pieces. Sounds like a lot of work, and it does take some time, but it will save you a ton of time later when you want a quick dinner!
Or, if you want the quality and flavor of hot packed chicken, but don’t want to make your own chicken stock, you can use commercial chicken broth or bouillon to top up your jars of boneless or bone-in portions of meat.
You can also simmer whole or portioned chicken pieces in a large pot or roasting pan, with enough water or broth to cover, just until they’re cooked enough to dice or shred, then pack in jars. This will give you a lighter flavored chicken that is perfect for soups and casseroles, without turning on the oven.

Serving Ideas for Canned Chicken
You’ll end up with jars of fully cooked, shelf-stable, ready-to-use chicken meat and broth. You can use these almost anywhere you would use cooked leftover or diced rotisserie chicken.
It’s great for quick weeknight pasta dishes or to use in your favorite casseroles. Use your home canned chicken to make quick homemade and hearty soups or white chili. Make quick sheet pan nachos, tacos, or burritos, adding salsas and seasonings to taste. Add a jar to a pot of ramen, with some fresh or frozen vegetables and poached or soft-boiled eggs!
Shred or chop the chicken and heat with your favorite BBQ sauce (like our Spicy Peach BBQ Sauce) and serve on homemade buns, Texas toast, or baked potatoes, or use it to top your homemade pizzas!
Chicken pot pies are easy when you have fully cooked diced chicken in the pantry. Make a roux (from equal parts butter or oil and all purpose flour) or a slurry with cornstarch or potato starch and simmer it to thicken the broth, then fold in the meat along with diced fresh or frozen mixed vegetables and peas, and bake in a pie crust. Or you can pour this filling into a casserole dish, make a drop-biscuit dough and bake it on top like a cobbler for an even easier chicken pot pie casserole!
You can even drain the jars (save the broth for cooking) and make chicken salad for sandwiches or to serve on a bed of salad greens… just fold the diced meat with some mayo or yogurt, chopped celery and onion, and dried cranberries, and season to taste. So fast and tasty!
Ingredients in Hot-Pack Canned Chicken
Chicken:
You can process whole birds (my preferred method, since it’s usually cheaper per pound, and you get bones that you can use to make your own stock to pack the meat in), breasts, or dark meat. Poultry can be canned as boneless pieces or bone-in, as long as the the pieces are not too large to fit in your jars whole with the bones.
The process is the same, but the processing time for bone-in is less than for deboned meat. The bones conduct heat and are hollow and less dense than meat, so the heat penetrates the jars faster. If you have a mixed canner load (some boneless meat, plus a jar or two with bone-in wings), process the whole batch for the longer processing time.
Note: There are no tested or recommended processing times for ground poultry products, so keep your meat in chunks or shreds. Unfortunately if you want to make chicken sausage or preserve ground chicken, you need to freeze it or use it fresh.
Chicken Broth:
You can pack your chicken meat in water, commercial stock, or prepared bouillon, but I like to break the process up over two days so I can bone out the chicken and make my own stock. If you have the refrigerator space to do this, it is the way to go.
You could make a plain bone stock with just the bones (and a few tablespoons of vinegar to help extract the minerals), but I like to make a full-flavored stock. I add mirepoix (two parts onions to one part each carrots and celery), parsley stems, mushroom stems, or whatever I have in the stock bag of little scraps in the freezer.
- Season your chicken broth with some whole peppercorns, bay leaves, and maybe some thyme and rosemary.
- Do NOT add sage to a stock that you are going to can, as it turns bitter and awful tasting after pressure-cooking.
- It’s best to keep your stock neutral so that it’s versatile and flavor it later.
- However, if you already have a fully stocked pantry shelf with plenty of plain canned proteins, you can get a bit creative with your broths, as long as you stick to ingredients that are safe to can.
- It’s best to experiment with small batches to make sure you and your family like the results.
- You could do an Asian-style chicken broth with ginger, garlic, and soy (or add some shiitake powder or lemongrass, or a bit of five-spice blend), that’s great in ramen, pho, stir-fry, and dumplings.
- Or try a Southwestern chicken broth with dried chili peppers, Mexican oregano, and cumin!
Salt:
Adding salt to your jars is optional, and not necessary to preserve them. It does add flavor, and can help keep the meat moist. I always add a little bit, but if you’re on a sodium-restricted diet or cooking for someone who is, you can leave it out.
Equipment Needed to Can Chicken
Pressure Canner:
You absolutely must use a pressure canner to safely can chicken. Do not try to water-bath can low-acid foods! You also can’t safely can this in an Instant Pot or small pressure cooker. They do not reliably build up enough pressure to safely can foods, especially low-acid foods like meat and veggies that require consistent pressure and long processing times.
Botulism isn’t worth the risk… always pressure can low-acid foods like meats and vegetables.
I love my All-American pressure canner, but any pressure canner that is large enough to hold at least four quart jars and that has a pressure weight and/or a tested pressure gauge will work.
Sheet pans or roasting tray:
You can make the stock with raw bones, but lightly roasting them first will add a lovely color and depth of flavor to your stock, and I highly recommend that you take the time to do this. If you’re processing chickens for some reason in August without air-conditioning… first of all, why? But sometimes you have to do what you have to do. Otherwise, roast those bones! If you have room in your oven, roast your mirepoix (stock vegetables) too.
Stock pot, large Instant Pot or Crock-pot, or Nesco Roaster:
Every cook has their own favorite way to make stock (bone broth). I usually either use a large stock pot on the stove top or our big Instant Pot, but if you have another safe method, feel free to use it. I usually bring the stock up to a low lazy bubble and skim it before bed, and then leave it on our simmer burner overnight. Smaller batches of stock I do under pressure in the Instant Pot, which is faster.
Strainer or Large Colander:
Ladle or carefully pour your finished stock through a strainer or colander, then through a fine mesh sieve or cheesecloth to get a stock with better clarity and less sediment.
Canning accessories:
Jar tongs, a jar funnel, and chopsticks or a de-bubbling wand aren’t essential but they’ll make you life a lot easier! If you have a pressure canner, you probably already have this, but if you don’t, do yourself a favor and get some.
Mason Jars and Lids:
You’ll need an assortment of quart or pint jars (or a combination of the two). You can also can in some smaller jars for convenience, but don’t try to use half-gallon jars or anything larger than a quart. You’ll need new metal canning lids (or reusable lids with rubber gaskets, like Tattler, Harvest Guard, or Weck, if you’re comfortable with those).
How to Can Chicken: (Raw or Hot-Pack Method)
Raw-Pack Instructions:
- Cut chicken into pieces that will fit into the jars.
- Loosely pack the chicken pieces into jars, leaving 1″ of headspace.
- Add salt if desired (up to 1 tsp for quart jars, 1/2 tsp for pints).
- Do NOT add liquid to the jars!
- Wipe the jar rims with a lint-free cloth or paper towel dampened with hot water or white vinegar.
- Top with new canning lids and jar rings (or clean and sanitized reusable canning lids and rings) and close lids according to manufacturer recommendations.
- Skip ahead to pressure-canning process instructions.
Hot-Pack Instructions:
Debone your whole chickens (or dice/portion boneless cuts)
- A stiff boning knife is best for this, but you can use a sharp chef’s knife or a stout filet knife as you prefer.
- You can do this in several ways, but I like to start with removing the breast meat- make a long cut on either side of the breast bone, freeing the meat from the bone with small cuts against the rib cage, working down towards the back of the bird.
- Remove the wing tips and wings, then the legs, cutting carefully around the tendons to free the leg quarters.
- Refrigerate or freeze the chicken pieces until you are ready to can them. If you freeze it, fully defrost before canning.
Make chicken stock (or heat pre-made stock or bouillon)
- On a large sheet pan or roasting pans, roast the neck bones, wing tips, and carcasses/backs for stock… about 25-35 minutes in a hot oven (375-425 F), or skip the roasting to make a milder-flavored white stock.
- Place bones in a large stockpot, crock pot, or Instant Pot, along with mirepoix vegetables: peeled and large chopped carrots, celery, and onion (2 parts onions to one part each carrots and celery).
- Add a tablespoon or two of black peppercorns, a few bay leaves, parsley or parsley stems, and other fresh or dry herbs if you like. Don’t use sage! It turns bitter when pressure canned. See ingredient section above or our separate chicken stock post for more tips!
- Top up with cool water to cover the bones and vegetables by about 3-4″.
- Simmer stock over medium-low to low heat at a very low, lazy bubble for at least 3 hours or overnight.
- Strain stock & keep hot.
- If you’d like, especially if you did a shorter cook time on your stock, you can make a remouillage (“remi”, meaning “re-wetting”) or second light stock with your chicken bones. Add fresh mirepoix vegetables to the pot, and top up again with cool water.
- This second stock is lighter in color and flavor, but is good for hot-packing chicken or other meat, cooking rice or other grain pilaf, as a soup base, and more.
- You can add the wing and leg bones to your remi stock after prepping whole chickens for canning, and then can the batch of remi stock after pressure canning the meat in broth, or spread your canning over a day or two, keeping the chicken chilled (or frozen) while you make stock from the bones.
Par-cook and/or brown chicken
- Oven-Method: Partially cook the chicken breasts, leg quarters, and wings… there are various ways to do this, but I like to roast them on sheet pans in a hot oven (between 375-400 F).
- You can also brown the pieces in a large skillet (or several smaller ones) without cooking fully.
- You don’t need to roast them all the way through, just until they begin to color and firm up enough to slice easily. The juices should still be pink, not clear.
- The exact cook times will vary, depending on your oven and how large your chicken pieces are.
- Simmering Method: You can also simmer the chicken pieces in a large stockpot, dutch oven, or roaster in enough water or broth to cover.
- Simmer just until the meat is firm and tender enough to pick or cut from the bones, and use the light broth to pack the chicken.
- This method is simpler, and is great when you don’t want to turn on the oven, and makes a light chicken broth you can use to pack the meat.
- Roasting will give you a deeper flavor, but simmering is still a better method than raw-packing, and makes a great product!
Dice & de-bone meat
- Remove from the oven (or stockpot for simmering method) and let cool just enough to handle (if you have latex or nitrile gloves, these can help shield your hands while prepping the hot chicken).
- Slice white meat into large chunks or dice it into ready-to-use pieces. The pieces will shrink slightly during canning, so plan your cuts accordingly.
- Second, de-bone the dark meat. This can be tricky, especially with the tendons and small bones in the legs. You can also leave smaller cuts whole and can them bones and all!
- Use a small boning or large paring knife in a scraping motion to free the meat from the bones.
- Alternately, you can simmer the leg pieces until they are more tender and use them for soup.
- Canning the dark meat on the bone will give you a very thick collagen-rich broth in those jars, but the bones become soft and brittle during processing and usually need to be picked out before using the chicken in recipes, which is messy.
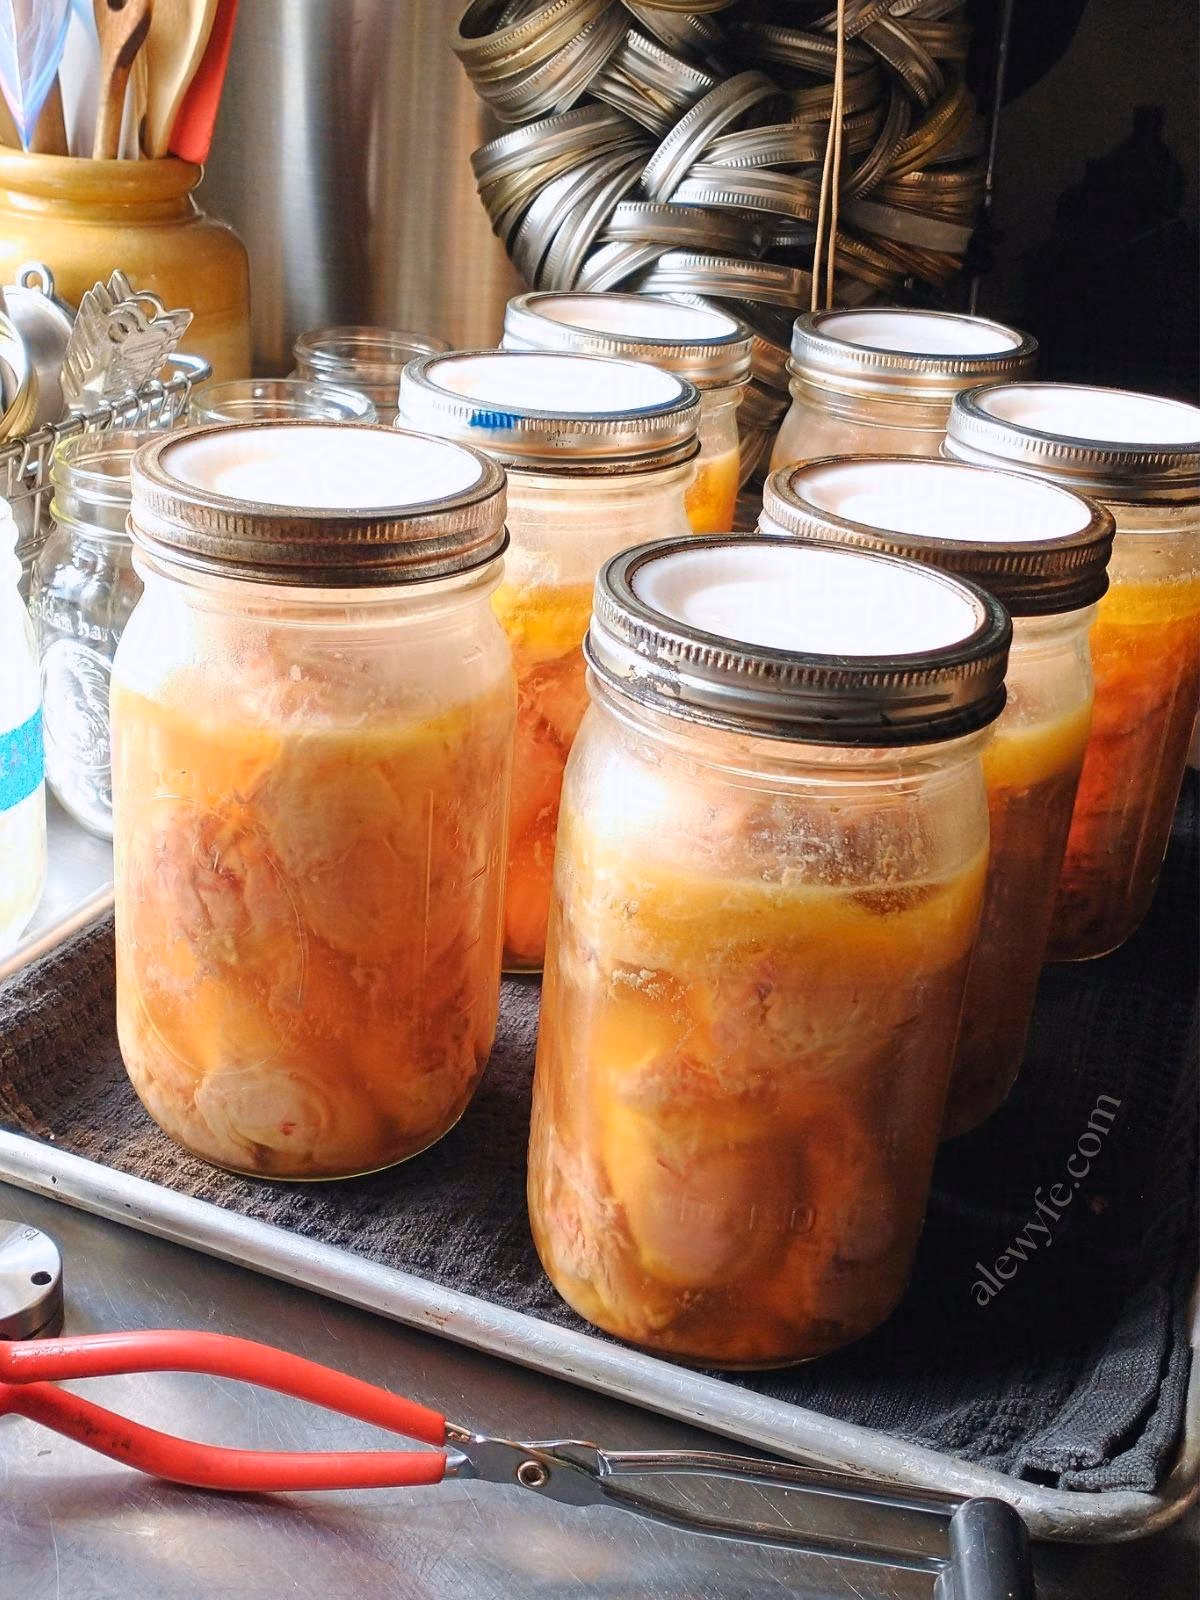
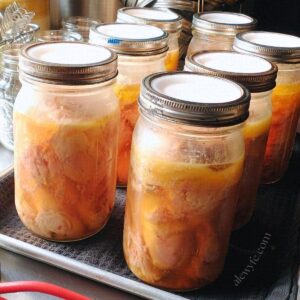
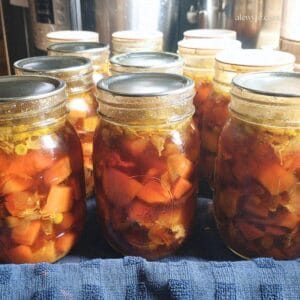
Pack jars for processing
- Place the recommended amount of warm water in the bottom of your canner (check your pressure canner manual, but usually 3-4″ of water) and begin to preheat the canner.
- Pack clean, hot quart and/or pint mason jars with the diced or shredded meat, leaving 1″ headspace at the top.
- Top up the jars with hot chicken stock, broth, or boiling water.
- You can add a teaspoon of salt to each quart jar (half teaspoon per pint) if you like. This isn’t necessary for food safety but adds flavor.
- De-bubble the jars with a chopstick, de-bubbling tool, or thin flexible spatula. Top up with more stock if needed. If you run out of prepared stock, you can use boiling water.
- Wipe the jar rims with a lint-free cloth or paper towel dampened with hot water or white vinegar. Top with new canning lids and jar rings.
- Keep leftover stock hot while you process the meat. If you have room in the canner you can process the stock with the meat, though it has a much shorter processing time.
- If you are doing a larger batch of chicken, you can can the stock after the batch of meat. Or, refrigerate or freeze any extra chicken stock.
Pressure canning the jars of raw or hot packed chicken:
- Carefully place the filled jars into the preheated canner.
- Check that the canner vent isn’t clogged and close & seal the lid. Bring the canner up to pressure over medium heat with the vent open, and once the canner is venting a steady stream of steam, set a timer for 10 minutes.
- When the canner has vented for 10 minutes, regulate the heat if necessary and drop the weight over the vent (or close the petcock if you have an older unweighted dial-gauge canner) to begin pressurizing the canner.
| Raw or Hot Pack | PINTS | QUARTS | PSI (weighted or dial gauge) |
| Bone-In Pieces | 1 hr 5 min (65 minutes) | 1 hr 15 min (75 minutes) | 10 lbs pressure (11# dial gauge) or adjust for altitude above 1001 ft |
| Boneless Pieces | 1 hr 15 min (75 minutes) | 1 hr 30 min (90 minutes) | 10 lbs pressure (11# dial gauge) or adjust for altitude above 1001 ft |
- Can quarts of chicken for 75-90 minutes (65-75 minutes for pints) at 11 PSI dial gauge/10 PSI weighted gauge up to 1000 ft (adjust to 15 at higher altitudes with a weighted canner, or consult the altitude chart link for dial-gauge adjustments) according to the chart below.
| Altitude Feet | Weighted Gauge | Dial Gauge |
|---|---|---|
| 0- 1,000 | 10 | 11 |
| 1,001- 2,000 | 15 | 11 |
| 2,001- 4,000 | 15 | 12 |
| 4,001- 6,000 | 15 | 13 |
| 6,001-8,000 | 15 | 14 |
| 8,001-10,000 | 15 | 15 |
- When in doubt, or when canning a mixed batch (pints and quarts, or boneless plus bone-in pieces), choose the longer processing time for your jars.
Start your processing timer only once the appropriate PSI has been reached (11 PSI on a dial-gauge canner for up to 2000 ft, see chart for altitude adjustments), or when the weight on a weighted gauge canner is jiggling to indicate that the proper pressure has been reached.
Watch or listen carefully, adjust heat as needed, and reset the timer to zero and restart processing time if you lose pressure below the correct processing pressure at any point.
Remove & cool the jars (+ can additional batches or stock)
- After the processing time is complete, turn the heat off. Once the pressure canner has cooled and returned to neutral pressure (the dial will drop to zero, and no steam escapes from the weight or petcock if jiggled) you should open the canner and remove the jars (follow your canner instructions for opening).
- Carefully remove the jars from the canner using jar tongs or the jar rack.
- Place the jars on a folded dish towel, cooling rack, or wooden surface. Protect hot jars from cold surfaces like granite, stainless, or concrete countertops until they have cooled.
- Process additional batches if needed, or start canning any leftover chicken broth.
- You can also chill the chicken stock for up to three days before reheating and canning it if you are short on time.
Storing your Canned Chicken
- Let the jars of chicken cool in a draft-free place where they can rest overnight or for up to 24 hours.
- Don’t touch the rings until the jars have cooled and the seals are set (disregard for reusable lids and follow manufacturer instructions to tighten rings).
- Remove the metal rings and check the seals on the jar lids after they have rested at least overnight.
- Promptly freeze or refrigerate any jars of chicken that did not seal and use within a few days. Reprocessing these jars will cause a loss in quality, though it is possible if you use new lids and process again within the 24 hour window… I don’t recommend it though.
- Gently wash all sealed jars with soapy water, label clearly, and store in a cool, dark place.
- Protect jars of chicken from freezing, high heat, sunlight, or other extremes of temperature in storage.
- Safely discard the contents of any jars that lose their seals in storage or show signs of spoiling (off-flavors or aromas, hissing, bubbling, or spurting when opened, or any mold).
- Sterilize jars before reuse if the contents were spoiled (otherwise, wash them well with hot soapy water, and use vinegar or a non-scratch scrub pad to remove any hard water or protein haze on the glass).
How to Can Chicken (Raw-Pack or Hot-Pack Methods)
Equipment
- glass canning jars, rings, and new lids
- jar lifters or tongs or jar rack with handles
Ingredients
For Raw-Pack Chicken
- raw boneless or bone-in chicken (whole or pieces)
- salt (optional) up to 1 tsp per quart (½ tsp pints)
For Hot-Pack Chicken
- raw boneless or bone-in chicken (whole or pieces)
- hot chicken stock, broth, bouillon, or boiling water
- salt (optional) up to 1 tsp per quart (½ tsp pints)
Instructions
Raw-Pack Instructions:
- Cut chicken into pieces that will fit into the jars.
- Loosely pack the chicken pieces into jars, leaving 1″ of headspace.
- Add salt if desired (up to 1 tsp for quart jars, 1/2 tsp for pints).
- Do NOT add liquid to the jars!
- Wipe the jar rims with a lint-free cloth or paper towel dampened with hot water or white vinegar.
- Top with new canning lids and jar rings (or clean and sanitized reusable canning lids and rings) and close lids according to manufacturer recommendations.
- Skip ahead to pressure-canning process instructions.
Hot-Pack Instructions:
Debone your whole chickens (or dice/portion boneless cuts)
- A stiff boning knife is best for this, but you can use a sharp chef’s knife or a stout filet knife as you prefer.
- You can do this in several ways, but I like to start with removing the breast meat- make a long cut on either side of the breast bone, freeing the meat from the bone with small cuts against the rib cage, working down towards the back of the bird.
- Remove the wing tips and wings, then the legs, cutting carefully around the tendons to free the leg quarters.
- Refrigerate or freeze the chicken pieces until you are ready to can them. If you freeze it, fully defrost before canning.
Make chicken stock (or heat pre-made stock or bouillon to a simmer)
- On a large sheet pan or roasting pans, roast the neck bones, wing tips, and carcasses/backs for stock… about 25-35 minutes in a hot oven (375-425 F), or skip the roasting to make a milder-flavored white stock.
- Place bones in a large stockpot, crock pot, or Instant Pot, along with mirepoix vegetables: peeled and large chopped carrots, celery, and onion (2 parts onions to one part each carrots and celery).
- Add a tablespoon or two of black peppercorns, a few bay leaves, parsley or parsley stems, and other fresh or dry herbs if you like. Don’t use sage! It turns bitter when pressure canned. See ingredient section above or our separate chicken stock post for more tips!
- Top up with cool water to cover the bones and vegetables by about 3-4″.
- Simmer stock over medium-low to low heat at a very low, lazy bubble for at least 3 hours or overnight.
- Strain stock & keep hot (See original post or our stock recipe for more tips & making a second lighter stock from the bones).
Par-cook and/or brown chicken
- Oven-Method: Partially cook the chicken breasts, leg quarters, and wings… there are various ways to do this, but I like to roast them on sheet pans in a hot oven (between 375-400 F).
- You can also brown the pieces in a large skillet (or several smaller ones) without cooking fully.
- You don’t need to roast them all the way through, just until they begin to color and firm up enough to slice easily. The juices should still be pink, not clear.
- The exact cook times will vary, depending on your oven and how large your chicken pieces are.
- Simmering Method: You can also simmer the chicken pieces in a large stockpot, dutch oven, or roaster in enough water or broth to cover.
- Simmer just until the meat is firm and tender enough to pick or cut from the bones, and use the light broth to pack the chicken.
- This method is simpler, and is great when you don’t want to turn on the oven, and makes a light chicken broth you can use to pack the meat.
- Roasting and packing in bone broth will give you a deeper flavor, but simmering in a quick broth is still a better method than raw-packing, and makes a great product!
Dice & de-bone meat
- Remove from the oven (or stockpot for simmering method) and let cool just enough to handle (if you have latex or nitrile gloves, these can help shield your hands while prepping the hot chicken).
- Slice white meat into large chunks or dice it into ready-to-use pieces. The pieces will shrink slightly during canning, so plan your cuts accordingly.
- Second, de-bone the dark meat. This can be tricky, especially with the tendons and small bones in the legs. You can also leave smaller cuts whole and can them bones and all!
- Use a small boning or large paring knife in a scraping motion to free the meat from the bones.
- Alternately, you can simmer the leg pieces until they are more tender and use them for soup, or pack smaller pieces whole in the jars. This will give you a collagen-rich broth in those jars, but the bones become soft and brittle during processing and need to be picked out before using the chicken in recipes, which is messy.
Pack jars for processing
- Place the recommended amount of warm water in the bottom of your canner (check your pressure canner manual, but usually 3-4″ of water) and begin to preheat the canner.
- Pack clean, hot quart and/or pint mason jars with the diced or shredded meat, leaving 1″ headspace at the top.
- Top up the jars with hot chicken stock, broth, or boiling water.
- You can add a teaspoon of salt to each quart jar (half teaspoon per pint) if you like. This isn’t necessary for food safety but adds flavor.
- De-bubble the jars with a chopstick, de-bubbling tool, or thin flexible spatula. Top up with more stock if needed. If you run out of prepared stock, you can use boiling water.
- Wipe the jar rims with a lint-free cloth or paper towel dampened with hot water or white vinegar. Top with new canning lids and jar rings.
- Keep leftover stock hot while you process the meat. If you have room in the canner you can process the stock with the meat, though it has a much shorter processing time. If you are doing a larger batch of chicken, you can can the stock after the batch of meat. Or, refrigerate or freeze extra chicken stock.
Pressure Canning the Jars of Raw or Hot-Packed Chicken:
- Carefully place the filled jars into the preheated canner.
- Check that the canner vent isn’t clogged and close & seal the lid. Bring the canner up to pressure over medium heat with the vent open, and once the canner is venting a steady stream of steam, set a timer for 10 minutes.
- When the canner has vented for 10 minutes, regulate the heat if necessary and drop the weight over the vent (or close the petcock if you have an older unweighted dial-gauge canner) to begin pressurizing the canner.
- Can quarts of chicken for 75-90 minutes (65-75 minutes for pints) at 11 PSI dial gauge/10 PSI weighted gauge up to 1000 ft (adjust to 15 at higher altitudes with a weighted canner, or consult the altitude chart link for dial-gauge adjustments). Use the processing chart in the notes below for the proper time for your batch.
- When in doubt, or when canning a mixed batch (pints and quarts, or boneless plus bone-in pieces), choose the longer processing time for your jars.
- Start your processing timer only once the appropriate PSI has been reached (11 PSI on a dial-gauge canner for up to 2000 ft, see notes for altitude adjustments), or when the weight on a weighted gauge canner is jiggling to indicate that the proper pressure has been reached.
- Watch or listen carefully, adjust heat as needed, and reset the timer to zero and restart processing time if you lose pressure below the correct processing pressure at any point.
Remove & cool the jars (+ can additional batches or stock)
- After the processing time is complete, turn the heat off. Once the pressure canner has cooled and returned to neutral pressure (the dial will drop to zero, and no steam escapes from the weight or petcock if jiggled) you should open the canner and remove the jars (follow your canner instructions for opening).
- Carefully remove the jars from the canner using jar tongs or the jar rack.
- Place the jars on a folded dish towel, cooling rack, or wooden surface. Protect hot jars from cold surfaces like granite, stainless, or concrete countertops until they have cooled.
- Process additional batches if needed, or start canning any leftover chicken broth. You can also chill the stock for up to three days before reheating and canning it if you are short on time.
Notes
| Raw or Hot Pack | PINTS | QUARTS | PSI (weighted or dial gauge) |
| Bone-In Pieces | 1 hr 5 min (65 minutes) | 1 hr 15 min (75 minutes) | 10 lbs pressure (11# dial gauge) or adjust for altitude above 1001 ft |
| Boneless Pieces | 1 hr 15 min (75 minutes) | 1 hr 30 min (90 minutes) | 10 lbs pressure (11# dial gauge) or adjust for altitude above 1001 ft |
More Pressure-Canning Recipes:
- How to Can a Whole Turkey (or three)
- Canning Hearty Chicken & Mushroom Stew or Pot Pie Filling
- How to Can Fresh Bluegill, Perch, and Other Small Panfish
- Five-Alarm Venison or Beef Chili (canning recipe)
- How To Can Swedish Meatballs
- Cajun Red Beans and Sausage
- How to Can Bolognese Meat Ragu
- Garlic and Herb Potatoes (Easy Raw-Pack Recipe)
- Enchilada Roja Sauce (Pressure-Canner or Freezer Recipe)