CANNING: How to Can a Whole Turkey (or three)
- Advantages to Canning Turkey
- Raw-Pack vs Hot-Pack Methods
- Frugal Turkey Canning Tips
- Ingredients in Hot-Pack Canned Turkey
- Equipment Needed to Can Turkey
- How to Can Turkey (Hot-Pack Method)
- Serving Ideas for Canned Turkey
- How to Can a Whole Turkey
Unless you have a really big family, a whole turkey is pretty hard to get through without getting sick of turkey (or if you take too long eating it, getting sick FROM turkey). But it’s totally worth it to learn how to can turkey in your pressure canner!
That title is not *entirely* click-bait… we’re not going to magically fit an entire turkey in a jar like those weird whole canned chickens you can sometimes buy at the store (or in novelty catalogs, if those are still a thing?). But perhaps more magically, I fit THREE turkeys into many jars. Best of all, now that turkey is not taking up all of the space in the big freezer (and that means more room for the important things, like ice cream, right?).
Okay, okay, it’s not magic at all, just takes a little bit of time and a little bit of basic knife work. You can use plain turkey broth to pack your jars of turkey meat, or flavor and season it for even more versatile easy meal shortcuts! You can also skip the broth if you are raw-packing your meat, but we’ll talk about why I don’t recommend that shortcut in a minute.
Advantages to Canning Turkey
Pressure canning turkey is a great way to make one too-large turkey (or several smaller ones) into many future dinners. It’s portioned and easy to spread it out over many meals and it’s in your pantry, fully-cooked & ready to use when you need it.
You can use pint or quart jars, or even smaller jars… whichever works best for your recipe needs and family size. Just make sure you follow the appropriate processing time for the jar size that you choose. If you are doing a mixed batch of jar sizes in your canner, always use the longest processing time for the jars you are using.
When you’re done, you’ll end up with a bunch of jars of fully cooked tender turkey breast meat (either diced or in large chunks that you can heat and slice), some jars of dark meat for soups and casseroles, and even more jars of delicious homemade bone broth. Or you can dice and mix all the light and dark meat together.
We find that the diced and smaller pieces of light and dark meat together in broth are most useful in our kitchen, but I like to do a few jars with larger chunks of white meat for variety. It’s your choice, so do what you think will be most useful in your kitchen in your favorite recipes.

Raw-Pack vs Hot-Pack Methods
While you can raw-pack poultry, you’ll get a much better product if you hot-pack it. Raw-packing turkey is exactly what it sounds like. You fill your jars with just raw turkey and perhaps a bit of salt, and process them in your pressure canner as-is. They will cook in the jar in their own liquid.
While raw-packing the jars saves quite a bit of time on the front end, the finished product isn’t quite as nice. It can be harder to use (especially if you are canning bone-in pieces), and leaves a protein film on the jars that is a real pain to scrub off (especially if you aren’t using wide mouth jars or don’t have little hands).
The meat in jars of raw-packed meat and poultry doesn’t always make enough liquid to fully cover the meat after processing, and the product above the liquid tends to dry out or discolor. It’s still safe to eat, but not ideal. I think it looks a bit gross and unappetizing on the pantry shelf, and it’s just not as nice of a product!
For all of those reasons, I prefer to hot-pack most of my meat, which is what I’m going to demonstrate below. Briefly:
- We’ll bone out the whole turkeys into portions (or you can use already portioned meat)
- Make homemade broth with the bones (or use commercial stock or bouillon)
- Then partially roast the meat before canning it in either chunks or ready to use diced or shredded pieces.
- You can also parboil the meat while making the broth to combine these steps, but I like to roast mine separately for color and flavor development
That might sound like a lot of work, and while it does take some time, it’s not hard. Most importantly, it will save you a ton of time later when you want a quick dinner!

Frugal Turkey Canning Tips
I lucked out recently and found a fantastic sale on some really nice ten pound frozen turkeys. They were on clearance for $5 each… So of course, I bought five of them. Like you do (I know, not everyone is like this, but if you’re here, maybe you are one of us too)?
In retrospect, I honestly wish I had bought a few more but wasn’t sure I’d have the freezer space until I would have a free weekend to process them, or enough empty jars left when I did. I also bought them online, and didn’t realize they were such good quality they were until the grocery delivery showed up. They were fancy free-range heritage birds, not Butterballs, and they’re delicious! Se la vie.
I did the math and for what I paid for the turkeys, if I just bought the amount of turkey stock I ended up with, I would break even, and the meat is all a bonus. Score!
This is a great way to take advantage of the seasonal sales on whole turkeys, or if like me, you luck out and find a late season overstock sale. I suspect they were clearing out freezer room or had overbought, now that the holiday meals are mostly over, and who just cooks a whole turkey on a random weekend? Me, and now hopefully, you, I guess?
You also might want to can turkey soup or meat in broth if you bought and roasted a too-big turkey for your holiday meals. While it’s not generally recommended to can leftovers, if you follow good food-handling procedures you can do it. Don’t leave that roasted bird out for hours while you nap and then try to can it, for example. Keep your meat hot or cool it down quickly, and process your jars as soon as possible after roasting, and you should be okay.
I don’t recommend stuffing your bird if you’re planning to can any of the leftovers… make your dressing in a separate dish, since you don’t want to add starch to anything before canning, and it’s almost impossible to get all the bready bits out of your turkey carcass before making stock with it if you stuffed the bird.
Ingredients in Hot-Pack Canned Turkey

Turkey:
You can process whole birds (my preferred method, since it’s usually cheaper per pound, and you get bones that you can use to make your own stock to pack the meat in), breasts, or dark meat. Poultry can be canned bone-in or boneless, though with turkey, you’re usually going to be boning it out before canning, since other than turkey wings, the pieces are going to be too large to fit in your jars whole with the bones.
The process is the same, but the processing time for bone-in is less than for de-boned meat. The bones conduct heat and are hollow and less dense than meat, so the heat penetrates the jars faster. If you have a mixed canner load (some boneless meat, plus a jar or two with bone-in wings), process the whole batch for the longer processing time.
Note: There are no tested or recommended processing times for ground poultry products, so keep your meat in chunks or shreds. Unfortunately if you want to make turkey sausage, you need to freeze it or use it fresh.
Turkey Broth:
You can pack your turkey meat in water, commercial stock, or prepared bouillon, but I like to break the process up over two days so I can make my own stock. If you have the refrigerator space to do this, it is the way to go.
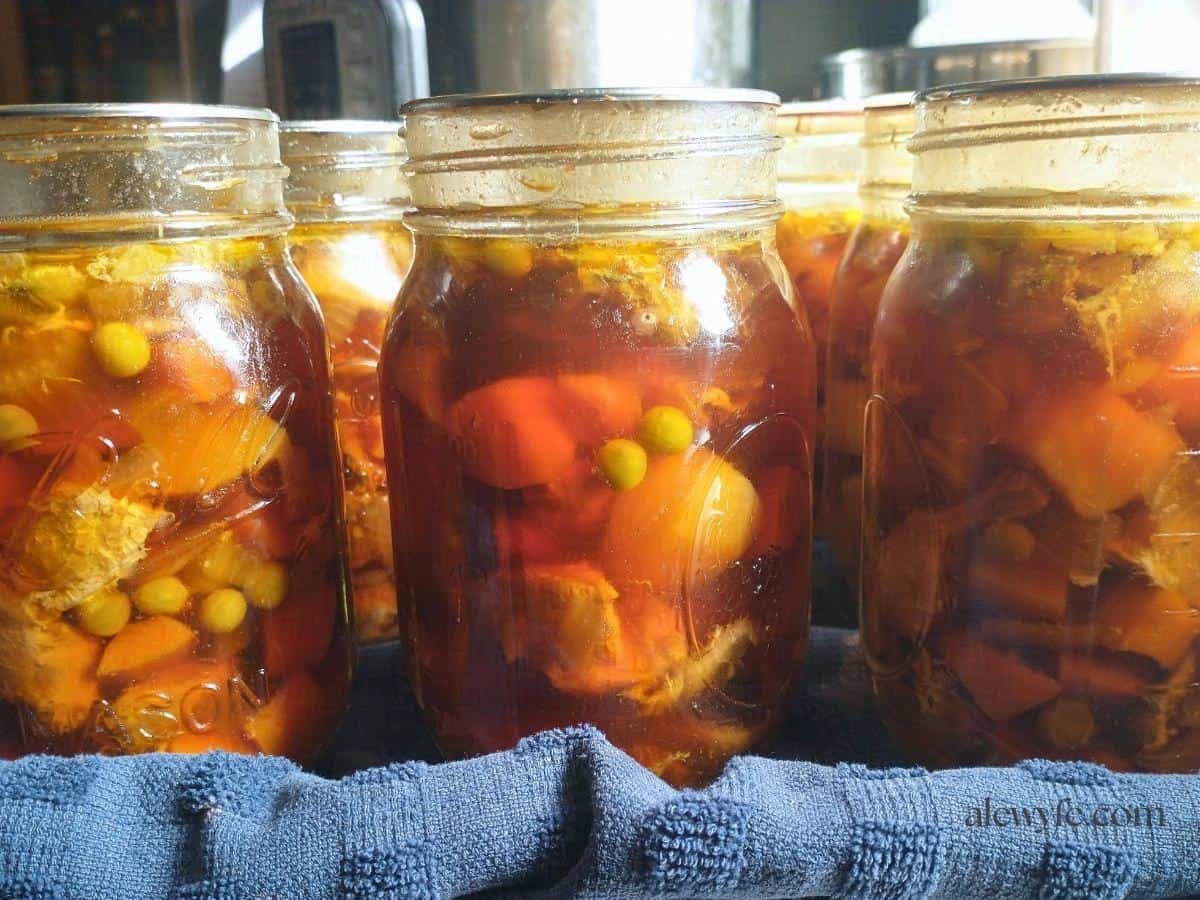
You could make a plain bone stock with just the bones (and a few tablespoons of vinegar to help extract the minerals), but I like to make a full-flavored stock. I add mirepoix (two parts onions to one part each carrots and celery), parsley stems, mushroom stems, or whatever I have in the stock bag of little scraps in the freezer.
Season with some whole peppercorns, bay leaves, and maybe some thyme and rosemary. Do NOT add sage to a stock that you are going to can, as it turns bitter and awful tasting after pressure-cooking. It’s best to keep your stock neutral so that it’s versatile and flavor it later.
Broth Seasoning Variations
However, if you already have a fully stocked pantry shelf with plenty of plain canned proteins, you can get a bit creative with your broths, as long as you stick to ingredients that are safe to can.
It’s best to experiment with small batches to make sure you and your family like the results. You could do an Asian-style broth with ginger, garlic, and soy (or add some shiitake or lemongrass, or a bit of five-spice powder), that’s great in ramen, pho, stir-fry, and dumplings.
Make a Southwestern broth infused with chili peppers and cumin for making spicy turkey soup, tamales, enchiladas, easy mole, chili, or tacos. You can even use curry spices… but you should definitely experiment with a few jars before canning a big batch since pressure-canning can change seasonings. Don’t use Japanese curry cubes though, as those have starches and other thickeners.
Salt:
Adding salt to your jars is optional, and not necessary to preserve them. It does add flavor, and can help keep the meat moist. I always add a little bit, but if you’re on a sodium-restricted diet or cooking for someone who is, you can leave it out.
Equipment Needed to Can Turkey
Pressure Canner:
You absolutely must use a pressure canner to safely can turkey. Do not try to water-bath can low-acid foods! You also can’t safely can this in an Instant Pot or small pressure cooker. They do not reliably build up enough pressure to safely can foods, especially low-acid foods like meat and veggies that require consistent pressure and long processing times.
Botulism isn’t worth the risk… always pressure can low-acid foods like meats and vegetables.
I love my All-American pressure canner, but any pressure canner that is large enough to hold at least four quart jars and that has a pressure weight and/or a tested pressure gauge will work.
Sheet pans or roasting tray:
You can make the stock with raw bones, but lightly roasting them first will add a lovely color and depth of flavor to your stock, and I highly recommend that you take the time to do this.
If you’re processing turkeys for some reason in August without air-conditioning… first of all, “what is you doin’?”… second, I guess do what you gotta do when you gotta do it (but now would be a good time to make a white stock and save yourself a bit of sweat, or at least use an electric roaster instead of turning on your oven)?
But otherwise, you should take the time to roast those bones! If you have room in your oven, roast your mirepoix (stock vegetables) too. Don’t forget to deglaze the roasting trays with some water to dissolve the fond (the browned protein layer on the pans that has all of those lovely Maillard reaction flavors in it).
Stock pot, large Instant Pot or Crock-pot, or Nesco Roaster:
Every cook has their own favorite way to make stock (bone broth). I usually either use a large stock pot on the stove top or our big Instant Pot, but if you have another safe method, feel free to use it.
I usually bring the stock up to a low lazy bubble and skim it before bed, and then leave it on our simmer burner overnight. Smaller batches of stock I do under pressure in the Instant Pot, which is faster.
Strainer or Large Colander:
Ladle or carefully pour your finished stock through a strainer or colander, then through a fine mesh sieve or cheesecloth to get a stock with better clarity and less sediment.
Canning accessories:
Jar tongs, a jar funnel, and chopsticks or a debubbling wand aren’t essential but they’ll make you life a lot easier! If you have a pressure canner, you probably already have these, but if you don’t, do yourself a favor and get some.
Mason Jars and Lids:
You’ll need an assortment of quart or pint jars (or a combination of the two). You can also can in some smaller jars for convenience, but don’t try to use half-gallon jars or anything larger than a quart.
You’ll need new metal canning lids (or reusable lids with rubber gaskets, like Tattler, Harvest Guard, or Weck jars & clips, if you’re comfortable with those).
How to Can Turkey (Hot-Pack Method)

Debone your turkeys
- A stiff boning knife is best for this, but you can use a sharp chef’s knife or a stout filet knife as you prefer.
- You can do this in several ways, but I like to start with removing the breast meat- make a long cut on either side of the breast bone, freeing the meat from the bone with small cuts against the ribcage, working down towards the back of the bird.
- Remove the wing tips and wings, then the legs, cutting carefully around the tendons to free the leg quarters.
Make turkey stock
- On a large sheet pan or roasting pans, roast the neck bones, wing tips, and carcasses for stock… about 25-35 minutes in a hot oven (375-425 F).
- Place bones in a large stockpot, crock pot, or Instant Pot, along with mirepoix vegetables: peeled and large chopped carrots, celery, and onion (2 parts onions to one part each carrots and celery). Add a tablespoon or two of black peppercorns, a few bay leaves, parsley or parsley stems, and other fresh or dry herbs if you like. Don’t use sage! It turns bitter when pressure canned.
- Top up with cool water to cover the bones and vegetables by about 3-4″.
- Simmer stock over medium-low to low heat at a very low, lazy bubble for at least 3 hours or overnight.
- Strain stock & keep hot.
- If you’d like, especially if you did a shorter cook time on your stock, you can make a remouillage (“remi”, meaning “rewetting”) or second light stock with your turkey bones. Add fresh mirepoix vegetables to the pot, and top up again with cool water. This second stock is lighter in color and flavor, but is good for cooking rice or other grain pilaf, as a soup base, and more. Add the wing and leg bones to your remi stock after prepping the meat for canning, and can the batch of remi stock after pressure canning the meat in broth.
Par-cook turkey
- Partially cook the turkey breasts, leg quarters, and wings… there are various ways to do this, but I like to roast them on sheet pans in a hot oven (between 375-400 F).
- You don’t need to roast them all the way through, just until they begin to color and firm up enough to slice easily. The juices should still be pink, not clear.
- The exact cook times will vary, depending on your individual oven, roasting pans, and how large the turkey pieces are.
Dice & debone meat
- Remove from the oven and let cool just enough to handle (if you have latex or nitrile gloves, these can help shield your hands while prepping the hot turkey).
- Slice white meat into large chunks or dice it into ready-to-use pieces. The pieces will shrink slightly during canning, so plan your cuts accordingly.
- Second, debone the dark meat. This can be tricky, especially with the large tendons in the legs. Use a small boning or large paring knife in a scraping motion to free the meat from the bones. Alternately, you can simmer the leg pieces until they are more tender and use them for soup.

Pack jars for processing
- Place the recommended amount of warm water in the bottom of your canner (check your pressure canner manual, but usually 3-4″ of water) and begin to preheat the canner.
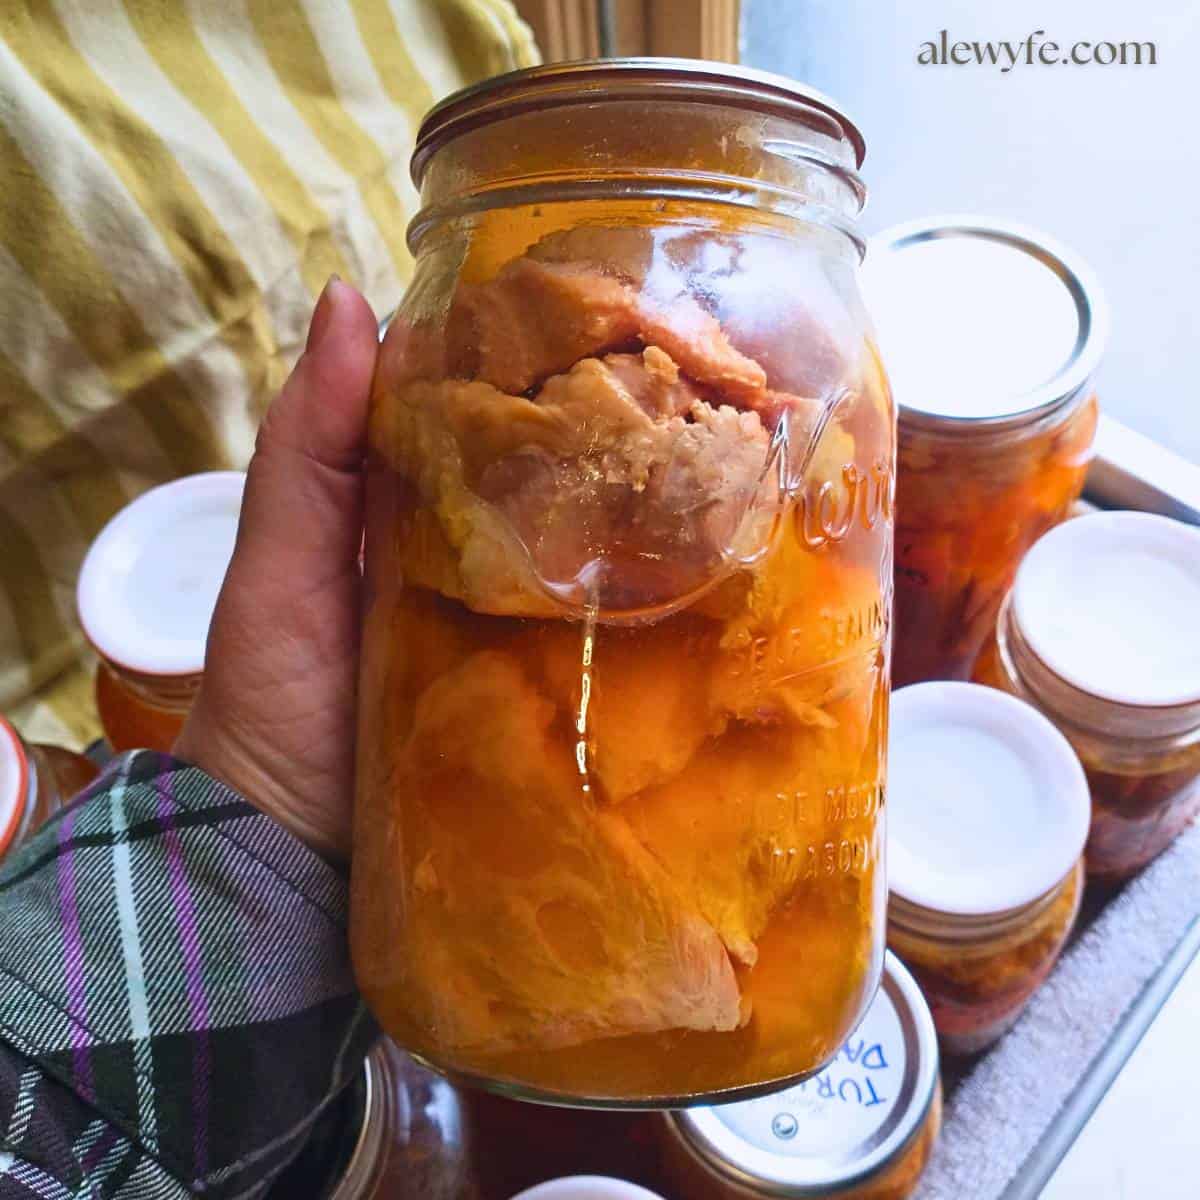
- Pack clean, hot quart and/or pint mason jars with the diced or shredded meat, leaving 1″ headspace at the top.
- Top up the jars with hot turkey stock. You can add a teaspoon of salt to each quart jar (half teaspoon per pint) if you like. This isn’t necessary for food safety but adds flavor.
- Debubble the jars with a chopstick, debubbling tool, or thin flexible spatula. Top up with more stock if needed. If you run out of prepared stock, you can use boiling water.
- Wipe the jar rims with a lint-free cloth or paper towel dampened with hot water or white vinegar. Top with new canning lids and jar rings.
- Keep leftover stock hot while you process the meat. If you have room in the canner you can process the stock with the meat, though it has a much shorter processing time. If you are doing a larger batch of turkey, you can can the stock after the batch of turkey meat. Or, refrigerate or freeze extra stock.
Pressure can the jars
- Carefully place the filled jars into the preheated canner.
- Check that the canner vent isn’t clogged and close & seal the lid. Bring the canner up to pressure over medium heat with the vent open, and once the canner is venting a steady stream of steam, set a timer for 10 minutes.
- When the canner has vented for 10 minutes, regulate the heat if necessary and drop the weight over the vent (or close the petcock if you have an older unweighted dial-gauge canner).
Can quarts of meat for 90 minutes (75 minutes for pints) at 11 PSI dial gauge/10 PSI weighted gauge up to 1000 ft (adjust to 15 at higher altitudes with a weighted canner).
Start your processing timer only once the appropriate PSI has been reached (11 PSI on a dial-gauge canner for up to 2000 ft, see notes for altitude adjustments), or when the weight is jiggling to indicate that the proper pressure has been reached.
Watch or listen carefully, adjust heat as needed, and reset the timer to zero and restart processing time if you lose pressure below the correct processing pressure at any point.
Remove & cool the jars (+ can additional batches or stock)
- After the processing time is complete, turn the heat off. Once the pressure canner has cooled and returned to neutral pressure (the dial will drop to zero, and no steam escapes from the weight or petcock if jiggled) you should open the canner and remove the jars (follow your canner instructions for opening).
- Remove the jars from the canner using jar tongs or the jar rack.
- Place the jars on a folded dish towel, cooling rack, or wooden surface. Protect hot jars from cold surfaces like granite, stainless, or concrete countertops until they have cooled.
- Process additional batches if needed, or start canning any leftover turkey broth. You can also chill the stock for up to three days before reheating and canning it if you are short on time.
Check seals & store
- Let the jars cool in a draft-free place where they can rest overnight or for up to 24 hours. Don’t touch the rings until the jars have cooled and the seals are set (disregard for reusable lids and follow manufacturer instructions to tighten rings).
- Remove the rings and check the seals on the jars after they have rested at least overnight.
- Promptly freeze or refrigerate any jars that did not seal and use within a few days. You can reprocess these jars with new lids within 24 hours, but I don’t recommend this. It will cause a loss in quality and you’d need to process at least 2 quarts or 4 pints at a time to be safe, so it’s not worth the hassle unless you had a bad batch of lids & many jars that didn’t seal.
- Gently wash all sealed jars with soapy water, label clearly, and store in a cool, dark place.
- Protect jars from freezing and safely discard the contents of any jars that lose their seals in storage and sterilize jars before reuse.
Serving Ideas for Canned Turkey

You’ll end up with jars of fully cooked, shelf-stable, ready-to-use turkey meat and broth. You can use these anywhere you would use cooked leftover turkey. It’s great for quick weeknight turkey tetrazzini and other easy pasta dishes, like this red lentil spaghetti with turkey & mushrooms, or to use in your favorite casseroles.
Turkey pot pies are easy when you have fully cooked diced turkey in the pantry. Make a roux and use it to thicken the broth, then fold in the meat along with diced fresh or frozen mixed vegetables and peas, and bake in a pie crust. Or pour this filling into a casserole dish, make a drop-biscuit dough and bake it on top like a cobbler for an even easier turkey pot pie casserole.
If you really want to impress your friends, use your canned turkey to make turkey mole tamales. Or for something simpler, shred the meat and toss it with a bit of homemade ancho salsa for quick turkey tacos, burritos or fajitas, or roll the diced meat up in tortillas with cheese and top with green or red enchilada sauce, then bake until bubbly. Delicious!
Use your home canned turkey to make quick homemade and hearty soups or white chili. You can even drain the jars (save the broth for cooking) and make turkey salad for sandwiches or to serve on a bed of salad greens… just fold the diced meat with some mayo or yogurt, chopped celery and onion, and dried cranberries, and season to taste. So fast and tasty!


How to Can a Whole Turkey
Ingredients
- whole bone-in turkey(s)
- 1 tsp salt per quart jar (optional- for flavor and texture)
Turkey Stock
- 1 large bones from whole turkey (neck, back, wing tips)
- 2-3 large onions, quartered or large dice outer layers peeled & root end removed
- 1 ½ cups celery, washed & chopped into 1-2" pieces
- 1 ½ cups carrots, washed & chopped into 1-2" pieces
- 1 bundle parsley stems, washed
- 1 tbsp whole black peppercorns
- 2-3 each bay leaves
- 3-4 sprigs/tsp fresh or dried thyme
Instructions
Debone the Turkeys
- A stiff boning knife is best for this, but you can use a sharp chef’s knife or a stout filet knife as you prefer.
- You can do this in several ways, but I like to start with removing the breast meat- make a long cut on either side of the breast bone, freeing the meat from the bone with small cuts against the ribcage, working down towards the back of the bird.
- Remove the wing tips and wings, then the legs, cutting carefully around the tendons to free the leg quarters.
Make Turkey Stock
- On a large sheet pan or roasting pans, roast the neck bones, wing tips, and carcasses for stock… about 25-35 minutes in a hot oven (375-425 F).
- Place bones in a large stockpot, crock pot, or Instant Pot, along with mirepoix vegetables: peeled and large chopped carrots, celery, and onion (2 parts onions to one part each carrots and celery). Add a tablespoon or two of black peppercorns, a few bay leaves, parsley or parsley stems, and other fresh or dry herbs if you like. Don’t use sage! It turns bitter when pressure canned.
- Top up with cool water to cover the bones and vegetables by about 3-4″.
- Simmer stock over medium-low to low heat at a very low, lazy bubble for at least 3 hours or overnight.
- Strain stock & keep hot. See notes if you'd like to make a second remi stock.
Par-Cook Turkey
- Partially cook the turkey breasts, leg quarters, and wings… there are various ways to do this, but I like to roast them on sheet pans in a hot oven (between 375-400 F).
- You don’t need to roast them all the way through, just until they begin to color and firm up enough to slice easily. The juices should still be pink, not clear.
- The exact cook times will vary based on how big your pieces are and how hot your oven is, but probably about 25-35 minutes.
Dice & Debone Meat
- Remove from the oven and let cool just enough to handle (if you have latex or nitrile gloves, these can help shield your hands while prepping the hot turkey).
- Slice white meat into large chunks or dice it into ready-to-use pieces. The pieces will shrink slightly during canning, so plan your cuts accordingly.
- Second, debone the dark meat. This can be tricky, especially with the large tendons in the legs. Use a small boning or large paring knife in a scraping motion to free the meat from the bones. Alternately, you can simmer the leg pieces until they are more tender and use them for soup.
Pack Jars for Processing
- Place the recommended amount of warm water in the bottom of your canner (check your pressure canner manual, but usually 3-4″ of water) and begin to preheat the canner.
- Pack clean, hot quart and/or pint mason jars with the diced or shredded meat, leaving 1″ headspace at the top.
- Top up the jars with hot turkey stock. You can add a teaspoon of salt to each quart jar (half teaspoon per pint) if you like. This isn’t necessary for food safety but adds flavor.
- Debubble the jars with a chopstick, debubbling tool, or thin flexible spatula. Top up with more stock if needed. If you run out of prepared stock, you can use boiling water.
- Wipe the jar rims with a lint-free cloth or paper towel dampened with hot water or white vinegar. Top with new canning lids and jar rings.
- Keep leftover stock hot while you process the meat. If you have room in the canner you can process the stock with the meat, though it has a much shorter processing time. If you are doing a larger batch of turkey, you can can the stock after the batch of turkey meat. Or, refrigerate or freeze extra stock.
Pressure Can the Jars of Turkey
- Carefully place the filled jars into the preheated canner.
- Check that the canner vent isn't clogged and close & seal the lid. Bring the canner up to pressure over medium heat with the vent open, and once the canner is venting a steady stream of steam, set a timer for 10 minutes.
- When the canner has vented for 10 minutes, regulate the heat if necessary and drop the weight over the vent (or close the petcock if you have an older unweighted dial-gauge canner).
- Can quarts of meat for 90 minutes (75 minutes for pints) at 11 PSI dial gauge/10 PSI weighted gauge up to 1000 ft (adjust to 15 at higher altitudes with a weighted canner). Start your processing timer only once the appropriate PSI has been reached (11 PSI on a dial-gauge canner for up to 2000 ft, see notes for altitude adjustments), or when the weight is jiggling to indicate that the proper pressure has been reached. Watch or listen carefully, adjust heat as needed, and reset the timer to zero and restart processing time if you lose pressure below the correct processing pressure at any point.
- After the processing time is complete, turn the heat off. Once the pressure canner has cooled and returned to neutral pressure (the dial will drop to zero, and no steam escapes from the weight or petcock if jiggled) you should open the canner and remove the jars (follow your canner instructions for opening).
Cool Jars, Check Seals, & Store
- Let the jars cool in a draft-free place where they can rest overnight or for up to 24 hours. Don't touch the rings until the jars have cooled and the seals are set (disregard for reusable lids and follow manufacturer instructions to tighten rings).
- Remove the rings and check the seals on the jars after they have rested at least overnight. Promptly freeze or refrigerate any jars that did not seal and use within a few days- reprocessing these jars will cause a loss in quality and might not be safe. Gently wash all sealed jars with soapy water, label clearly, and store in a cool, dark place. Protect jars from freezing and safely discard the contents of any jars that lose their seals in storage and sterilize jars before reuse.
Notes
Remouillage (Remi) Stock:
If you’d like, especially if you did a shorter cook time on your turkey stock, you can make a remouillage (“remi”, meaning “rewetting”) or second light stock with your turkey bones while you are canning the rest of your turkey and broth. After straining the first stock, add a few cups of fresh mirepoix vegetables to the stock pot, and top up again with cool water. This second stock is lighter in color and flavor, but is a good broth for cooking rice or other grain pilafs, as a soup base, and more. Add the wing and leg bones to your remi stock after prepping the meat for canning, and can the batch of remi stock after pressure canning the meat in broth.More Pressure-Canning Recipes:
- Hearty Chicken & Mushroom Stew or Pot Pie Filling
- How to Can Meat, Chicken or Turkey Stock
- Five-Alarm Venison or Beef Chili (canning recipe)
- How To Can Swedish Meatballs
- Cajun Red Beans and Sausage
- Garlic and Herb Potatoes (Easy Raw-Pack Recipe)
- Enchilada Roja Sauce (Pressure-Canner or Freezer Recipe)
Can I pressure can a turkey that has been completely roasted
I just want to de bone save carcass use store bought broth and pressure can and make stock from carcass later
Yes, that should be fine! The final texture is a bit better if you don’t completely cook the meat before canning, but what you want to do should work as long as you are careful with temperatures (keep hot food hot or chill promptly and then reheat before canning).