CHICKENS: Build an Outdoor Brooder & Grow-out Pen for Pullets
- A Grow-Out Pen is also an Isolation Coop
- Why Not Just Use a Dog Crate?
- Basic Construction Details for Chicken Brooder Pen
- Tools and Supplies Used to Build a Chicken Brooder Pen

If you’ve ever had a batch of once-tiny baby chicks that were rapidly outgrowing their small indoor chicken brooder, you know the urgency that this can have. Baby chicks go from tiny helpless adorable fluff-balls to flapping, fussing dust monsters (and even if you keep their coop really clean, there’s definitely an “aroma” that you probably want out of your living room. Did I mention the dust?).
Because every backyard and chicken coops set-up is different, this isn’t going to be a complete step-by-step in-depth how-to post with cut-lists and diagrams. However, it’s a pretty good explanation about how and why I built our get’er done grow-out pen for our new batch of pullets this spring, and should have some good ideas and inspiration for your next chicken coop project or build, as well as lists of tools that you’ll find helpful to build an outdoor chicken brooder and grow-out pen of your own.
A Grow-Out Pen is also an Isolation Coop
Whether you’re a first-time “chicken tender” and you don’t have your permanent coop set up yet, or you need a way to separate your growing pullets from the rest of your birds while you integrate them into your flock, it’s helpful to have a separate secure pen in your chicken run. Sometimes you need to separate a broody hen in a safe place to raise her chicks (or just keep her away from the nest boxes until she gets that mama urge out of her system). Other times you need a place to isolate a sick or injured bird from the rest of your flock.
Why Not Just Use a Dog Crate?
 In the past we’ve used a large wire or airline dog crate in our main coop area, and that can be a great option if you need something temporary, but we needed something bigger this time. And we needed it soon. We also cleaned up that dog crate and were using it for a travel crate for our actual dog. We don’t usually bring a crate with us for him when we travel, but on our annual car camping trip at our friend’s farm, where there are other dogs and people and general chaos-energy, our dog benefits from having his own secure den to nap in away from the activity. Usually when we camp we set up a tie-out line for him, and bring him into the tent with us at night. This is a sandy beach trip with other off-leash dogs and kids running around, and it’s hot, so that’s not a great option. Anyway, we needed the crate so we needed to build something, fast.
Basic Construction Details for Chicken Brooder Pen
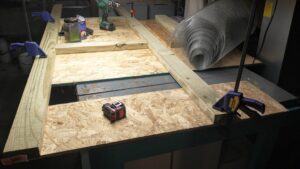
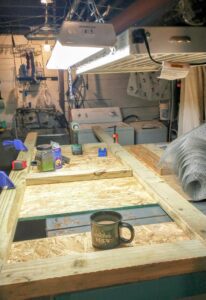
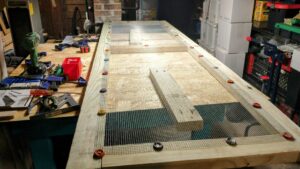
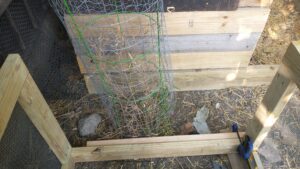
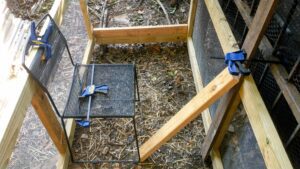
This is what I came up with! To build this chicken brooder pen, I basically built a rectangular box frame, assembled flat in our basement workshop and finished in place in the chicken run. Since I needed to be able to move it through narrow spaces, and might move or repurpose this into a secure raised bed cover for a garden bed later, I built everything with screws only, not glue, and made sure the screws I might need to access to break it down to move it were not covered by the hardware cloth. I built the frame with treated 2×4″ lumber assembled with pocket screws. I used a Kreg mini pocket-hole jig to make the pocket holes, and assembled the two long sides completely on the workbench in the shop. They’re covered with 1/4″ hardware cloth to make them predator and rat-proof on the sides. The base of the coop is open, but sits on the ground of the run on top of some sturdy 2×4″ wire fence to protect from larger digging predators. Since this is going inside our chicken run that is already pretty enclosed and fenced and we live in an urban area, this worked for us. If I were planning this to be a permanant coop structure or lived where there was more concern, I would have attached 1/2″ hardware cloth to the bottom.
Tools and Supplies Used to Build a Chicken Brooder Pen
- Kreg Jig (You could use a full-size or mini Kreg Jig if you have one, or another pocket-hole joinery jig, but this is the one I have)
- Cordless Drill/Driver Set (I love my Hitachi/Metabo drill/driver combos… I have an older Hitachi and a Metabo brushless set and they’re both great)
- Clamps (never have enough clamps, right? I used an assortment of trigger bar-clamps and C-clamps, mostly. I’d love a set of pipe-clamps but they weren’t really necessary. If you have corner clamps and face-frame kreg clamps they’ll make your life a lot easier but you can hack it without if you have to, I did)
- A speed square (especially useful for clamping into corners when you’re screwing the pocket screws in, if you don’t have dedicated corner clamps)
- Tin snips or side-cutters (to cut the hardware cloth)
- 2×4 Lumber (I used mostly treated 2″x4″ lumber because it’s what I had. You could make this with 2″x3″ or 2″x2″ for a lighter, more portable pen. Use treated wood for the parts that are in contact with the ground, or untreated if you’re concerned about the chemicals and will be painting or sealing it. Treated wood now is a lot less toxic than the stuff that was available in the past, but if this ever might be repurposed into a rabbit pen, use untreated). If you’ve got the budget for cedar, that would be ideal.
- Pocket Screws (blue-kote or other outdoor-safe fasteners. If you’re using treated wood make sure the fasteners are appropriate)
- Short deck screws (1″-1 1/2″ for securing the hardware cloth and washers). Don’t just staple the hardware cloth- some predators can pull staples out of wood. You can use hammered-in heavy duty fence staples, but I wanted the wire to be removable if I end up repurposing this for another use, so I used screw and…)
- Washers (I had a few fender washers in the bin, and used those, but mostly used “poor man’s washers”. Have you been saving bottle caps for some reason? Get a piece of scrap wood and a small punch or big nail and a hammer. Lay the bottle cap crimp-side-up on the scrap wood, and punch a hole big enough for the tip of your deck screws to go in. Turn your cap over, and you’ve got a poor-man’s (or woman’s) washer. I use them smooth side out so the sharp edges are against the wood, and also so the cap designs are visible (clear-coat them or they’ll rust). Alewyfe-approved!)
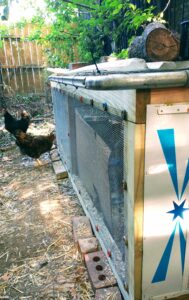
- Hardware (I bought hinges and was planning to make a nice lid for this, but ran out of time, using an old section of chain link gate instead, attached to the iron fence behind with zip ties and weighted down with logs and bricks. Get ‘er done, it works. You’ll also want some assorted hooks to hang your feeder and waterers from, and a secure latch if you’ll be putting this somewhere that it needs to be predator-proofed.
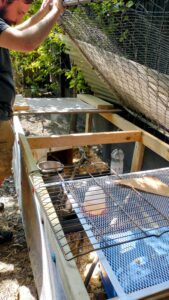
- Roofing sheets (I had a couple extra polycarbonate corrugated panels left over from the main coop roof. They’d been attached to the side of the run, but were too long and looked goofy, so I took them off, installed hard sides and hardware cloth on the main run instead and used these to cover the run. Both the pen I built and the sheets are about 8′ long, and the two sheets overlap to cover the whole thing and keep the birds inside dry and protected.
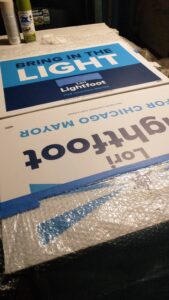
- Screen-door Grates and Chloroplast Campaign signs: (In part because I ran out of time to make the original lid that I planned, and ran out of hardware cloth before doing the last short side. I spray-painted some old campaign signs – they’re a great material to snag after elections – don’t take them before, unless like us you have a neighbor who keep putting signs for a candidate you don’t support on your fence… finally, those Lori signs from two elections ago are useful, lol! You can use them as is, but they look nicer spray-painted or covered with contact paper. The metal grates we already had for another project I haven’t finished… sigh, but borrowed them for now for this one).