CANNING: Chipotle Steak & Bean Chili (Beef or Venison)
- Chipotle Steak and Bean Chili Ingredients
- Kitchen Equipment Needed
- How to Can Chipotle Steak & Bean Chili
- Pantry Storage & Safety Tips
- Chipotle Steak & Bean Chili (Pressure-Canning Recipe)
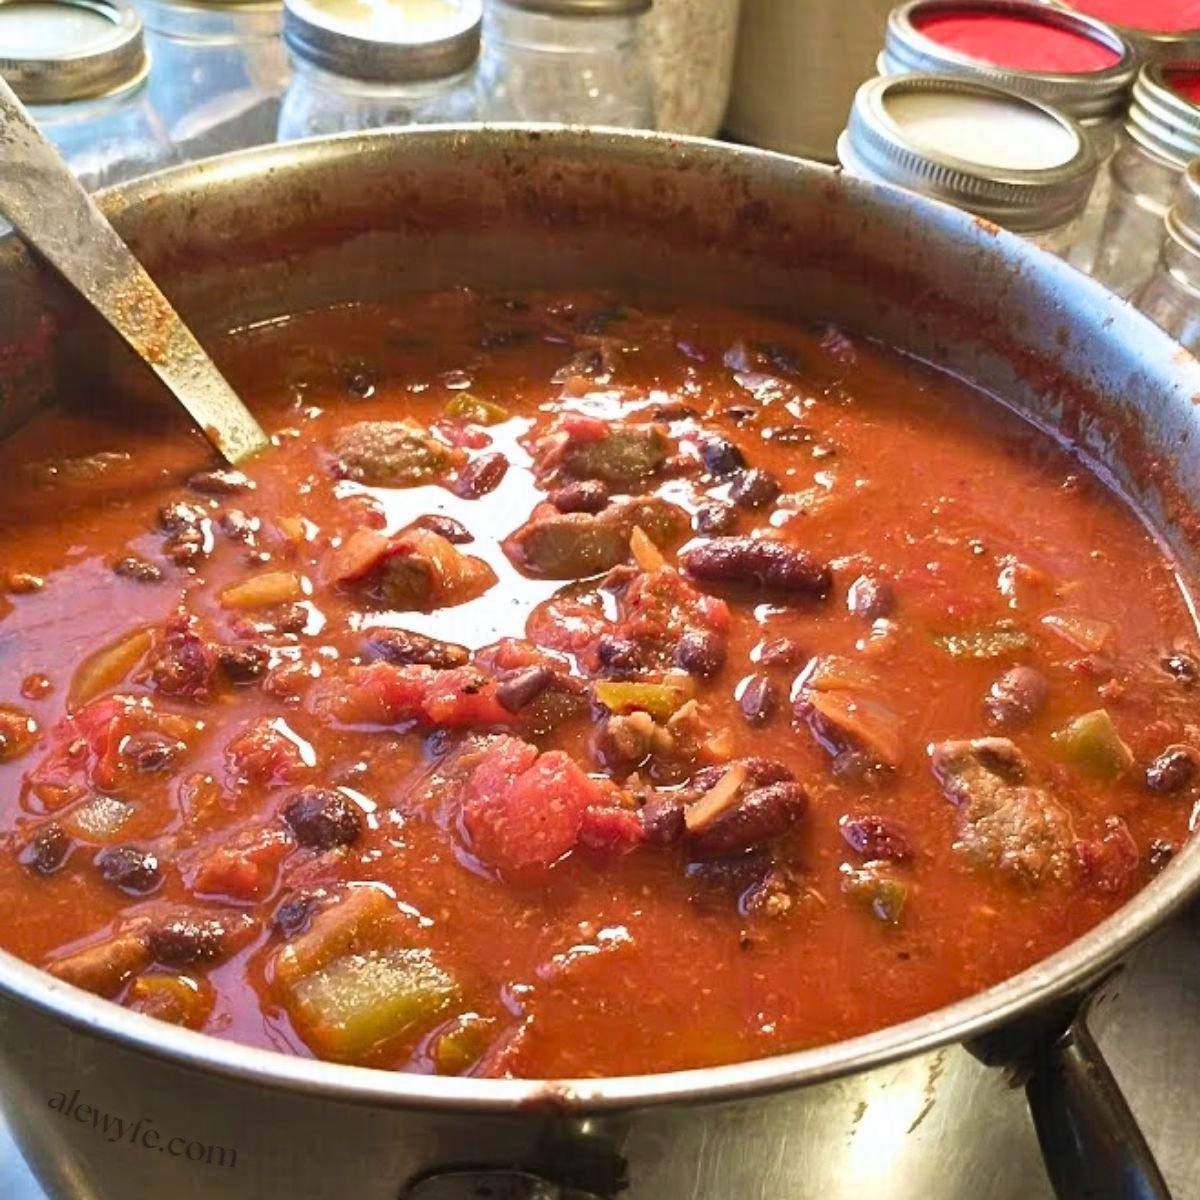
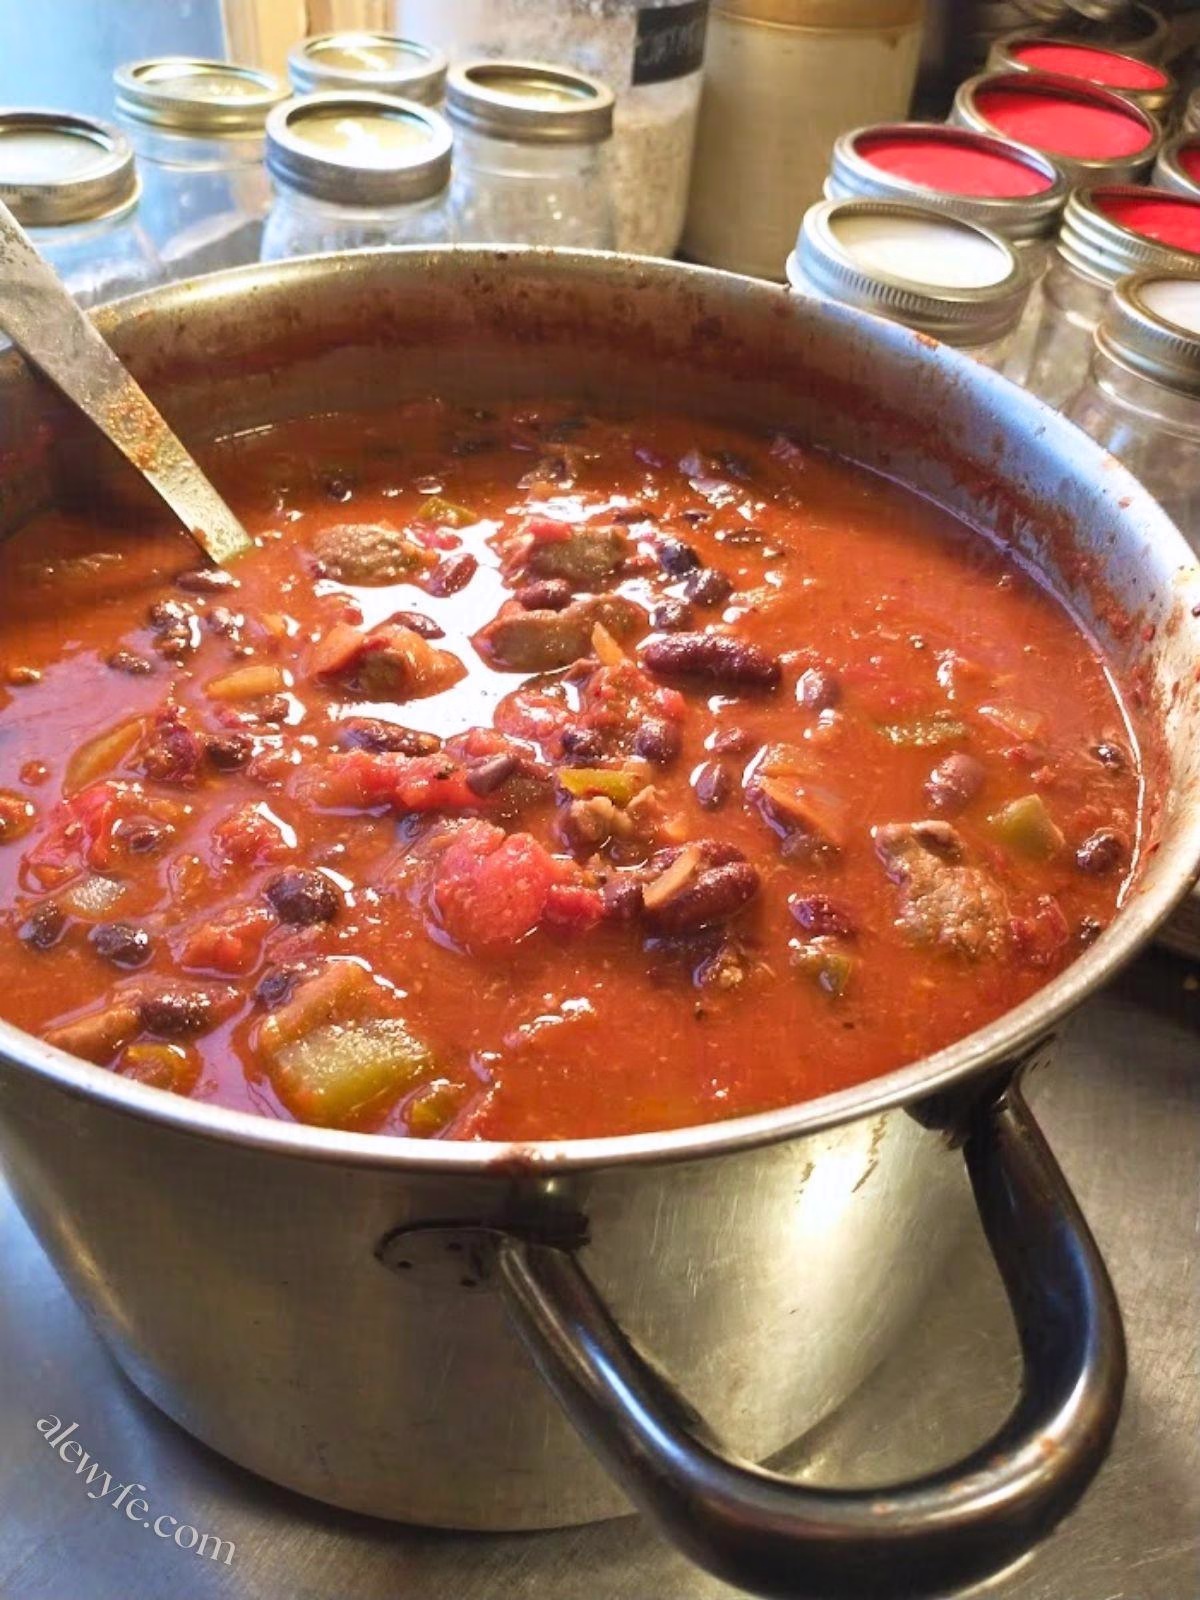
This chipotle steak and bean chili recipe is adapted from a tested Ball canning recipe, but you can also use it to cook up a big batch for your next party or to fill your freezer with ready-to-eat meals. Unlike our Five-Alarm Chili recipe, this one uses meaty chunks of beef or venison instead of ground meat, and is packed with the smoky flavor of chipotle peppers in adobo sauce, and studded with sweet bell peppers and onion.
Enjoy this hearty steak chili heated up on its own, or use it to make quick and easy beefy chili mac, casseroles, or tamale pie. Serve it with piping hot cornbread, biscuits, baked potatoes, or pasta, either plain, or garnished with chopped fresh onions, grated cheese, cilantro, yogurt, or sour cream.
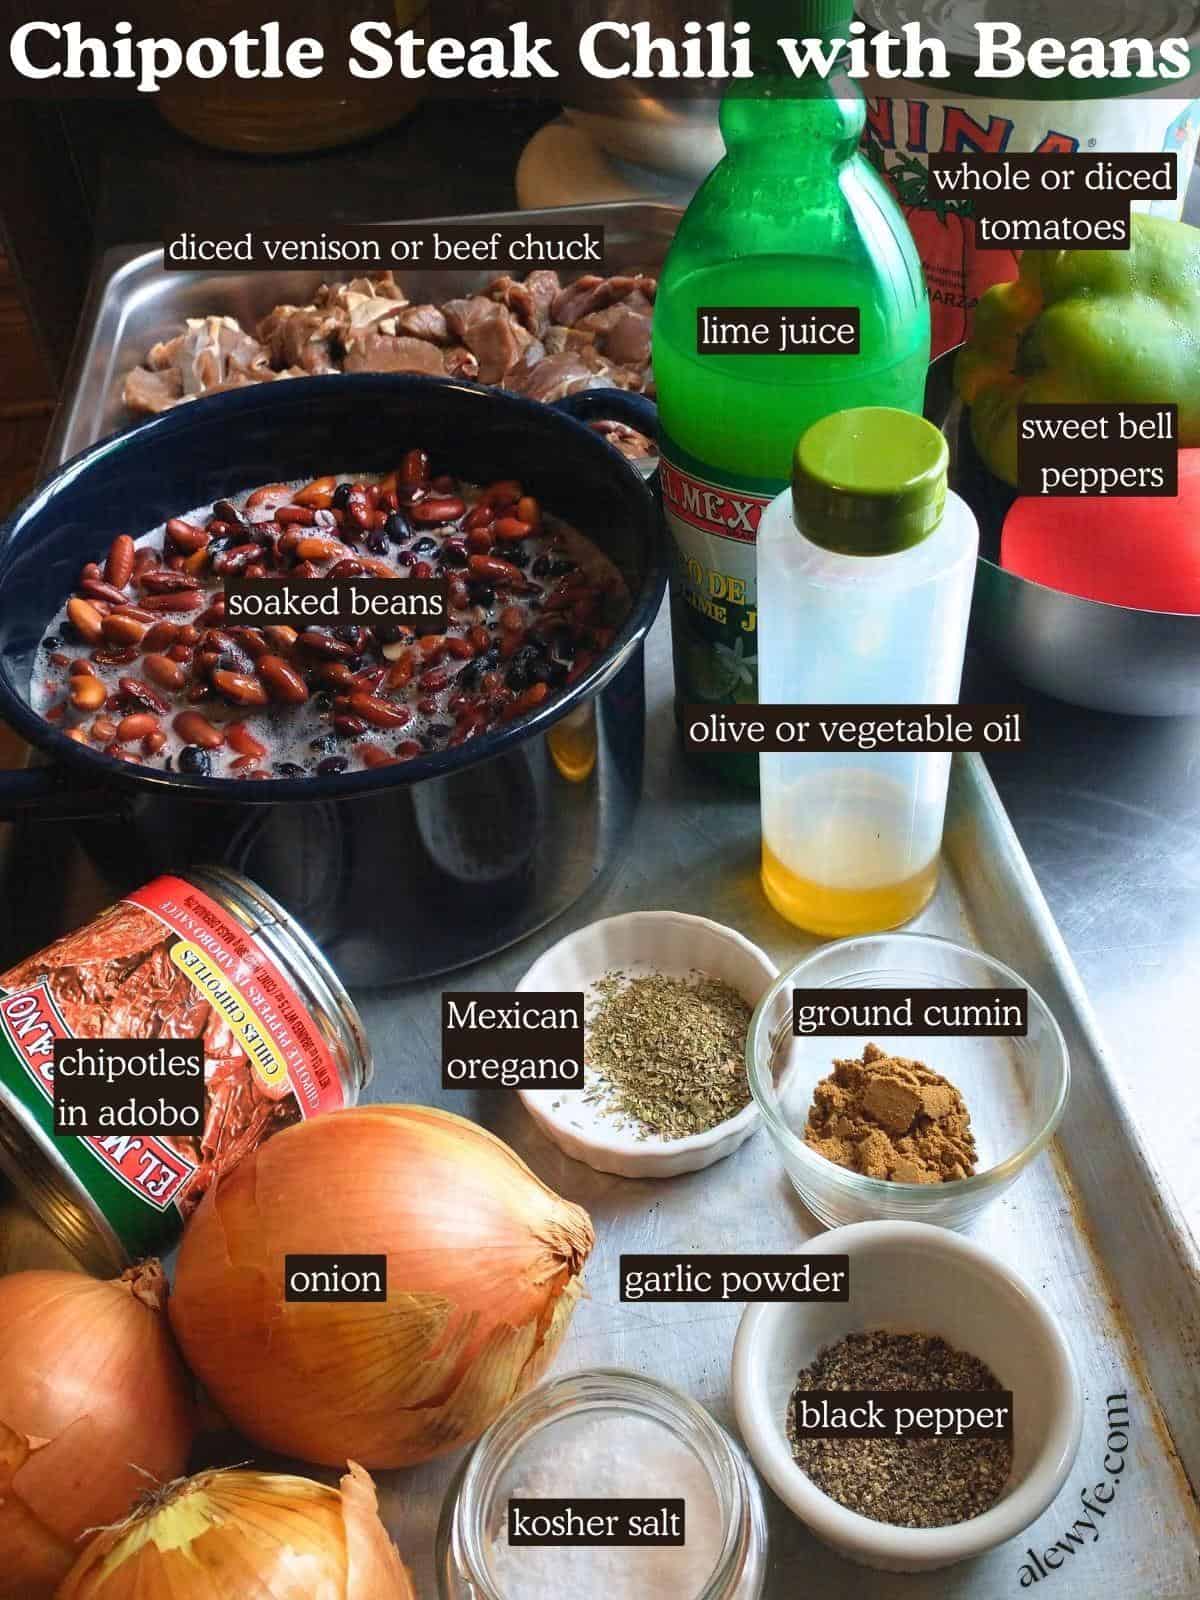
Chipotle Steak and Bean Chili Ingredients
Venison or Beef Roast or Stew Meat:
You can buy pre-cut stew meat, but it’s usually more economical to buy a chuck roast and cube it yourself if you are using beef in your steak chili.
If you are using venison, either ask your game processor to save whole roasts or stew meat for you, or cut the cubes yourself from the round, rump or shoulder roasts if you do your own processing.
Either way, as you cut the meat into cubes, trim off any tough bits of tendon or large pieces of silverskin (the silvery coating of connective tissue over the large muscles). Toss those in your freezer bag of bits for making stock. These meat trimmings are rich in collagen, which is great for making a thick, flavorful and nutritious stock.
Black or Pinto Beans:
This recipe uses either dried pinto or black beans. I prefer black beans for this chili, but you can also use a blend of the two of them or even substitute kidney beans if you prefer. You do need to use dried beans, and to pre-soak them.
Do not use un-soaked beans or canned beans in this recipe. Canned beans will overcook and go mushy or fall apart during processing, and un-soaked beans won’t re-hydrate properly, will throw off the density and processing time, and are unsafe to can. You can read more about this in our post about canning dried beans.
Tomato:
You’ll need six cups (1.5L) of canned, diced tomatoes. You can also use whole canned tomatoes, roughly chopped, or fresh tomatoes that have been blanched & peeled, diced, and brought to a simmer. Do not substitute tomato paste for the whole or diced tomatoes.
Onion:
I use standard yellow Spanish onions in this chili, but you could substitute an equivalent volume of red or white onions if you like, or a mixture of these. You’ll need two cups of onions (500 mL), peeled and chopped into medium dice.
Peppers:
This steak chili is flavored with canned chipotle peppers in adobo, which give it a rich, smoky flavor. You’ll also need a cup of chopped sweet bell peppers, either red, yellow, green, or a blend. You could substitute an equivalent volume of mild green chiles or banana peppers for the bell peppers if you prefer.
Olive oil:
Use a heat tolerant olive oil, or a neutral vegetable oil blend, here, since you’re going to use this to saute the beef or venison chunks. Don’t use extra virgin olive oil with a low smoke point. If you substitute peanut oil, make sure to note this on the jars if you might be sharing them with folks with nut allergies!
Seasonings:
The Ball recipe is only seasoned with salt, black pepper, fresh or bottled lime juice, and the chipotle peppers with adobo sauce. This is okay, but lacks complexity. I find it a bit one-note, and like to add a bit more authentic flavor.
To that end, I like to add some ground cumin, a bit of dried Mexican oregano (or regular oregano) and garlic powder. These are safe canning additions for this recipe and add an earthy and piquant note to the steak and bean chili. You can safely leave them out if you prefer, but I recommend adding them!
If you want to add other seasonings to your chili, it’s best to wait and add them after canning when you reheat the chili, especially if you aren’t sure about safe canning substitutions and recipe modifications.
Kitchen Equipment Needed
Pressure Canner:
You absolutely must use a pressure canner to safely can this chili recipe.
You can’t safely can this in an Instant Pot or a water-bath. They do not reliably build up enough heat or pressure to safely can foods, especially low-acid foods like beans, meat, mushrooms, and veggies that require consistent pressure and long processing times.
Botulism isn’t worth the risk… always pressure can low-acid foods like meats and vegetables in a suitable pressure canner.
I love my big All-American pressure canner, but any pressure canner that is large enough to hold at least four quart jars and that has a pressure weight and/or a tested pressure gauge will work (although you may need to adjust the batch size for your canner, or can the sauce in several batches).
For more information about canning basics and equipment, check out our introductory article with recommendations:
large stock pot or enameled dutch oven:
You need a non-reactive 6-8 quart enameled dutch oven or stainless pot for the chili. You can also use an 8 quart Instant Pot.
You’ll need another pot for soaking and cooking the beans, or you can use the same pot if you only have one, transferring the beans to another container after simmering while you make the chili.
canning jars & new lids:
Can this steak and bean chili recipe in pints, or smaller jars. There is no tested processing time for quarts of this recipe. You will need clean jars (check for any cracks, chips in the rim, or other damage and discard damaged jars or use for dry storage).
Use new canning jar lids (or reusable lids and rings like Tattler or Harvest Guard, or Weck jars, if you are comfortable with them). You can reuse canning jar rings as long as they aren’t too rusty and aren’t dented or warped.
jar funnel, tongs, and other canning accessories:
These tools are optional but make the job of filling your jars, and getting them into and out of the hot water bath a lot easier and safer!
You can read more about these and our recommendations in our guide to canning equipment if you don’t already have these or are new to canning.
How to Can Chipotle Steak & Bean Chili
soak beans
- Rinse the dried beans well, pick over them to remove any rocks or debris, and place them in a large pot.
- Cover the beans with cool water. Make sure they are covered by at least 2″ of water above the beans.
- Let them soak for 12 hours (overnight) in a cool place.
- Alternately, you can follow the quick-soak method in our “How to Can Beans” instructions. Do not skip the soaking step!
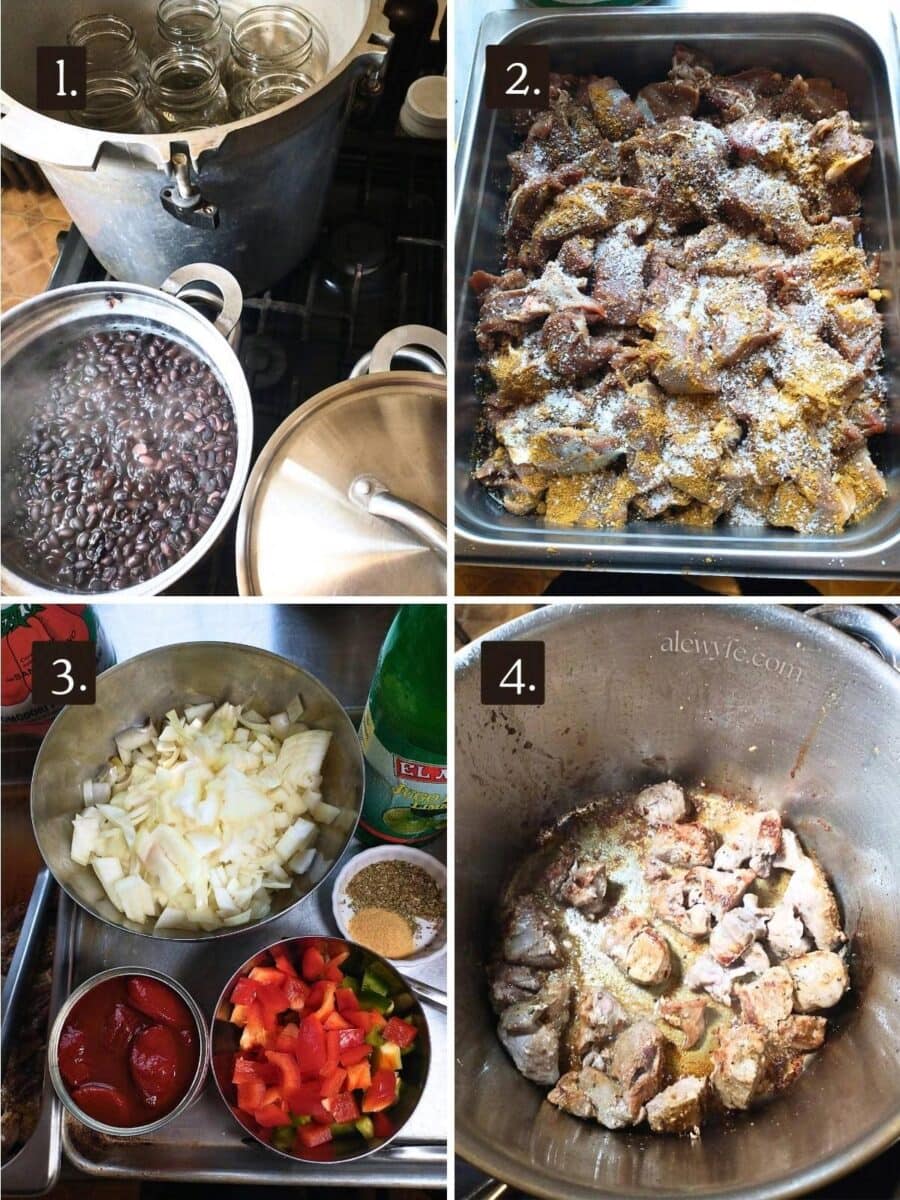
drain & simmer beans
- Drain the beans in a colander and rinse well, discarding the soaking water.
- Place the soaked beans back in a pot, along with 6 cups of water (or enough to generously cover).
- Place the pot over medium-high heat and bring up to a boil, stirring occasionally.
- Reduce the heat to medium-low, cover, and simmer the beans for about 40 minutes or until they are just tender.
- Drain the beans.
prep jars and canner
- Wash your canning jars and new canning lids in hot soapy water and rinse well.
- If you are using reusable lids (like Tattler or Harvest Guard, or Weck jars), follow manufacturer directions to prepare lids and rings.
- Fill your pressure canner with the recommended amount of water (check your canner manual, but at least several inches for this long processing time) and preheat it.
- Preheat the jars in the canner on low-medium heat while the beans simmer, or keep them hot in your oven, dishwasher, or using your preferred method.
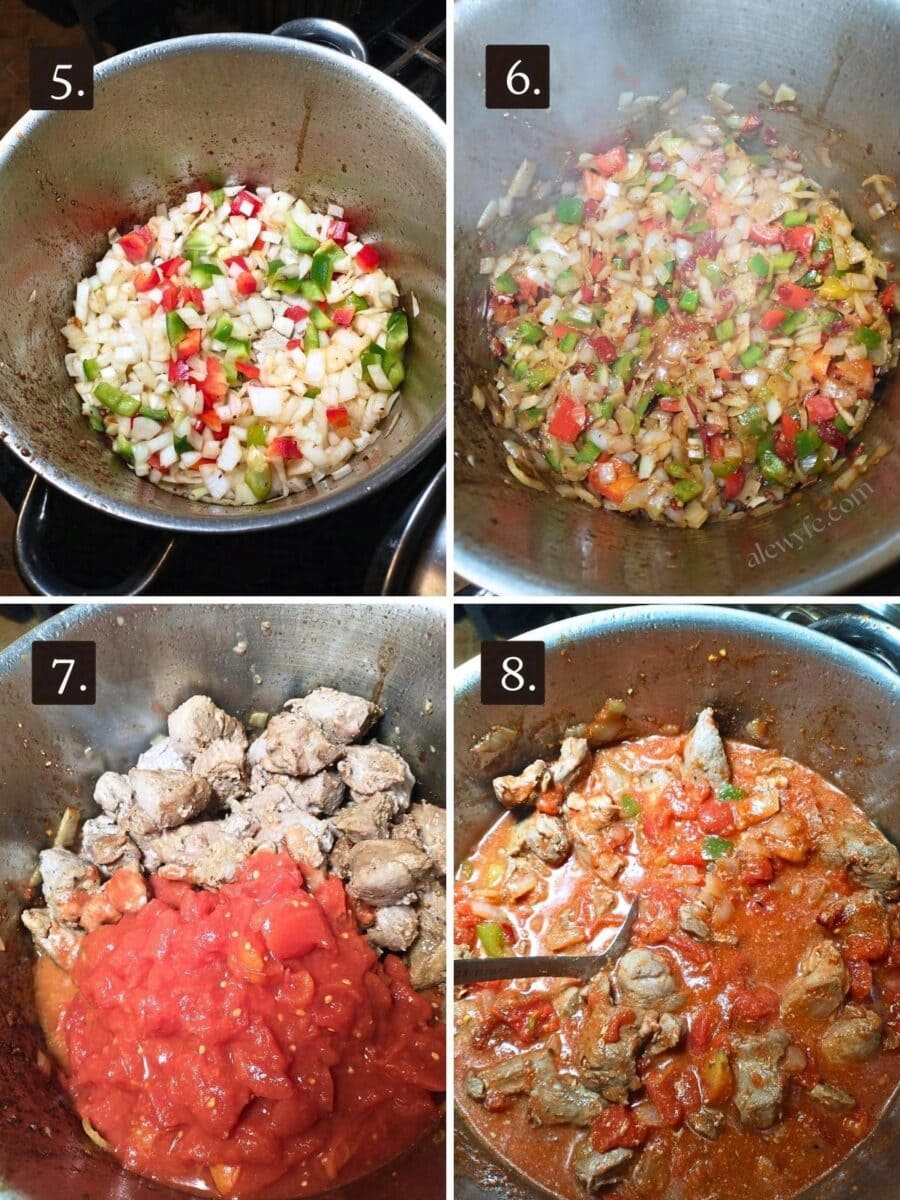
prep ingredients & brown meat
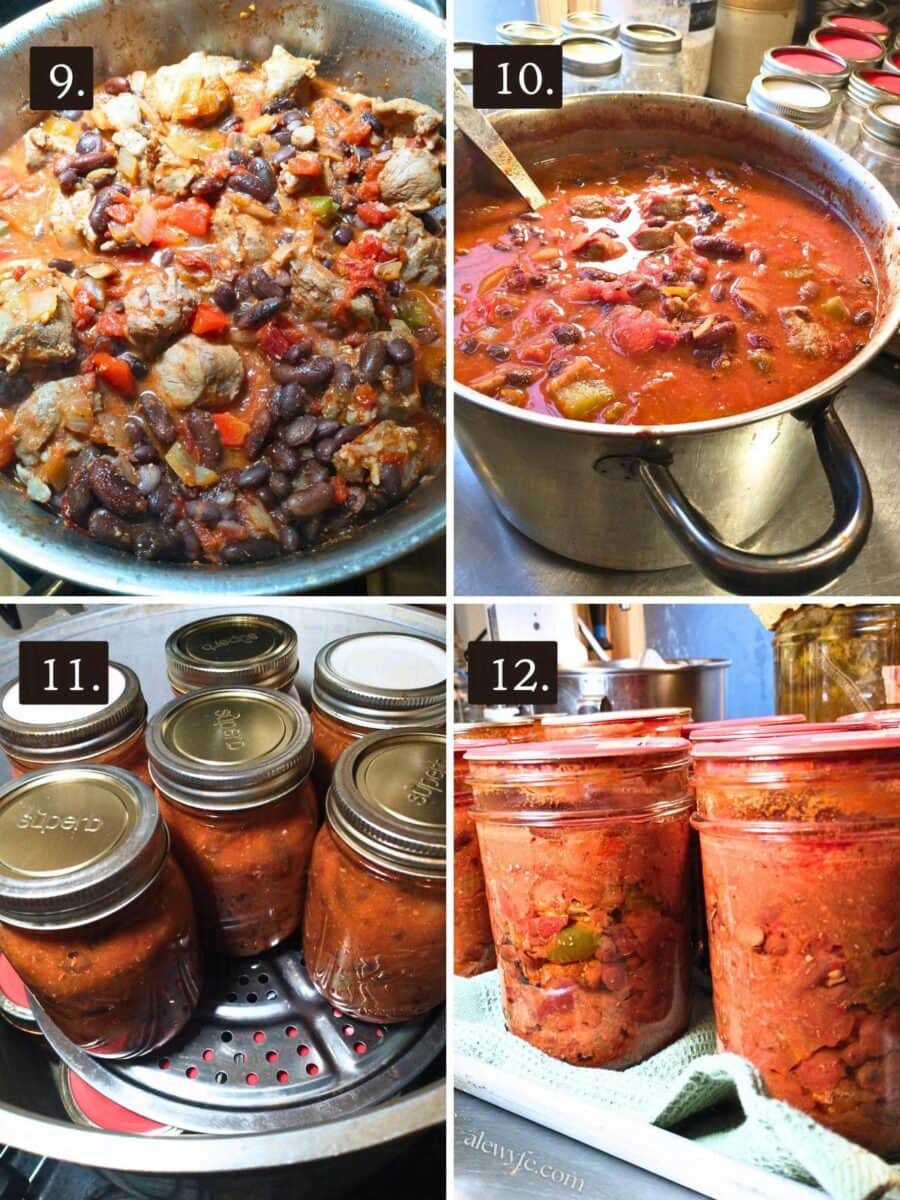
- Wash, peel, and chop the onion and bell peppers.
- Trim and dice the beef or venison roast into 1/2″ cubes. Remove excess fat and sinew (save non-fatty trimmings for making stock and fatty trimmings to grind for burgers if you like).
- Season the meat with the salt, pepper, and ground cumin.
- Get out your other ingredients- the garlic powder, oregano, canned tomato and chipotle, and lime juice. Chop the chipotle peppers if they’re whole.
- Heat a large enameled dutch oven or soup pot, add the olive oil, and brown the cubed meat in batches.
saute veggies & simmer chili
- Saute the onion and bell pepper in the pan. You can saute it with the last batch of meat, or by itself, depending on how much room you have in the pan.
- Stir, scraping the bottom of the pan, and let the onions sweat for about 5 minutes.
- Add the remaining browned meat and any juices back to the pot, along with the canned tomatoes, chipotle peppers in adobo, oregano, garlic powder, and drained cooked beans.
- Bring the steak chili up to a boil, stirring often, then reduce the heat to medium.
- Simmer the chili for at least 10 minutes, or until it is just beginning to thicken. The meat and beans will continue to cook while the chili is in the canner; you just want to bring the sauce together.
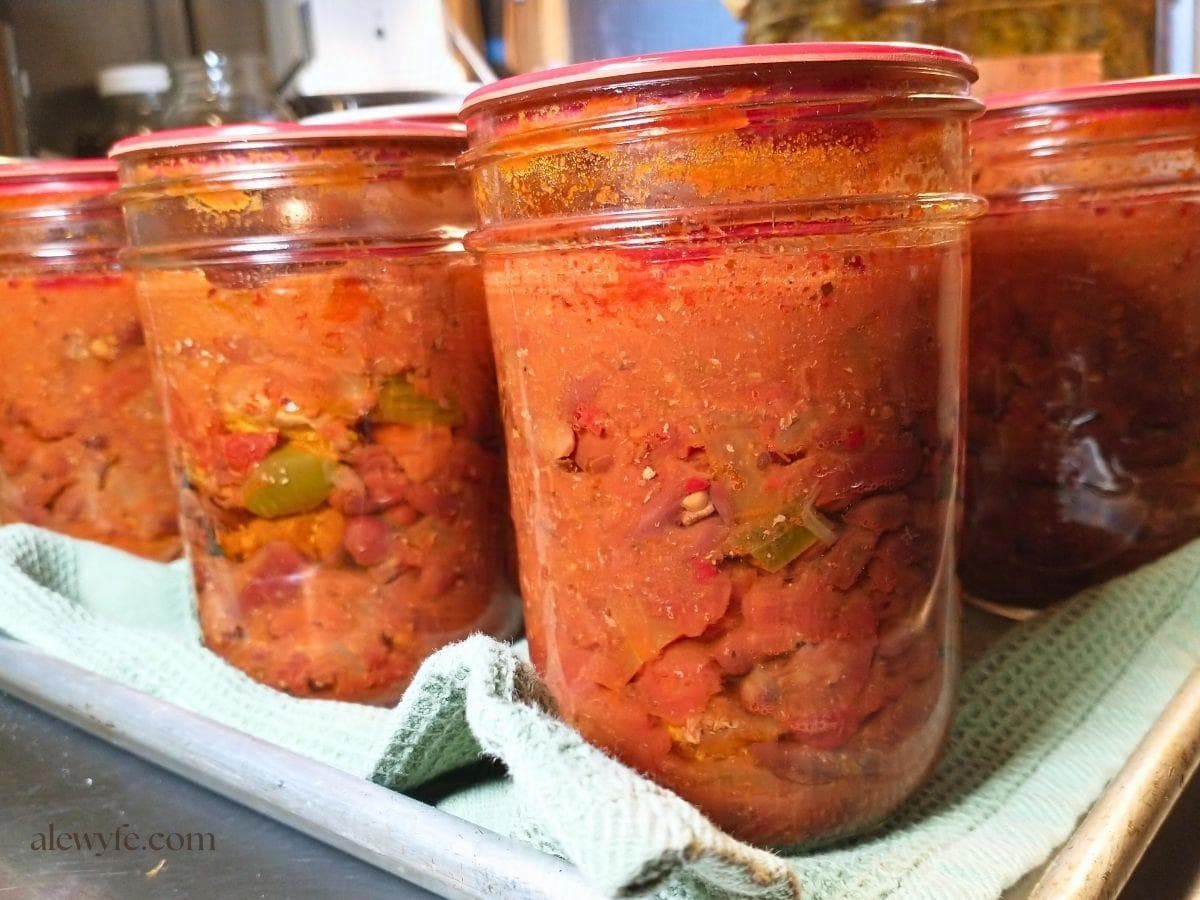
fill jars (or continue to simmer chili for freezer prep)
- If you are not canning the chili, continue to simmer until the meat and beans are tender, at least 45 minutes to an hour, adjusting seasoning to taste, before serving or freezing.
- Using canning jar tongs or a jar rack, carefully remove the pre-heated jars from your pressure canner.
- Place the jars on a kitchen towel or wire rack. Do not put hot jars directly on a cold countertop, or they may crack or shatter.
- Using a canning funnel and ladle, fill the pint jars with the hot chipotle steak chili.
- Divide the chili mixture evenly among the jars. Leave a 1″ headspace at the tops of the jars. De-bubble the jars, using a de-bubbling tool or chopstick, and top up if needed.
- Wipe the jar rims with a clean cloth or paper towel (dip the cloth in hot water or vinegar to cut any fat or residue for better seals).
- Top the jars with canning lids and rings, and tighten the rings down fingertip tight (quite snug but not overly tight).
pressure-can chili
- Carefully place the filled jars of sauce into the preheated canner.
- Check that the canner vent isn’t clogged and close & seal the lid. Bring the canner up to pressure over medium heat with the vent open, and once the canner is venting a steady stream of steam, set a timer for 10 minutes.
- When the canner has vented for 10 minutes, regulate the heat if necessary and drop the weight over the vent (or close the petcock if you have an older unweighted dial-gauge canner).
- Can pint or smaller jars of chipotle steak chili for 1 hr & 15 minutes (75 minutes) at 11 PSI dial gauge/10 PSI weighted gauge up to 1000 ft (adjust to 15 at higher altitudes with a weighted canner).
- Start your processing timer only once the appropriate PSI has been reached, or when the weight is jiggling to indicate that the proper pressure has been reached. Watch or listen carefully, adjust heat as needed, and reset the timer to zero and restart processing time if you lose pressure below the correct processing pressure at any point.
remove jars and cool
- After the processing time is complete, turn the heat off. Let the pressure canner cool and slowly return to neutral pressure (the dial will drop to zero, and no steam escapes from the weight or petcock if jiggled).
- Wait another 5 minutes after the dial on your canner reads zero before opening. Follow your canner instructions for opening, being careful of any remaining steam (open away from your face).
- Gently remove the jars from the canner using jar tongs or the jar rack.
- Place the jars of chili on a folded dish towel, cooling rack, or wooden surface. Protect hot jars from cold surfaces like granite, stainless, or concrete countertops until they have cooled.
- Let the hot jars cool in a draft-free place where they can rest overnight or for up to 24 hours.
Pantry Storage & Safety Tips
Remove the jar rings, check for seals, and wash the cooled jars of chipotle steak & bean chili. Use warm, soapy water to remove any residue from the outside of the jars.
Refrigerate any jars of chili that did not seal and use those jars promptly. You could reprocess them with new lids within 24 hours of the first processing.
However, since the canning time is so long, the reprocessed jars will lose quality, and the flavor and texture will suffer. I prefer to refrigerate any unsealed jars of steak chili and use them within a few days rather than reprocess.
You can also transfer the chili to freezer-safe containers and freeze. I recommend freezing for no more than 3-6 months for the best flavor and quality, though you can safely keep it longer if it is well-sealed (you risk freezer-burn or picking up off-flavors if you store it too long).
Label the jars and store in a cool, dark place. For best quality, enjoy most home-canned goods within 12-18 months, although they will be safe to eat while the seals are intact. Nutritional value and flavor declines slightly with longer storage (or improper storage conditions).
Discard the contents of any jars that lose seals in storage, smell off, are bubbling, or hiss when opened, and sterilize the jar before using it again.

Chipotle Steak & Bean Chili (Pressure-Canning Recipe)
Equipment
- canning jars, rings, and new lids
Ingredients
Beans
- 3 cups dried black or pinto beans, or a mix of the two soaked overnight in enough water to cover +2" (do not skip the soaking step!)
- 6 cups water
Meat
- 4 lbs cubed beef or venison roast or stew meat (you can substitute diced pork shoulder, lamb, goat, bear, or hooved game)
- ¼ cup olive or vegetable oil
Seasonings for Steak
- 1 tbsp salt
- 2 tsp cumin, ground
- 2 tsp black pepper, ground
Other Ingredients
- 2 cups onions, small diced or sliced about 2-3 medium or 1 large
- 1 cup red or green bell peppers seeded and diced
- 6 cups canned diced tomatoes (1.5 L)
- ⅓ cup chipotle in adobo, chopped, with sauce (75 mL)
- ¼ cup lime juice (60 mL) fresh or bottled is fine here
- 1 tsp Mexican oregano, dried (sub regular oregano)
- 1 tsp garlic powder
Instructions
one: soak beans
- Rinse the dried beans well, pick over them to remove any rocks or debris, and place them in a large pot.
- Cover the beans with cool water. Make sure they are covered by at least 2″ of water above the beans.
- Let them soak for 12 hours (overnight) in a cool place.
- Alternately, you can follow the quick-soak method in our “How to Can Beans” instructions. Do not skip the soaking step!
two: drain & simmer beans
- Drain the beans in a colander and rinse well, discarding the soaking water.
- Place the soaked beans back in a pot, along with 6 cups of water (or enough to generously cover).
- Place the pot over medium-high heat and bring up to a boil, stirring occasionally.
- Reduce the heat to medium-low, cover, and simmer the beans for about 40 minutes or until they are just tender.
- Drain the beans.
three: prep jars and canner
- Wash your canning jars and new canning lids in hot soapy water and rinse well.
- If you are using reusable lids (like Tattler or Harvest Guard, or Weck jars), follow manufacturer directions to prepare lids and rings.
- Fill your pressure canner with the recommended amount of water (check your canner manual, but at least several inches for this long processing time) and preheat it.
- Preheat the jars in the canner on low-medium heat while the beans simmer, or keep them hot in your oven, dishwasher, or using your preferred method.
four: prep ingredients & brown meat
- Wash, peel, and chop the onion and bell peppers.
- Trim and dice the beef or venison roast into 1/2″ cubes. Remove excess fat and sinew (save non-fatty trimmings for making stock and fatty trimmings to grind for burgers if you like).
- Season the meat with the salt, pepper, and ground cumin.
- Get out your other ingredients- the garlic powder, oregano, canned tomato and chipotle, and lime juice. Chop the chipotle peppers if they’re whole.
- Heat a large enameled dutch oven or soup pot, add the olive oil, and brown the cubed meat in batches.
five: saute veggies & simmer chili
- Saute the onion and bell pepper in the pan. You can saute it with the last batch of meat, or by itself, depending on how much room you have in the pan.
- Stir, scraping the bottom of the pan, and let the onions sweat for about 5 minutes.
- Add the remaining browned meat and any juices back to the pot, along with the canned tomatoes, chipotle peppers in adobo, oregano, garlic powder, and drained cooked beans.
- Bring the steak chili up to a boil, stirring often, then reduce the heat to medium.
- Simmer the chili for at least 10 minutes, or until it is just beginning to thicken. The meat and beans will continue to cook while the chili is in the canner; you just want to bring the sauce together.
six: fill jars (or continue to simmer chili for freezer prep)
- If you are not canning the chili, continue to simmer until the meat and beans are tender, at least 45 minutes to an hour, adjusting seasoning to taste, before serving or freezing.
- Using canning jar tongs or a jar rack, carefully remove the pre-heated jars from your pressure canner.
- Place the jars on a kitchen towel or wire rack. Do not put hot jars directly on a cold countertop, or they may crack or shatter.
- Using a canning funnel and ladle, fill the pint jars with the hot chipotle steak chili.
- Divide the chili mixture evenly among the jars. Leave a 1″ headspace at the tops of the jars. De-bubble the jars, using a de-bubbling tool or chopstick, and top up if needed.
- Wipe the jar rims with a clean cloth or paper towel (dip the cloth in hot water or vinegar to cut any fat or residue for better seals).
- Top the jars with canning lids and rings, and tighten the rings down fingertip tight (quite snug but not overly tight).
seven: pressure-can
- Carefully place the filled jars of sauce into the preheated canner.
- Check that the canner vent isn’t clogged and close & seal the lid. Bring the canner up to pressure over medium heat with the vent open, and once the canner is venting a steady stream of steam, set a timer for 10 minutes.
- When the canner has vented for 10 minutes, regulate the heat if necessary and drop the weight over the vent (or close the petcock if you have an older unweighted dial-gauge canner).
- Can pint or smaller jars of chipotle steak chili for 1 hr & 15 minutes (75 minutes) at 11 PSI dial gauge/10 PSI weighted gauge up to 1000 ft (adjust to 15 at higher altitudes with a weighted canner).
- Start your processing timer only once the appropriate PSI has been reached, or when the weight is jiggling to indicate that the proper pressure has been reached.
- Watch or listen carefully, adjust heat as needed, and reset the timer to zero and restart processing time if you lose pressure below the correct processing pressure at any point.
eight: remove jars and cool
- After the processing time is complete, turn the heat off. Let the pressure canner cool and slowly return to neutral pressure (the dial will drop to zero, and no steam escapes from the weight or petcock if jiggled).
- Wait another 5 minutes after the dial on your canner reads zero before opening. Follow your canner instructions for opening, being careful of any remaining steam (open away from your face).
- Gently remove the jars from the canner using jar tongs or the jar rack.
- Place the jars of chili on a folded dish towel, cooling rack, or wooden surface. Protect hot jars from cold surfaces like granite, stainless, or concrete countertops until they have cooled.
- Let the hot jars cool in a draft-free place where they can rest overnight or for up to 24 hours.
Notes
- 0- 1,000 ft 10 psi 11 psi
- 1,001- 2,000 15 psi 11 psi
- 2,001- 4,000 15 psi 12 psi
- 4,001- 6,000 15 psi 13 psi
- 6,001-8,000 15 psi 14 psi
- 8,001-10,000 15 psi 15 psi
Nutrition
Liked this? Try these recipes!

- Five-Alarm Venison (or Beef) Chili (Pressure Canning)
- Chipotle Barbacoa Beef or Venison (Pressure Canning)
- Cajun Red Beans and Sausage (Pressure Canning)
- Spicy Habanero Carrot Butter (Water-bath Canning)
- Chipotle Bacon Deviled Eggs
- Venison and Queso Chile Rellenos with Smoky Salsa Roja
- Green Chile & Cheese Cornbread